

17 Fall Window Painting Ideas for a Festive Autumn Look
Windows might be the most underrated spot for fall decorating. You can turn plain glass into pumpkins, swirling leaves, woodland scenes, or a cozy autumn border without sacrificing a table, shelf, or precious floor space.
And no, you don’t need professional mural skills. Some of the prettiest fall window painting ideas rely on simple shapes, loose brushstrokes, and a limited palette. Slight imperfections actually make hand-painted windows look more charming.
The key? Use paint or markers specifically designed for temporary glass decoration if you want to remove the artwork later, and always follow the product instructions.
So grab your autumn colors and choose a window. These 17 ideas range from ridiculously easy leaf borders to bigger seasonal scenes that can transform an entire room.
1. Paint a Border of Colorful Fall Leaves
If you’re new to fall window painting, start with leaves.
Paint a loose trail of maple, oak, and simple oval leaves around the outer edges of the glass. Keep the middle mostly clear so natural light can still enter the room.
Use rust, muted orange, mustard, burgundy, and olive green rather than making every leaf bright orange. The variation gives the design a more natural autumn look.
You also don’t need to paint each leaf with botanical accuracy. Start with basic silhouettes and add a few darker veins after the first layer dries according to your paint instructions.
I prefer leaving little gaps between the leaves instead of creating a solid border. The empty glass keeps everything airy.
Want an even easier approach? Paint only two corners rather than all four.

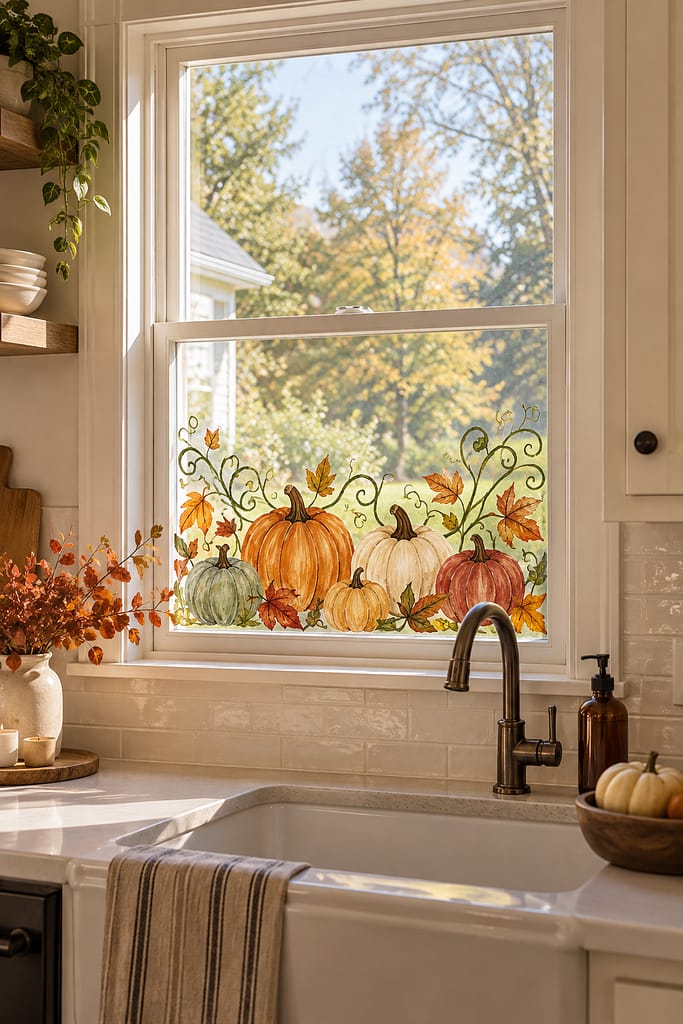
2. Create a Simple Pumpkin Patch Along the Bottom
A row of pumpkins along the lower edge gives you an instantly recognizable autumn design without covering the whole window.
Paint several pumpkins in different sizes and shapes. Mix classic orange with cream, muted sage, dusty peach, and deeper terracotta.
Then add curling green-brown vines between them.
Keep the pumpkins within roughly the bottom quarter of the glass so you can still see outside. This works especially well on kitchen and dining room windows.
The trick involves varying the pumpkin heights. A perfectly straight row can look stiff, while overlapping shapes create the feeling of a tiny painted pumpkin patch.
Add simple highlights and curved shadow lines for dimension.
Just don’t keep adding pumpkins until daylight becomes a distant memory. The actual purpose of the window still matters.
3. Paint Falling Leaves Across the Glass
Want something even simpler?
Scatter individual painted leaves diagonally across the window as though the wind just carried them past the glass.
Start with a denser group near one upper corner. Gradually reduce the number of leaves as the design travels toward the opposite lower corner.
That change in spacing creates movement.
Use different leaf shapes, sizes, and angles. A few tiny leaves between larger ones can make the composition feel much more natural.
For color, combine burnt orange, burgundy, golden yellow, olive, and warm brown.
I love this design because it works equally well on small windows and large glass doors. You can simply adjust the number of leaves to fit the surface.

4. Make a Cute Pumpkin Face Window
Fall doesn’t have to look sophisticated all the time.
For a playful window, paint one large pumpkin with a friendly face. Keep the expression sweet rather than spooky if you want the artwork to last from early fall through Thanksgiving.
Add rosy cheeks, curved eyes, or a tiny leaf near the stem.
This idea works particularly well for a child’s playroom, family room, or kitchen window.
You could surround the pumpkin with a few falling leaves, but don’t overcrowd it. One large character creates a stronger focal point than a dozen tiny illustrations.
If kids help with the project, let them design the face first on paper. Then transfer the basic shapes onto the glass.
Will the eyes end up perfectly symmetrical? Probably not. Will anyone care? Also probably not.

5. Paint a Cozy Autumn Tree
A simple autumn tree can turn a window into seasonal artwork.
Paint a slender brown trunk rising from one lower corner, then let several branches spread upward across part of the glass.
Add loose clusters of rust, gold, burgundy, and orange leaves.
Don’t paint every individual leaf. Small dabs and irregular shapes can create the impression of foliage much faster.
Leave some branches exposed too. That keeps the tree from becoming one giant blob of color.
For an extra touch, paint a few leaves drifting away from the branches.
This design works especially well on taller windows because the vertical format gives the tree room to grow visually.

6. Create a Minimalist White Leaf Design
Your autumn window painting doesn’t need traditional fall colors.
For a softer look, use white removable window paint or an appropriate chalk-style glass marker to draw delicate leaves and branches.
Keep the lines thin and simple.
Paint one branch across a lower corner or create a sparse border along one side of the window. Against outdoor greenery and autumn scenery, the white artwork can look surprisingly elegant.
This approach works beautifully in neutral, Scandinavian-inspired, modern farmhouse, and minimalist interiors.
It also keeps the room visually calm if you already use pumpkins, throws, and seasonal foliage elsewhere.
IMO, this is one of the easiest ways to make fall window art feel grown-up without trying too hard.

7. Paint Acorns and Oak Leaves
Pumpkins tend to steal the entire autumn decorating industry, but acorns deserve a little attention too.
Paint small groups of oak leaves and acorns around the window corners.
Start with warm brown acorns, then add olive, golden, rust, and deep reddish-brown leaves.
You can connect some of the shapes with thin painted branches to make them look like natural clusters.
This motif suits traditional and rustic interiors particularly well because it feels earthy rather than overly themed.
Try painting one larger cluster in the lower corner and a smaller one diagonally opposite it. That creates balance without framing the entire window.
Add subtle white or cream highlights if you want extra dimension.

8. Create a Harvest Basket Window Scene
Ready for something more detailed?
Paint a small harvest scene across the bottom section of a larger window.
Start with a simple woven basket shape. Fill it visually with pumpkins, apples, leaves, and wheat stems.
Keep the composition fairly low so the scene acts almost like a decorative window sill.
You don’t need to paint realistic basket weaving strand by strand. A few crossed lines and warm brown shading will suggest the texture.
Use terracotta, cream, burgundy, muted red, wheat gold, and olive green throughout the design.
This fall window art idea works especially well in a kitchen or breakfast nook, where the harvest theme feels right at home.

9. Paint Tiny Woodland Mushrooms and Leaves
If you like cottage-style fall decor, try a woodland theme.
Paint small mushroom clusters along the bottom corners of the window, then surround them with fallen leaves, acorns, and delicate branches.
Choose muted mushroom colors such as rusty red, warm beige, brown, cream, and dusty orange.
Keep the mushrooms small rather than turning your window into a giant fantasy forest.
You can also add a few tiny white dots or subtle grass strokes around the bases.
This design feels especially cozy in a reading nook, kitchen, craft room, or child’s bedroom.
Just remember that you’re painting autumn woodland decor, not auditioning to illustrate an enchanted mushroom kingdom. Restraint helps.

10. Create a Plaid-Inspired Painted Border
Plaid screams fall, but painting an entire window with it could quickly become a lot.
Instead, create a narrow plaid-inspired border around the outer edges.
Use thin intersecting lines in muted rust, cream, brown, and burgundy. Keep the lines slightly translucent if your chosen removable glass paint allows that effect.
You don’t need mathematical perfection. A hand-painted interpretation often looks warmer.
Make the border only a few inches visually wide so the center remains transparent.
This idea works particularly well in kitchens with simple cabinets or living rooms with traditional fall textiles.
Repeat one of the painted colors in a nearby pillow, throw, or vase to connect the window with the room.

11. Paint a Simple Pumpkin Vine
A curling pumpkin vine works beautifully on long or wide windows.
Paint a thin olive-brown vine traveling along the lower edge of the glass. Add several leaves, curling tendrils, and two or three small pumpkins along its length.
Keep the vine loose rather than perfectly straight.
Use muted orange and cream for the pumpkins, then add subtle highlights once the base layer dries.
This design gives you a festive autumn window without blocking much of the outdoor view.
It also works nicely across a set of adjoining panes. Let the vine visually continue from one pane to the next for a connected design.
If your window has divided panes, work with those lines rather than fighting them.

12. Make a Fall Sunflower Window Painting
Sunflowers bridge the gap beautifully between late summer and fall.
Paint two or three large sunflower heads near one lower corner of the window. Use muted golden petals rather than neon yellow, then add deep brown centers and olive leaves.
Allow the stems to curve naturally upward.
You can tuck a few rust-colored leaves between them to push the palette further into autumn.
I like this design for early fall when you’re not quite ready to go full pumpkin mode.
The flowers provide plenty of color, so keep the rest of the window simple.

13. Paint a Cute Fox in Autumn Leaves
For a playful woodland design, add a little fox.
Paint a simple rust-orange fox sitting near the bottom of the window, surrounded by a few falling leaves.
Keep the illustration stylized rather than hyper-realistic. A curved tail, pointed ears, cream chest, and simple facial features can communicate “fox” without requiring an art degree.
This idea works beautifully in children’s rooms, playrooms, and family spaces.
Add leaves in mustard, burgundy, brown, and olive around the fox, but leave plenty of empty glass above it.
You could even let kids help paint some of the leaves.
Their brushstrokes may not match your Pinterest vision perfectly, but that’s sort of the point, isn’t it?

14. Create a Corn and Wheat Harvest Border
For a more traditional harvest look, skip pumpkins and use grain-inspired artwork.
Paint slim wheat stems along the sides of your window using warm gold, camel, and brown.
Add a few stylized corn cobs near the bottom corners with muted yellow kernels and olive-brown husks.
Keep everything narrow and vertical.
This design naturally frames the glass without obscuring the center and works particularly well in dining rooms and kitchens.
You can also add several tiny falling leaves between the wheat stems if the arrangement feels too rigid.
The earthy colors pair beautifully with natural wood furniture, terracotta pottery, and cream walls.

15. Paint a Cozy Fall Cottage Scene
If you enjoy painting, use a larger window as your canvas.
Create a small autumn cottage scene across the bottom third of the glass. Paint a simple cottage with a warm brown roof, several trees, pumpkins near the path, and drifting leaves.
Keep the shapes loose and illustrative rather than overly detailed.
A little warm yellow in the cottage windows can suggest an evening glow, while rust and burgundy trees create the autumn setting.
Leave the upper two-thirds of the window mostly clear.
This balance prevents the mural from making the room feel dark.
I’d practice the composition on paper first. Removing one questionable tree sounds easy until you’ve already painted six more around it.

16. Paint Autumn Branches in the Upper Corners
Most window paintings sit near the bottom, so flip the idea.
Paint slender autumn branches extending inward from the upper corners of the window. Add sparse leaves in burgundy, rust, olive, and muted gold.
Let a few leaves appear to fall toward the middle.
The result creates a natural canopy effect without covering the lower view.
This layout works particularly well if furniture sits directly in front of the window and would otherwise hide lower artwork.
Keep the branches delicate. Heavy dark shapes across the top can make the window feel visually smaller.
You can also use only one corner for an even more minimalist design.

17. Create a Full Fall Window Mural
Want your window to become the main seasonal decoration in the room?
Combine several motifs into a full fall window mural.
Paint an autumn tree along one side, a pumpkin patch across part of the bottom, and drifting leaves moving through the upper glass. You can add tiny woodland details near the base if you want more personality.
The trick involves leaving intentional clear areas.
Don’t cover every square inch just because you can. Transparent sections allow natural light through and give the painted elements room to breathe.
Stick with one coordinated palette: rust, cream, olive, burgundy, muted gold, and warm brown work beautifully together.
For a large design, sketch your composition on paper first and work from the largest shapes to the smallest details.
This takes more time than painting three leaves in a corner, obviously. But if you enjoy seasonal DIY projects, the finished window can become your entire room’s fall focal point.

What Paint Should You Use for Fall Window Painting?
Before putting a brush anywhere near your glass, choose the right product.
For temporary seasonal artwork, look for washable or removable paint specifically labeled as suitable for glass or windows. Window markers designed for glass can also work well for outlines, lettering, and simpler illustrations.
Always check the manufacturer’s instructions because products vary. Some paints may suit interior-facing glass but not exterior exposure, while others may require specific removal methods.
A basic window-painting setup might include:
- Removable or washable glass paint
- Glass-safe window markers
- Small and medium paintbrushes
- Water and cleaning supplies recommended for your paint
- Paper towels or reusable cloths
- Painter’s tape if your design needs straight edges
- A paper sketch for more complicated designs
Test your chosen product on a small, inconspicuous section first if you have any concerns about removal.
Avoid assuming ordinary wall, craft, or permanent paint will come off easily. Your fun Saturday project shouldn’t become December’s window-replacement subplot.
How to Prepare a Window Before Painting
Clean glass makes painting much easier.
Remove dust, fingerprints, and residue using a cleaning method compatible with both your window and the paint manufacturer’s recommendations. Then allow the surface to dry fully.
Plan the design before you start.
For simple leaves or pumpkins, a rough paper sketch may provide enough guidance. For larger murals, map out where the major elements will sit so you don’t accidentally squeeze an entire autumn tree into the final six inches of glass.
Think about the room from a distance too.
Step several feet away and decide where you want the eye to land. A strong composition matters more than tiny details.
Pick a Simple Autumn Color Palette
Too many colors can make window art look busy, particularly when the view outside already contains plenty of visual information.
Choose around four or five main colors.
For a classic fall look, try burnt orange, burgundy, muted gold, olive, and warm brown.
A softer palette could include cream, dusty peach, sage, camel, and terracotta.
For moodier autumn decor, combine deep burgundy, chocolate brown, dark olive, rust, and muted mustard.
Repeat the same colors throughout your painting. That repetition makes even simple artwork feel intentional.
Easy Fall Window Painting Ideas for Beginners
You don’t need to begin with the full cottage mural.
If this is your first attempt, choose shapes that tolerate imperfect lines. Leaves work brilliantly because real leaves aren’t symmetrical anyway.
Pumpkins also make forgiving beginner subjects. Start with a basic oval, add curved vertical lines, then paint a stem.
Other beginner-friendly motifs include:
- Acorns
- Simple branches
- Falling leaves
- Small mushrooms
- Wheat stems
- Basic pumpkin vines
Paint fewer, larger shapes rather than dozens of tiny detailed ones.
You can always add more later. Removing half your masterpiece because things got a little enthusiastic takes considerably longer.
How to Keep a Painted Window From Looking Cluttered
Negative space matters.
For most fall window painting ideas, leave a significant portion of the glass unpainted. You want seasonal artwork, but you probably also want sunlight and a view.
Try concentrating your design around the edges, corners, or bottom quarter of the window.
You can also create one focal illustration rather than covering the whole pane.
Look at your artwork from across the room periodically. If individual shapes start blending into one large block of color, stop adding things.
That little pause can save a design.
Match Your Window Painting to Your Fall Decor
Your window artwork doesn’t need to exist separately from the rest of the room.
Pull two or three colors from your existing fall decor.
If your living room already features rust pillows and an olive throw, repeat rust and olive in the painted leaves. If your kitchen has cream pumpkins and warm wood accents, use cream, brown, and muted orange in your window artwork.
This simple repetition creates cohesion.
You can also match the style rather than just the colors. A cottage-inspired room suits mushrooms, woodland animals, and loose botanical artwork, while a minimalist home might look better with white branches or a sparse leaf design.
Removing Temporary Fall Window Paint
Eventually, autumn ends. Rude, but unavoidable.
Follow the removal directions for the exact paint or marker you used. Don’t assume every glass product cleans up the same way.
Remove the artwork carefully rather than attacking the glass with abrasive tools or harsh chemicals that the manufacturer doesn’t recommend.
If you plan to create window paintings throughout the year, keep a note of which products cleaned up easily. That information will save you some experimentation next season.
Once you clean the glass, you’ve also gained a blank canvas for winter.
See how seasonal decorating gets you? It always has another project waiting.
Final Thoughts
You don’t need professional painting skills to turn ordinary windows into festive autumn decorations.
Start small with a fall leaf border, pumpkin vine, sunflower cluster, or drifting leaves. Once you feel comfortable, try a harvest basket, woodland scene, cozy cottage, or full autumn mural.
Choose removable products designed for glass, keep your palette cohesive, and leave enough clear space for natural light.
Most importantly, embrace the handmade look. Slightly uneven leaves and imperfect pumpkins often give fall window painting its personality.
Pick a window, choose your favorite idea, and start with a few brushstrokes. Worst-case scenario? Your maple leaf looks suspiciously like a potato. Paint another leaf next to it and suddenly it’s a creative decision.