

15 Backyard & Porch Privacy Screen Ideas That Are Easy to Build
The best privacy fence ideas don’t always involve enclosing an entire yard. In many backyards, porches, and decks, the real problem is much smaller: one neighbor-facing side, one exposed seating area, or one awkward sightline from a nearby driveway.
That’s why a privacy screen can be easier, cheaper, and visually lighter than a full fence.
A useful rule is to build only enough screen to block the unwanted view.
Targeted screening usually costs less, preserves more daylight, keeps better airflow, and feels much less boxed-in on a small porch or patio. A five-foot-wide slatted panel behind a loveseat may solve the problem just as well as a new fence running the full property line.
The projects below focus on straightforward materials such as wood slats, lattice, trellis panels, planters, curtains, reed screening, and simple freestanding frames. Most are beginner- or intermediate-friendly, though anything tall, structural, deck-mounted, or permanently attached may deserve extra planning.
The goal is privacy without turning the outdoor space into a wall.
15 Backyard & Porch Privacy Screen Ideas That Are Easy to Build
1. Build a Horizontal Wood Slat Screen Behind a Patio Bench
A horizontal slat screen is one of the cleanest ways to block a neighbor-facing view without making a small patio feel enclosed.
Build a simple rectangular frame roughly 5 to 6 feet wide and around 6 feet tall, then attach horizontal cedar, pine, or other exterior-suitable boards with narrow, consistent gaps between them. Place the screen behind a two-seat bench or loveseat rather than running it across the entire yard.
The horizontal lines visually widen a narrow patio, and the gaps allow enough daylight and airflow to keep the area from feeling like a solid box.
For a budget version, use standard-width boards and one consistent stain or paint finish instead of mixing several wood sizes. Warm cedar stain, dark brown, or matte black can all look intentional depending on the house.
Keep the project manageable by screening only the chair-level sightline that actually bothers you.
If the panel is freestanding, the base needs enough weight or anchoring to deal with wind. A tall lightweight rectangle can behave like a sail.

2. Use Vertical Slats on One Open Side of a Porch
Vertical slats work particularly well on a porch because they emphasize height without visually stretching the wall across the entire front of the house.
Place a 4- to 5-foot-wide slatted panel between an existing porch post and the house wall on the side facing the neighbor. Use narrow vertical boards with small gaps and keep the front of the porch open.
This works because porch privacy is usually more effective when it blocks one side rather than enclosing the entire sitting area.
The vertical rhythm also feels lighter than a solid wall. If the porch is already dark, choose a lighter stain or soft sage paint instead of a very dark finish.
A small bench or two chairs can sit just inside the screened side while the opposite edge stays open toward the yard.
Reusing existing porch posts can simplify the concept, but don’t assume every post is designed to support added wind load. If the panel is tall or permanent, structural conditions matter.
For a beginner-friendly version, keep the screen modest in width and use simple straight slats rather than elaborate decorative joinery.

3. Frame a Ready-Made Lattice Panel for Quick Porch Privacy
Ready-made lattice can save a lot of cutting while still giving a porch or patio a finished look.
Use one standard rectangular lattice panel inside a simple wood frame, then position it along the exposed side of the porch. Paint the frame and lattice the same color—white, charcoal, dark brown, or soft green—so it reads as one deliberate feature rather than an unfinished garden panel.
Lattice gives partial rather than complete privacy, which is often enough for a porch where you mainly want to blur a neighbor’s view.
The openings let light through and keep air moving, so this solution feels less heavy than a solid fence-board wall.
It’s also one of the easier porch privacy screen ideas because the decorative pattern comes from a prebuilt panel rather than complicated carpentry.
Keep the panel to the width you actually need. Two or three continuous panels across a small porch can make the space feel closed.
Lattice is not a full visual barrier, especially when viewed straight on from nearby. If you need stronger privacy, layer planting behind it rather than automatically switching to a solid wall.

4. Combine Lattice With Climbing Plants for Softer Privacy
Lattice becomes more private over time when it doubles as a support for climbing greenery.
Install one framed lattice panel beside a patio or along a fence gap, then plant one or two suitable climbers at the base rather than trying to cover the whole panel with five different plants.
The lattice provides immediate partial screening. The plants gradually soften the openings and make the structure feel more connected to the garden.
This works especially well for a backyard seating zone because the hard material and greenery share the job. You don’t need a completely solid wall.
Use a simple wood or dark-painted frame so the structure still looks tidy before the plants mature.
The practical limitation is time. A plant-based screen won’t provide complete privacy the day it is installed, and growth rates vary widely with climate, light, and plant choice.
You also need maintenance access. Dense vines can become difficult to manage if they’re allowed to swallow the frame completely.
For a small yard, one planted panel aimed at the main sightline often looks calmer than a continuous wall of trellis.
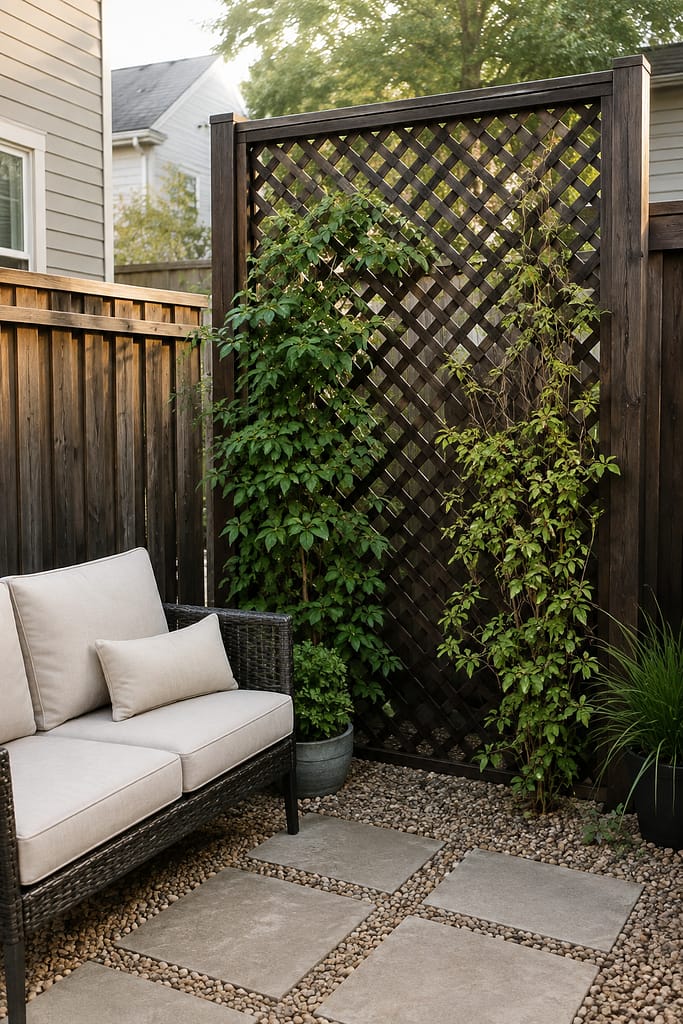
5. Build a Planter Box With an Attached Trellis
A planter-and-trellis screen is useful when you want privacy but don’t have an existing wall or post in the right place.
Use one long rectangular planter box with a simple trellis frame rising from the back. Place it beside a dining area, at the edge of a porch, or between a patio and the neighboring property.
The planter provides visual weight at the bottom, while the trellis handles the taller sightline.
This is one of the most adaptable backyard privacy screen ideas because the structure can be positioned exactly where the view needs blocking.
Keep the trellis relatively open rather than filling it with closely spaced boards. Plants can gradually add softness without cutting off all airflow.
For a more polished look, stain the planter and frame the same warm brown or paint both matte black.
The biggest practical issue is weight. Soil-filled planters get very heavy, especially when watered. That can be helpful for stability on a ground-level patio, but it matters much more on a raised deck.
If you plan to use this on a deck, think about structural load and placement rather than casually assuming a large soil-filled box is harmless.

6. Group Tall Planters Instead of Building a Wall
Sometimes you can get enough privacy without constructing a screen at all.
Place two or three tall planters along the exposed side of a small patio or porch and fill them with upright greenery suited to the site. Use matching or closely related containers so the group reads as one privacy feature.
This works best when the unwanted sightline is at seated eye level rather than from a second-story window.
The advantage is flexibility. Planters can be moved, rearranged, or removed more easily than a permanent screen, which makes the idea useful for renters or changing layouts.
It also preserves light because the gaps between plants remain open.
Choose substantial containers rather than six small pots. Two taller planters usually look calmer and provide more visual weight.
The limitation is that plant screens depend on mature size. Newly planted greenery may not block much at first, and some plants become far wider than expected.
Planter drainage, watering, wind exposure, and total weight all matter. On a deck, several large saturated containers can become a structural issue, so ground-level patios are the easier fit.

7. Hang Outdoor Curtains on One Porch Side
Outdoor curtains are one of the simplest privacy options when you already have a porch beam, roof structure, or other appropriate support.
Hang one or two weather-resistant fabric panels along the neighbor-facing side only. Use tiebacks so the curtains can stay open when privacy isn’t needed.
This works because the setup is adjustable. A solid screen is always there; curtains can change with the time of day.
For a small porch, use simple cream, oatmeal, soft gray, or muted striped fabric. Very dark heavy curtains can make the space feel smaller and block more light than necessary.
This is also a strong option for cheap DIY porch privacy ideas because the visual effect comes from fabric rather than lumber.
The main reality check is wind. Loose outdoor curtains need to be tied back or otherwise managed so they don’t flap constantly across furniture.
And fabric outdoors still gets dirty, damp, and weathered. Choose material intended for exterior conditions and be realistic about seasonal care.
Avoid hanging curtains directly where they can interfere with doors, grills, stairs, or walkways.

8. Attach Reed Screening to an Existing Porch Railing
If you already have a railing, lightweight reed-style screening can provide a quick visual filter without building a new frame from scratch.
Attach the roll neatly along the inside of the railing so the top edge stays straight and the material doesn’t sag between attachment points.
This works particularly well on a small porch or townhouse patio where the railing itself is already in the right place but offers almost no privacy.
Natural reed tones also bring warmth to painted railings and concrete patios.
The screen won’t provide complete blockage at every angle, but it can reduce direct sightlines enough to make sitting outside feel more comfortable.
This is one of the most budget-conscious porch privacy ideas DIY cheap approaches, especially if you only need to cover a short section.
The tradeoff is durability. Reed or bamboo-style rolls generally won’t age like solid exterior wood and may wear faster in harsh weather.
Keep the top height modest. Extending a flexible screen far above the railing can increase wind problems and may violate rental or HOA rules.
This idea is best thought of as a temporary or medium-term privacy layer.

9. Make a Freestanding Folding Privacy Screen
A freestanding screen is especially useful when you rent or when the unwanted sightline changes depending on where you sit.
Build or use three narrow rectangular framed panels connected in a folding arrangement. Fill each panel with vertical slats, lattice, or exterior fabric, then position the screen near the seating area instead of attaching it permanently to the house.
The folding shape adds stability compared with one flat panel because the angled sections create a wider base.
It also lets you adjust the screen around a chair, dining table, or patio corner.
For a budget-friendly version, keep the panels relatively narrow and use simple straight slats painted one consistent color.
This is one of the most practical freestanding privacy screen options for renters because it can be moved or stored.
But freestanding doesn’t mean windproof. A tall folding screen still needs enough weight, appropriate feet, or other safe stabilization for the conditions.
Avoid building it taller than necessary. If seated eye-level privacy only requires five feet, a seven-foot screen adds weight and wind exposure without necessarily improving the result.

10. Build a Deck Corner Screen Instead of a Full Deck Wall
A screen that works beautifully on a patio can become a wind sail when mounted too high on a raised deck.
That’s why a deck often benefits from one compact corner screen rather than a full-height wall across the railing.
Use an existing structural corner or post layout where appropriate and add a modest slat or lattice panel behind a loveseat or dining bench. Keep the panel only wide enough to block the neighbor-facing angle.
The corner arrangement creates a sheltered feeling without closing off the view in every direction.
This is a realistic version of DIY deck privacy ideas because it focuses on one targeted panel rather than casually adding a six-foot wall to an entire deck perimeter.
Small gaps between boards preserve airflow.
The structural reality matters here. Deck railings and posts have load limits, especially when large panels catch wind. Don’t assume an existing railing can support a tall privacy wall.
For a large or permanent panel, professional review may be appropriate.
The easier approach is to keep the screen compact, integrate it carefully with existing structure, and avoid unnecessary height.

11. Add a Simple Privacy Extension to an Existing Fence
Sometimes the best privacy fence makeover is to improve one weak section instead of replacing the fence.
If the existing fence is generally fine but one neighbor-facing sightline remains exposed, add a modest topper or trellis section above only that area.
A narrow framed lattice topper can provide extra screening while keeping the upper section open to air and light. Another option is a short row of vertical battens spaced slightly apart.
Paint or stain the new section to relate to the existing fence so it doesn’t look like an afterthought.
This works because you’re using structure you already have instead of building a second privacy wall inside the yard.
It can also be one of the cheapest ways to improve privacy if the needed extension is short.
However, fence height and extensions may be regulated by local codes, HOAs, or neighbor agreements. The existing fence may also not be designed to carry significant added wind load.
Treat small decorative toppers differently from major structural height increases.
For larger permanent changes, check what is allowed before attaching anything.

12. Create a Narrow Side-Yard Screen With Vertical Boards
A narrow side yard often needs privacy at one specific point, not along its entire length.
Build one slim vertical-board panel where a window, patio door, or neighboring seating area creates the strongest sightline. Place it perpendicular or slightly angled to the fence instead of extending another wall down the full side yard.
This interrupts the direct view while preserving the long path and airflow.
Vertical boards are useful here because they emphasize height without visually widening the structure into the already-tight passage.
Paint the panel a dark brown, charcoal, or green tone so it blends into the boundary rather than becoming the brightest object in the side yard.
Keep enough clearance for normal walking and maintenance access.
This is one of the more efficient ideas for privacy in backyard situations where building a long fence would waste material.
The panel still needs a stable frame and base. A narrow space can funnel wind, so don’t assume the nearby fences completely protect it.
And avoid making the screen so wide that it turns the path into a squeeze point.

13. Combine a Built-In Bench With an Integrated Privacy Panel
If you already want seating along a boundary, combining the bench and privacy screen into one composition can save visual clutter.
Run a simple bench along the back or side of a patio, then extend a slatted panel upward behind only part of the seat. The screened section can sit behind the most exposed chair position while the other end remains open.
This creates privacy exactly where someone sits without making the entire patio feel walled off.
A horizontal slat panel can visually widen a narrow courtyard, while warm wood helps the bench and screen read as one structure.
Keep the construction geometry simple: straight bench, rectangular screen, consistent finish.
This is a more permanent project than a freestanding panel, so make sure the location is right before building it.
Outdoor-rated cushions and a storage plan matter too. A built-in bench stays outside all year even when the cushions don’t.
For decks, integrated seating and privacy structures need more careful structural planning. On a ground-level patio, the concept is usually easier to adapt.

14. Pair a Shade Sail With One Side Privacy Screen
Overhead shade and side privacy solve two different problems, and a small patio sometimes needs both.
Use a modest shade sail over the seating zone, then add one separate slatted or fabric screen along the side facing the neighbor. Don’t try to turn the shade structure itself into a full enclosure.
The overhead element reduces sun exposure, while the side panel blocks the uncomfortable sightline.
This is a useful sun shade design strategy for a small backyard because each element has a clear job.
Keep the side screen partial rather than full width. A 4- to 5-foot panel near the chairs can be enough.
The combination works especially well when the screen uses wood and the shade sail is a neutral fabric, giving the area a light, simple material palette.
Structural attachment matters with both features. Shade sails create significant tension and wind load, while tall privacy panels catch wind from the side.
For anything permanent or attached to the house or deck structure, proper installation matters more than making the project look easy.
If the site isn’t suited to a fixed shade sail, a large umbrella plus freestanding side screen can achieve a similar visual effect with less permanence.

15. Make a Movable Planter-Supported Screen for Rental Privacy
For a renter-friendly solution, combine a lightweight framed screen with planter-style bases so the whole setup can move without permanent structural changes.
Use one or two simple rectangular framed panels filled with lattice, vertical slats, or exterior fabric. Position each panel between or behind substantial planter boxes that provide visual weight and help stabilize the arrangement.
Keep the total screen height moderate, especially if the patio is windy.
This works well for a rental patio, townhouse courtyard, or porch where drilling into walls or railings may not be allowed.
It also gives you flexibility. If the sun angle or seating arrangement changes, the screen can move with it.
For a polished look, paint the frame and planter boxes the same matte black, warm brown, or soft sage finish.
The key is not pretending the planters magically make a tall screen windproof. Stability depends on the actual construction, screen size, and conditions.
Heavy planters can also be difficult to move once filled.
For a truly movable setup, keep the panels relatively narrow and use the minimum height needed to block the seated sightline.

A Simple Formula for Building Privacy Without Overbuilding
The strongest privacy fence ideas usually come down to block the sightline + keep the build simple + leave airflow + secure the screen + use one consistent finish.
Stand where you actually sit before buying lumber or panels. Look toward the unwanted view and ask how much height and width you truly need.
A backyard may only need one slatted panel behind a lounge chair. A porch might work with a curtain on one side. A patio could use one trellis, a planter screen, or a freestanding panel rather than a full fence.
Cost usually drops quickly when you shorten the screen, reuse existing posts where appropriate, use standard-size materials, leave intentional gaps, and combine inexpensive hard materials with plants.
Also think beyond appearance. Wind, sun, drainage, deck structure, porch posts, local rules, HOA restrictions, rentals, plant growth, and future maintenance all affect whether the project stays useful.
Privacy doesn’t have to mean darkness or enclosure. The easiest screen is usually the one that solves the exact view problem without adding more structure than the space needs.
The goal is simply to make the outdoor area feel more comfortable while keeping it bright, breathable, and easy to use.