

17 DIY Skeleton Decoration Ideas for a Spooky Front Yard
Skeletons are especially useful for diy halloween decorations outdoor because they can do something. A ghost mostly relies on shape and movement, but a skeleton can climb a tree, dig beside a faux grave, sit on a porch, push a wheelbarrow, or hold a lantern. That makes even a fairly simple yard setup feel like a scene instead of a collection of unrelated props.
The easiest way to plan one is to give each skeleton a clear action before adding extra props.
If the action isn’t obvious from the sidewalk, tiny details probably won’t save it. Bend the elbows and knees more than you think you need to. Turn the skull toward whatever the skeleton is supposedly doing. Raise some figures off the lawn so their silhouettes don’t disappear into grass and darkness.
You also don’t need five full-size skeletons. One figure with a strong pose, one readable prop, and good lighting can carry a small front yard.
The ideas below range from simple setups using a store-bought skeleton and an old chair to more involved PVC and foam-based DIY builds.
17 DIY Skeleton Decoration Ideas for a Spooky Front Yard
1. Pose a Skeleton Climbing a Front-Yard Tree
A skeleton halfway up a tree is immediately readable from the sidewalk, even before you add extra props.
Use one full-size plastic skeleton and position it against the lower trunk of a sturdy front-yard tree. Bend one knee as though it’s pushing upward, stretch one arm higher than the other, and turn the skull toward the next “handhold.” That uneven body position is what sells the climbing action.
Keep the skeleton low enough that the scene can be installed and removed safely without treating the tree like a ladder project. Use discreet, non-damaging attachment methods around the trunk or branches rather than relying on the skeleton’s joints to hold the entire weight.
At dusk, one low ground light aimed toward the trunk makes the ribs, elbows, and skull stand out against the bark.
This works well for simple Halloween decor outdoors because you don’t need a pile of supporting props. The tree provides the setting.
Avoid placing the skeleton where it could fall onto a sidewalk, driveway, or someone approaching the house. Lightweight plastic bones can shift more than expected when wind catches the figure.

2. Build a Grave-Digger Skeleton Scene
If you only have one skeleton, giving it a job is usually more effective than placing it upright in the middle of the lawn.
For a grave-digger scene, angle one skeleton beside a low faux grave mound made from dark mulch, leaves, or another temporary yard-safe material. Bend both knees slightly and lean the torso forward. Position a lightweight wooden or plastic shovel so the hands appear to be gripping it.
The shovel is important because it makes the action readable from much farther away than small accessories would.
Add two pumpkins off to one side and one low warm ground light near the mound. That’s enough. A row of ten tombstones behind the skeleton would dilute the scene rather than improve it.
For inexpensive DIY skeleton yard decor, thrifted tools or lightweight faux versions can work well as long as they are stable.
Skeleton fingers rarely hold props convincingly on their own, so use discreet ties where needed.
Keep any raised soil, mulch, or props away from sidewalks and driveway edges where people could trip over them after dark.

3. Seat a Skeleton in a Porch Rocking Chair
A seated skeleton works particularly well on a porch because raising the figure above lawn level makes it visible without needing an elaborate setup.
Put one skeleton in an old wooden rocking chair or sturdy outdoor chair near the side of the porch. Bend the knees naturally rather than letting both legs stick straight forward. Rest one elbow on the arm of the chair and turn the skull toward the walkway, as if the skeleton is watching people arrive.
Place a battery lantern beside the chair or on a small table.
That body language gives the figure much more character than a stiff seated pose.
This is one of the easiest skeleton porch decor ideas because the chair does most of the support work. Discreet ties can secure the pelvis or spine to the chair if the joints won’t stay in place.
Keep the rest of the porch simple. Two pumpkins or one fall planter are plenty.
A lightweight chair can tip in strong wind once a skeleton is attached, so use stable furniture and move delicate props during severe weather.

4. Make a Skeleton Crawl Out of a Garden Bed
A skeleton only needs to be partially visible to create a strong scene.
Place the torso and upper half of one skeleton at the edge of a front planting bed as though it’s pulling itself out of the soil. Angle the skull upward, extend one arm onto the lawn, and bend the other elbow so it appears to be supporting the body.
Use mulch, fall leaves, or plants to conceal the lower section rather than trying to build a complicated fake underground body.
This works because the planting bed naturally provides the transition from “buried” to visible skeleton. You don’t need a faux grave or large structure.
From the street, the skull, shoulders, and one reaching arm create a much clearer silhouette than several loose bones scattered through the mulch.
A small low light behind the bed can emphasize the rib cage after dark.
Make sure the skeleton is secured so rain or wind doesn’t slowly rotate the torso into an unreadable position. Also keep the reaching arm away from the lawn edge if people regularly walk through that area.

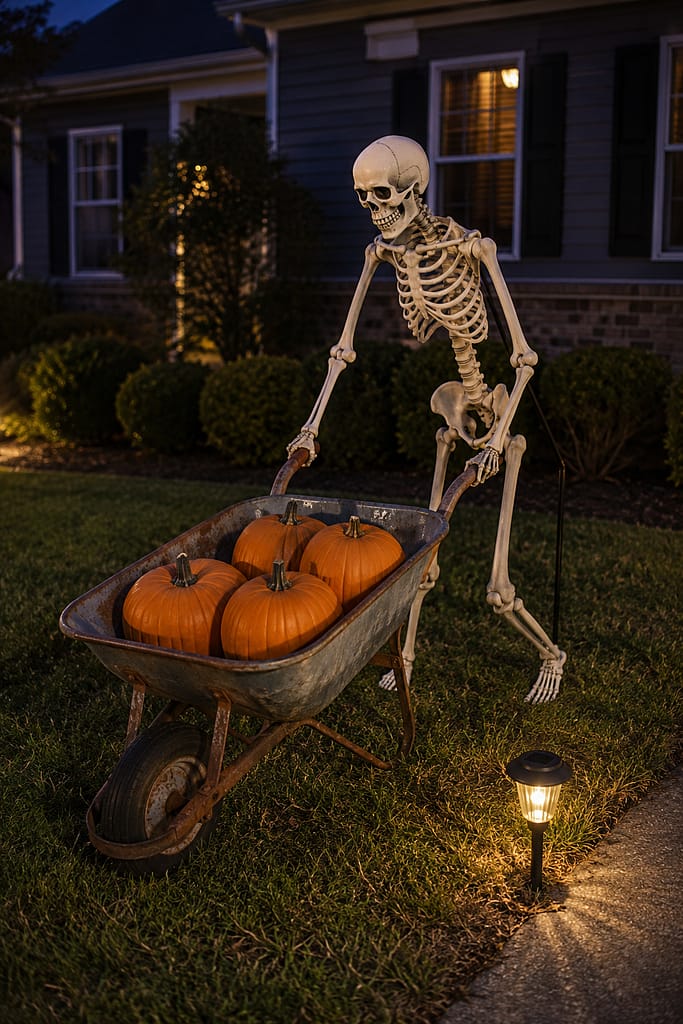
5. Put a Skeleton Behind a Wheelbarrow Full of Pumpkins
A wheelbarrow creates scale and gives the skeleton an action that is easy to read from the curb.
Fill an old wheelbarrow with three or four pumpkins and pose one skeleton behind the handles as though it’s pushing the load across the lawn. Lean the torso slightly forward, bend the elbows, and place one foot ahead of the other.
That small stagger in the legs matters. If both feet are side by side and the spine is perfectly vertical, the skeleton will look like it’s simply standing behind the wheelbarrow.
Use discreet ties to keep the hands connected to the handles and secure the skeleton itself separately. The wheelbarrow shouldn’t be responsible for holding the entire figure upright.
This scene feels playful rather than especially scary, which makes it useful for family-friendly front yard Halloween ideas.
The pumpkins are large enough to remain visible in daylight and at night. A nearby solar pathway light or low ground light can provide enough illumination.
Keep the wheelbarrow completely outside the driveway and normal walking route.
6. Create a Skeleton Picnic Scene
Two skeletons sitting together can create a stronger story than two figures standing on opposite sides of the yard.
Seat them on a dark picnic blanket or low outdoor chairs near the edge of the lawn. Angle their skulls toward one another and bend their arms toward a small central prop, such as a pumpkin, lantern, or oversized faux mug.
The interaction is what matters. From the street, people should immediately understand that the skeletons are gathered together.
For a simple version, use one blanket, two skeletons, one lantern, and two pumpkins. You don’t need a detailed picnic spread filled with tiny fake food that disappears after sunset.
If the skeleton joints don’t hold seated positions well, support the pelvis or spine with low stakes or discreet ties behind the figures.
Warm lantern light suits this scene better than harsh uplighting because the mood is more playful than threatening.
Place the whole setup several feet back from the sidewalk. Props spread across the lawn can become difficult to see and annoying to move if they’re placed where people actually walk.

7. Make a Skeleton Walk a Fake Dog
A skeleton dog-walker scene works because the basic action is recognizable instantly.
Use one full-size skeleton standing in a slightly exaggerated walking pose. Bend one knee forward and pull the opposite arm back so the figure doesn’t look stiff. Attach a rope or lightweight leash to one hand and connect it to a small skeleton dog prop, black dog silhouette, or another clearly fake Halloween pet.
Keep the pair fairly close together. A long leash stretched across the lawn may disappear visually and create an unnecessary trip hazard.
Place the scene near the front walkway but not on it, with both figures angled toward the street.
The dog provides a second shape without requiring another full skeleton, which makes the idea work on a smaller budget.
A single low light aimed across the figures can cast enough shadow to make the legs readable after dark.
If your skeleton can’t balance in a walking pose, use a discreet rear stake rather than depending on locked knees or feet pressed into grass.

8. Pose a Skeleton Carrying Pumpkins Up the Porch Steps
A porch staircase naturally creates height, which helps a skeleton scene stay visible from the curb.
Place one skeleton on the lower or middle steps as though it’s carrying pumpkins toward the door. Use one medium plastic pumpkin tucked under an arm and perhaps a second lightweight pumpkin held against the torso.
Turn the skull toward the front door, bend the knees slightly, and position one foot on a higher step. That makes the body read as moving upward.
This is easier than trying to make the skeleton balance independently on a lawn because the steps provide multiple stable contact points.
Use the existing porch lighting to illuminate the figure. A warm wall sconce often gives the bones enough contrast without adding special effects.
Secure both the skeleton and pumpkin props discreetly so nothing rolls down the stairs.
Keep at least one side of the steps completely clear for actual people. A Halloween setup should never force guests to weave between bones and pumpkins to reach the door.
This is a compact option for Halloween DIY skeleton decorations when the yard itself is too small for a full scene.

9. Hang a Skeleton From a Fence in an “Escape” Pose
A fence gives you a vertical backdrop that makes the skeleton shape much easier to see.
Position one skeleton halfway over a fence as though it’s trying to climb out of the yard. Place both hands over the top edge, let one leg hang on the yard side, and angle the other knee higher as though it has just reached the top.
Turn the skull back toward the house or forward toward the sidewalk depending on the story you want.
This pose works because the fence supports the skeleton and also creates strong contrast behind the bones.
Use discreet ties at several points so the weight isn’t hanging from the hands alone. Skeleton finger joints are decorative; they’re not designed to support a full prop.
A small uplight from the yard side can make the ribs and skull visible above a dark fence after sunset.
Use an attachment method that won’t damage the fence, and avoid placing the skeleton over a shared property line or somewhere it could fall toward a sidewalk.

10. Make a Skeleton Pop Out of a Trash Can
This is one of the cheapest setups if you already have a large outdoor trash can or clean plastic bin.
Place the lower half of one skeleton inside the container and lean the upper torso over the rim. One arm can hang toward the ground while the other rests on the edge, with the skull turned toward the street.
The tall container automatically raises the skeleton and gives it a clear action.
This idea is funny rather than frightening, and it works well near a garage or driveway edge where the trash can doesn’t look out of place.
You can add a few dry leaves around the opening, but keep the props minimal. A sign with tiny text isn’t necessary because the pose already explains the joke.
Make sure the bin is weighted or stable enough that the skeleton doesn’t turn it into a wind-catching tower. Secure the torso inside so it can’t slide forward.
If you’re using your actual household trash can, choose a container you won’t need during the display period. Constantly dismantling the prop on collection day gets old fast.

11. Turn One Skeleton Into a Creepy Gardener
Gardening props make a skeleton scene easy to understand without buying specialty Halloween accessories.
Seat or crouch one skeleton beside an existing front-yard planter or garden bed. Put a lightweight hand trowel or small watering can nearby and angle the skull down toward the plants.
Bend the spine slightly forward and keep the elbows close to the task. A skeleton standing perfectly upright next to a watering can doesn’t tell the same story.
For extra humor, place one fake skeletal hand or a small plastic bone sticking out of the planter—but keep it restrained.
This is a low-cost skeleton yard decoration because you can use a normal planter and ordinary garden tool as the supporting props.
The garden itself provides texture and makes the skeleton feel integrated with the yard rather than placed randomly on the lawn.
Use a small pathway light or porch light if the bed is near the house.
Remember that lightweight watering cans and tools can blow away. Secure or remove them in bad weather rather than relying on the skeleton’s hands to hold them.

12. Use a Skeleton as a Lantern Keeper by the Walkway
If you want a minimal scene, give one skeleton a single oversized prop.
Stand the figure beside the front walkway with one arm extended slightly forward, holding a large LED lantern or positioning it just below the hand. Turn the skull toward arriving guests.
Bend one knee and angle the shoulders rather than leaving the skeleton perfectly straight. That small asymmetry makes the figure feel more intentional.
The lantern becomes both the prop and the lighting source, so you don’t need another floodlight pointed at the skeleton.
This works particularly well for a narrow townhouse lawn or porch edge where there isn’t space for a multi-figure setup.
Choose a lantern large enough to read from the sidewalk. A tiny tea-light lantern may look nice up close but disappear completely from 25 feet away.
The lantern should be lightweight and use an LED rather than an open flame around plastic bones, clothing, or dry fall leaves.
Secure the skeleton with a rear stake or stable base. An extended arm increases leverage in wind and can pull a poorly anchored figure sideways.

13. Pair One Skeleton With Three Front-Yard Ghosts
Skeletons and ghosts can work together as long as one theme remains visually dominant.
Use one seated or standing skeleton as the main figure and position three simple sheet ghosts in a loose semicircle facing it. For example, the skeleton can sit on an old chair with a lantern while the ghosts gather around as though listening.
Keep the ghosts simpler than the skeleton—white sheets, basic black faces, minimal extra props. That allows them to act as supporting characters rather than turning the yard into two competing displays.
The repetition of three white figures makes the ghost front yard decor obvious, while the skeleton still provides the main storytelling action.
Use one lantern near the skeleton and perhaps a soft backlight behind the ghosts. More lighting than that isn’t necessary.
Keep enough distance between the figures for the scene to read clearly from the curb.
Wind is the main practical issue: anchor the ghost supports separately rather than attaching them to the skeleton or chair.

14. Build a Simplified PVC Skeleton Silhouette
If you’re wondering how to make a skeleton rather than simply pose a store-bought one, a simplified PVC frame can give you the body shape without attempting full anatomy.
Build the visual concept around a tall lightweight frame with a central torso, two arms, and two legs. Add a lightweight skull or store-bought plastic skull at the top, then use thrifted dark clothing with selected bone-like pieces or pale limb accents showing through.
From the street, the silhouette matters more than individual ribs or finger bones.
This is a more involved PVC skeleton DIY than arranging a purchased prop, so it’s better treated as a weekend build. Keep the construction high-level and focus on proportion, stability, and a clear pose.
For example, angle the frame so the figure appears to be reaching over a fence or standing behind a porch column.
A rear support or weighted base is essential; tall lightweight frames catch wind easily.
Avoid overcomplicating the arms and joints. A readable six-foot silhouette is more useful outdoors than a detailed but fragile homemade skeleton.

15. Add a Spray-Foam Corpse-Like Skeleton Accent to a Fence
A spray foam skeleton concept works best as a limited prop effect rather than trying to sculpt an entire anatomically detailed body.
Start with a prebuilt lightweight frame or existing skeleton-shaped prop and use decorative foam only to create rough aged texture around selected areas, such as the torso or shoulders. The final figure can appear as though it has been weathered or partially mummified, then be positioned rising behind a fence or planter.
Visually, this adds bulk and an uneven silhouette that contrasts with a clean plastic skeleton elsewhere in the yard.
Because this is a moderate build involving a specialty material, follow the manufacturer’s safety directions, use appropriate protection, and work in a well-ventilated setting. The goal here is the visual concept, not detailed chemical technique.
After painting or finishing appropriately for decorative use, place the figure where rain exposure is limited if the material isn’t designed for prolonged outdoor weather.
One low amber or warm-white light can pick up the rough surface texture at night.
This prop doesn’t need several companions. Its unusual silhouette is enough.

16. Make a Funny Puking Skeleton Planter Scene
A puking skeleton decoration can stay funny without becoming graphic.
Seat or kneel one skeleton beside a large planter, with its torso leaning over the rim and both hands braced near the top. Angle the skull downward so the action reads immediately.
Use bright green yarn, shredded green fabric, or another clearly fake decorative material hanging a short distance into the planter. The effect should look intentionally ridiculous rather than realistic.
Place two pumpkins nearby to reinforce the Halloween setting and add one low ground light so the outline remains visible after dark.
This is a good one-skeleton scene because the body pose carries the joke. You don’t need signs explaining what’s happening.
Secure the skeleton around the planter or with a discreet rear support so the forward-leaning posture doesn’t pull it over.
Keep the faux material short and contained. Long strands blowing across the lawn will look messy rather than funny.
Avoid realistic fluid effects, gore, or red lighting. The scene works better as obvious Halloween slapstick.

17. Create an “Escaping From the Grave” Skeleton Pair
Two interacting skeletons can create a bigger final scene without requiring an entire yard full of props.
Use one skeleton partly buried or concealed behind a low faux grave mound with its upper body reaching upward. Place a second skeleton standing beside it, leaning back slightly as though helping pull the first one free.
Turn both skulls toward the action. The standing skeleton can grip a short piece of faux chain or rope connected near the emerging figure, but keep the prop large and simple enough to be seen.
The opposing body directions make the scene easy to read: one figure pulls upward while the other reaches out.
Use one cool-white or warm-white ground light behind the mound to outline both rib cages after sunset.
For a smaller yard, keep the grave mound compact and position the pair toward one corner instead of spreading props across the whole lawn.
Both figures need independent anchoring. Don’t rely on the rope or one skeleton to support the other.
Keep the setup safely away from sidewalks and driveways, especially if the standing skeleton leans backward.

A Simple Formula for Better DIY Skeleton Yard Decor
The strongest diy halloween decorations outdoor don’t depend on owning a dozen skeletons. A much more useful formula is one clear action + a readable pose + one or two supporting props + secure anchoring + simple lighting.
Start with the action.
If the skeleton is digging, the shovel and forward lean need to be obvious. If it’s climbing, bend the knees and turn the skull toward the next handhold. If it’s sitting on the porch, give the figure enough elevation and body language to remain visible from the walkway.
Then stop adding props once the story reads clearly.
One large lantern will usually do more for a nighttime scene than six tiny accessories. A wheelbarrow is easier to recognize from the curb than miniature fake food. And one securely anchored figure will look better all October than an elaborate scene that collapses every windy afternoon.
Work with the space you actually have. A porch may only need a seated skeleton and lantern, while a larger lawn can support a grave-digger or two interacting figures.
Plan for wind, rain, walkway clearance, outdoor-suitable lighting, and storage after Halloween. A good skeleton scene should be fun to look at without becoming frustrating to maintain.