

18 DIY Privacy Fence Ideas for Decks and Patios on a Budget
Some of the best privacy fence ideas don’t involve fencing an entire yard. On a small deck or patio, the real problem may be one neighboring window, one exposed side, or a direct view from the house next door. Covering every boundary can cost more, reduce airflow, block light, and make a compact outdoor area feel boxed in.
A better starting point is to block the view you dislike first, then decide whether the rest of the space actually needs screening.
Targeted privacy usually uses less material and can be easier to adapt as the layout changes. A narrow slat screen behind a loveseat may solve the issue. So might a planter-and-trellis combination, an outdoor curtain, or an extension added to one section of an existing fence.
Budget matters, but so do wind, weight, sightlines, sunlight, and the structure you’re attaching things to. Some of these projects are simple enough for renters or beginner DIYers. Others involve posts, railings, or additional loads and deserve more careful planning.
The goal is privacy that makes the outdoor space more comfortable without making it darker, hotter, or harder to use.
18 DIY Privacy Fence Ideas for Decks and Patios on a Budget
1. Add One Horizontal Slat Screen to the Exposed Side of a Deck
A narrow cedar panel behind a loveseat can block the neighbor’s patio without turning the whole deck into a wooden box. On a compact raised deck, run horizontal slats along only the most exposed side and leave small, even gaps between the boards.
Warm cedar works particularly well because the screen can double as a visual backdrop for seating. Place a two-seat outdoor sofa or pair of cream chairs in front, then repeat the wood tone in one planter so the panel feels integrated with the deck rather than added later.
The gaps matter. A fully solid wall catches more wind and can make a hot deck feel stagnant. Partial screening interrupts the direct sightline while allowing light and air through.
This is also one of the more economical DIY deck privacy ideas because you’re paying for one targeted panel rather than fencing every side.
If you’re attaching the screen to existing deck posts or railing components, don’t assume they’re designed for the extra wind load. Tall additions may require structural evaluation or local approval.

2. Use Vertical Slats to Screen a Narrow Patio Corner
Horizontal slats make a space feel wider; vertical boards can give a cramped patio more height. On a narrow townhouse patio, build or install one vertical privacy panel at the seating end rather than running fencing the entire length.
Use simple pressure-treated boards or cedar with narrow gaps. Paint the finished panel matte black, warm brown, or soft gray depending on the house exterior. A small café table or two chairs can sit in front without the screen consuming much usable floor area.
This works because a vertical yard privacy screen creates a focal wall while blocking the direct view toward the neighboring property. The open spacing makes the structure feel lighter than a solid fence.
For a budget-conscious build, standard-width boards and a limited panel width usually cost less than decorative custom materials. Paint can also make inexpensive lumber read as one intentional surface.
Tall freestanding panels can catch significant wind. If the design depends on posts or structural attachment, treat that as more than a casual beginner DIY project.

3. Frame Inexpensive Lattice for a More Finished Look
Basic lattice is affordable, but installed by itself it can look temporary. Framing it with simple exterior wood boards gives it more visual structure and turns it into a convincing patio or deck screen.
Use a painted black lattice panel for a contemporary backyard, white lattice on a cottage-style porch, or cedar-toned lattice for a warmer deck. Place it where one neighboring window or seating area is most visible rather than enclosing the entire perimeter.
Lattice gives partial privacy immediately. It breaks up a clear view without blocking all the air, and the pattern becomes more effective if vines or nearby planting eventually fill some of the openings.
This is one of the easier answers to how to make a privacy fence cheap: reduce the overall square footage, use standard lattice sheets, and spend a little extra effort making the frame and paint finish look intentional.
Climbing plants aren’t instant privacy, and not every vine belongs against every structure. Choose plants appropriate to the climate and support system, and keep maintenance in mind.

4. Combine a Planter Box With a Trellis
A planter-and-trellis screen is useful when you want privacy without installing a hard wall directly into a patio. Build or buy a long rectangular planter and place a lightweight trellis panel rising from the back, then use it to block one low or mid-height sightline.
This works particularly well behind a small patio bench or dining table. The solid planter base gives the arrangement visual weight while the upper trellis remains airy.
For a budget version, keep the planter shape simple and use standard lattice or an inexpensive trellis panel rather than custom metalwork. Paint the planter and trellis the same color so the two pieces read as one unit.
Plants add softness, but don’t expect a newly planted screen to become opaque immediately. Tall grasses, climbing vines, or narrow shrubs need time to reach mature size.
Weight and drainage matter too. A large wet planter can become very heavy, particularly on a raised deck. On a ground-level patio that’s usually easier to manage, but deck placement should account for structural capacity.

5. Group Tall Planters to Block a Single Sightline
Sometimes you don’t need a fence at all. If the privacy issue is a narrow angle between your patio and the neighbor’s seating area, a group of tall planters may solve it.
Use two or three substantial containers rather than a line of small pots. Tall ornamental grasses, compact evergreen shrubs, or upright plants suited to your climate create vertical coverage while keeping the space softer than a wood wall.
This approach works particularly well for renter-friendly patio privacy because the containers can move. It also preserves more light and airflow than a solid panel.
For a budget-conscious setup, spend on fewer containers and repeat the same finish. Matching black, terracotta, or dark brown pots usually look more intentional than many unrelated containers.
Plant choice is the real long-term consideration. Mature width matters as much as height, and seasonal plants may lose privacy in winter. Watering and drainage also become part of the maintenance routine.
On an elevated deck, several large wet planters can add serious weight. Make sure the structure is appropriate before treating heavy containers as casual decor.

6. Extend Privacy Above an Existing Deck Railing With Slats
If the lower half of the deck is already screened by a railing but seated eye level remains exposed, adding privacy above part of the railing can be more efficient than constructing a separate wall.
A narrow slatted extension can work behind the main seating zone. Use vertical or horizontal boards with gaps and stop the screen once it blocks the actual view from the neighboring property.
This is one of the more practical deck privacy screens because it uses the existing deck layout and concentrates extra material where it’s useful.
Visually, repeat the railing color or deck stain so the addition doesn’t look like an unrelated topper. On a dark railing, matching dark slats can recede into the background; on a cedar deck, natural wood can feel softer.
The structural side deserves caution. Railings are designed for specific loads, and adding tall panels changes how wind acts on the system. Don’t assume posts or rails can automatically support an extension just because they’re already there.
Local height limits, HOA rules, and deck requirements may also apply.

7. Add Reed-Style Screening to an Existing Railing
Reed or bamboo-style roll screening is one of the quickest inexpensive outdoor privacy ideas when you already have a suitable railing or fence to work with.
On a small porch or ground-level patio, attach screening only across the section facing the neighbor. The warm natural texture can soften metal railings or visually hide an unattractive utility area without becoming a heavy solid wall.
This setup is particularly attractive when paired with simple cream cushions, terracotta pots, or warm wood furniture. It feels casual rather than architectural.
The budget advantage comes from using the structure that’s already there and limiting the screening to one sightline.
The tradeoff is durability. Reed-style material generally won’t age like a properly built wood screen, and exposure to rain, strong sun, and wind can make it weather faster. It may be better viewed as a lower-cost medium-term solution than a permanent fence replacement.
Use outdoor-suitable fastening methods and keep attachment points neat so the finished screen doesn’t flap or sag noticeably.

8. Hang Outdoor Curtains on One Side of a Covered Porch
Outdoor curtains are useful when privacy needs change throughout the day. A covered porch or patio with an existing beam or suitable support can use one curtain section on the exposed side rather than fabric around the entire perimeter.
Choose weather-resistant cream, oatmeal, or muted gray fabric and let the curtains stack neatly when privacy isn’t needed. Tiebacks prevent them from blowing constantly into seating.
This is one of the more flexible porch privacy screen ideas because the barrier can open completely, preserving light and views when the neighbors aren’t outside.
Curtains also soften hard surfaces in covered outdoor spaces, particularly porches with metal railings or plain posts.
The low material cost is appealing, but the support and wind exposure matter. Fabric needs a real rod, track, or beam connection rather than a makeshift line. Strong wind can turn large panels into sails, so the curtains need somewhere safe to go when conditions change.
The lower hem should stay clear of wet flooring and dirt rather than pooling on the porch.

9. Use a Freestanding Folding Screen for a Rental Patio
If you can’t attach anything to the building or fence, a freestanding screen can provide targeted privacy without permanent alterations.
Choose a sturdy outdoor-rated folding panel or simple framed wood screen and place it behind a small seating area. A dark stain or matte black paint can make an inexpensive frame look more intentional, particularly against greenery.
This is useful for renters because the screen can move if the sightline changes. It can also be stored or repositioned as furniture moves.
The key is keeping it proportional. A screen wide enough to cover one chair grouping may work beautifully; a line of tall panels across an entire patio can feel unstable and visually heavy.
Wind is the biggest reality check. Freestanding panels need an appropriately stable design and may still need to be moved or secured when weather worsens. A narrow, top-heavy screen isn’t a good candidate for windy exposed locations.
Don’t block exits or access routes simply to hide a neighboring view.

10. Build a Freestanding Slatted Planter Screen
A freestanding screen feels much more stable visually when it incorporates a planter base. On a ground-level patio, combine a wide rectangular planter with a slatted upper panel and use the unit as a movable boundary beside the seating area.
The planter doesn’t need dense vegetation to create privacy; the slats handle the primary screening while greenery softens the base.
This kind of DIY backyard screen is useful where digging posts isn’t desirable. It also lets you position privacy where it’s needed instead of following the property line.
For a lower-cost build, use straightforward boards, standard lumber sizes, and one paint or stain color. Alternating materials usually adds cost without making a small screen more effective.
The construction does need enough stability for the panel height and local wind exposure. A tall sail-like screen sitting on a lightweight planter box is not a realistic solution.
On a deck, consider the filled planter’s weight carefully. This concept is generally more straightforward on a patio or paved ground-level area.

11. Refresh an Old Fence With Paint and Narrow Battens
An old privacy fence may not need replacement just because it looks tired. If the structure is still sound, paint or stain plus a few visual improvements can make it feel much more intentional.
Use a soft charcoal, warm gray, dark brown, or natural stain to unify patchy boards. Then, where appropriate, add narrow vertical battens over inconsistent gaps or as a simple design detail.
This privacy fence makeover can improve both appearance and screening without rebuilding the entire boundary.
A darker fence can make greenery stand out; a softer gray often works well with light siding and concrete patios. Use the same finish on one nearby planter or bench detail to connect the fence with the rest of the outdoor room.
Cost stays lower because you’re preserving sound posts and boards rather than replacing everything.
Paint cannot solve rot, leaning posts, loose sections, or structural failure. Those problems belong in the repair category first. Also make sure additional battens don’t create unnecessary load or moisture traps.

12. Add a Slatted Topper to One Section of a Short Fence
If the existing fence is adequate at ground level but a neighbor’s elevated deck or second-story window creates the problem, a partial topper may be more useful than replacing the entire fence.
Use one section of spaced cedar or painted wood slats above the existing fence near the seating zone. The topper can extend the visual barrier where eye level needs it while leaving the rest of the boundary unchanged.
This is another practical privacy fence makeover because you’re adding material only where the extra height solves a real sightline.
Keep the upper portion somewhat open. Small gaps preserve airflow and reduce the visual heaviness of an extra-tall wall.
The biggest consideration is structure and local regulation. Adding height increases wind exposure and may require stronger posts or may be restricted by local rules, HOAs, or property-line requirements. Don’t assume an old fence is automatically capable of carrying a taller top section.
A slightly shorter topper paired with strategic planting can often feel softer than chasing maximum possible height.

13. Use Alternating-Width Slats for a More Designed Screen
If plain slats feel too basic, varying the board widths can make a budget privacy wall look more custom without introducing complicated materials.
Use standard lumber in two widths and alternate them across a panel behind a patio bench. Keep the gaps consistent so the pattern reads clearly.
A dark brown or matte-black finish gives the screen a contemporary look; natural wood suits a softer deck or backyard. Add one tall planter nearby rather than covering the screen in decor.
The interest comes from rhythm rather than ornament, so this screen can remain visually simple while feeling more deliberate than a basic fence panel.
Because only standard lumber is needed, the concept can still fit the privacy fence DIY inexpensive category when built as one targeted section.
Don’t make the panel unnecessarily tall or wide. More pattern doesn’t improve privacy if the actual sightline is only six feet across.
As with any standalone or post-supported wall, wind and attachment need to be treated realistically.

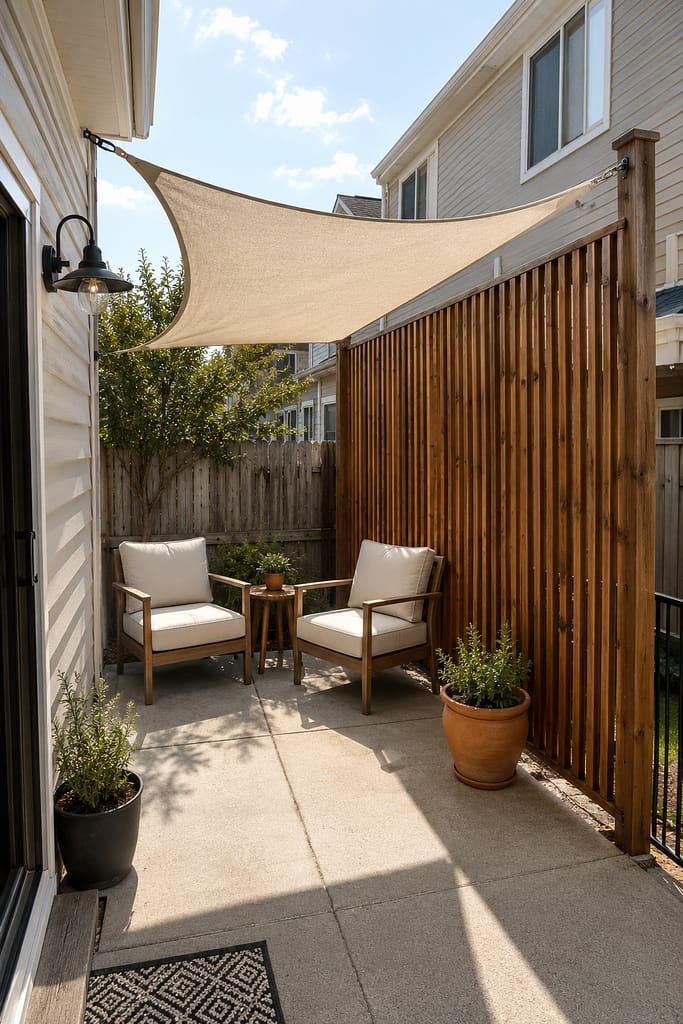
14. Pair a Shade Sail With One Side Privacy Screen
Shade and privacy often overlap, but they’re not the same problem. A shade sail can reduce overhead sun while a targeted side screen blocks the neighbor’s view.
On a small patio, stretch a modest shade sail over the seating area using appropriate structural attachment points, then place a vertical slat or lattice panel on the exposed side. The combination can make the space feel more comfortable without enclosing every edge.
This is useful sun shade design because each element has a distinct job: the sail reduces overhead exposure, and the side screen handles the direct sightline.
For a budget approach, keep the shade area proportional to the furniture rather than covering the entire yard. Likewise, install only one side panel if that’s the privacy problem.
A shade sail requires proper structural anchoring and tension; it isn’t simply a decorative fabric sheet. Wind loads matter. If the mounting conditions aren’t appropriate, a freestanding umbrella or another shade solution may be safer and easier.
The side screen should also preserve airflow rather than creating a solid hot corner.
15. Create Porch Privacy With One White Lattice Side Panel
A small front or back porch often needs privacy on only one side. Instead of screening across the entire front, install a white framed lattice panel between two existing porch posts on the side facing the neighbor.
This works especially well with cottage or traditional siding because the lattice feels connected to porch architecture rather than like a backyard fence pushed onto the house.
Place a simple bench or chair near the panel and one medium planter at the base. The lattice allows air and some light through while interrupting a direct side view.
It’s a strong answer for porch privacy ideas DIY cheap because standard lattice plus paint can look finished without expensive custom materials.
If the porch is covered, the panel may also weather more slowly than a fully exposed yard screen.
The existing posts still need to be appropriate for any attachment. Don’t assume decorative trim or thin columns are suitable support for a large panel without understanding their structure.
Avoid screening the porch front unless there’s a real reason; that can make a small entry feel closed off from the yard.

16. Add Privacy Mesh Behind Existing Greenery
Privacy mesh isn’t usually the most attractive material by itself, but it can work as a low-cost background layer behind planting or a railing where a temporary visual barrier is needed.
Choose a subdued dark green, charcoal, or brown mesh rather than bright plastic-looking fabric. Attach it neatly to a suitable fence or railing section, then soften the view with a few planters or existing shrubs in front.
The plants break up the flat surface and make the screen look less temporary.
This approach can work for a rental yard, patio edge, or narrow backyard privacy problem where a permanent build isn’t appropriate.
The benefit is quick visual filtering at relatively low material complexity. The drawback is appearance and weathering. Loose, sagging mesh can make even a tidy patio look unfinished.
Keep the material tensioned and confined to the problem area. And if you’re attaching it to a railing, make sure the system can handle wind pressure and that the property owner or rental rules permit it.

17. Combine a Built-In Bench With a Corner Privacy Panel
If one deck corner already serves as the seating zone, privacy can be built around that area rather than around the whole perimeter.
Place a simple bench along the edge and add an L-shaped or single corner slat screen behind only the back and exposed side. This visually defines the seating nook while blocking the most intrusive angle.
A bench also reduces the need for multiple freestanding chairs, which helps keep a small deck open.
For a budget-friendly version, use the same standard lumber for the screen and bench-facing detail so everything reads as one project. Leave gaps in the slats and avoid extending the screen much higher than the actual sightline requires.
This is a useful DIY privacy fence for deck concept, but it becomes more involved if the bench or screen attaches structurally to the deck. Structural modifications and tall panels shouldn’t be treated as beginner work automatically.
Add one lightweight planter rather than several heavy containers to keep the corner from feeling overloaded.

18. Use a Movable Planter-and-Screen Pair for Flexible Privacy
For patios where the sightline changes with the furniture arrangement, separate movable elements can be more practical than a fixed fence.
Use one narrow freestanding wood screen together with one tall planter. Position the screen behind the chair or dining spot that needs coverage, and move the planter slightly outward to soften the edge.
This is particularly useful for renters or people who rearrange their outdoor space seasonally. The two pieces create enough visual interruption without requiring a continuous wall.
Paint both elements the same color—soft charcoal, warm brown, or muted green—so the arrangement looks deliberate.
The budget benefit comes from making only the amount of screen needed. It also avoids post holes, fence replacement, and major deck modifications.
Stability is still essential. The screen should have a base designed for outdoor use and shouldn’t be left exposed if high wind is expected. The planter needs enough weight to stay stable but shouldn’t be used as an improvised structural anchor unless the design is specifically made for that purpose.
For patios, flexibility is useful only if the pieces remain easy and safe to reposition.

How to Add Privacy Without Overbuilding the Space
The strongest privacy fence ideas on a budget usually follow one simple framework: identify the sightline + choose the least material that solves it + preserve airflow + use one consistent finish + keep the solution stable.
Before buying lumber or panels, sit where you actually use the deck or patio. Look toward the neighbor’s windows, walkway, elevated deck, or seating area and identify exactly where the unwanted view begins and ends. You may discover that six feet of screening is more useful than thirty feet of new fence.
Then think about light and wind. Slats, lattice, planting, and partial panels can provide privacy without creating a hot, dark wall around a small outdoor area.
Paint and stain also matter. A basic lattice screen, simple boards, or an old fence can look far more intentional when the finish relates to the deck, siding, furniture, or planters nearby.
Finally, respect the difference between decorative screening and structural work. Deck-mounted panels, tall fences, posts, and fence extensions may involve wind loads, property rules, HOA requirements, rental restrictions, or professional evaluation.
Privacy should make the space easier to enjoy—not more enclosed than it needs to be.