
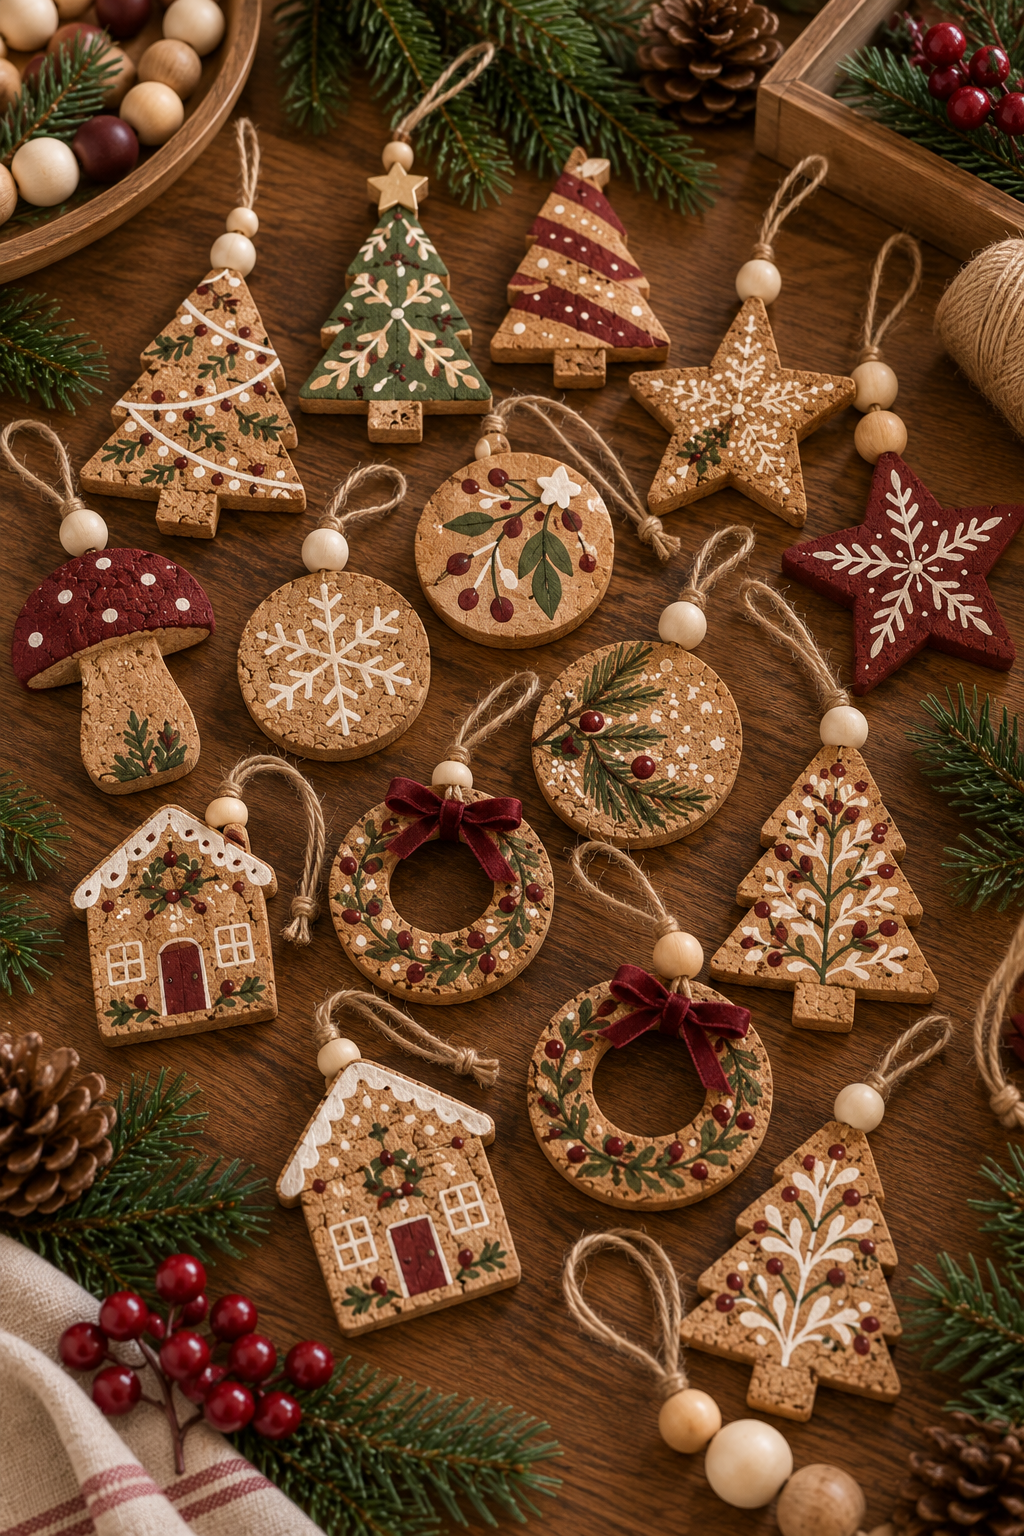
13 Cork Christmas Ornaments Ideas for a Creative Handmade Holiday
Cork might not be the first material you think of when Christmas decorating starts.
Evergreen?
Obviously.
Ornaments?
Of course.
Cork?
Give it a minute.
Its warm brown color and naturally textured surface make it surprisingly good for rustic, Scandinavian, woodland, farmhouse, and handmade Christmas decor.
Even better, cork Christmas ornaments can be lightweight enough for smaller tree branches when they’re designed properly.
You can use purpose-made cork craft sheets, cork shapes, cork discs, and clean natural cork craft pieces.
Paint them.
Cut simple shapes.
Add wooden beads.
Create tiny trees.
Make mushrooms.
Paint snowflakes.
Or leave most of the cork visible and add only a few Christmas details.
That’s usually my favorite approach.
Why use cork and then cover every millimeter of cork?
Seems like the material would have grounds for a complaint.
Before crafting, use materials intended or suitable for craft use. If cutting cork, work on a protected surface with an appropriate tool and technique, and supervise children appropriately. Follow the instructions for paints, adhesives, sealers, and other products.
Also remember that cork, wood, paper, twine, fabric, and dried greenery are combustible materials.
Keep finished ornaments away from open flames and significant heat sources.
Now find that craft box.
Here are 13 Cork Christmas Ornaments Ideas for a Creative Handmade Holiday.
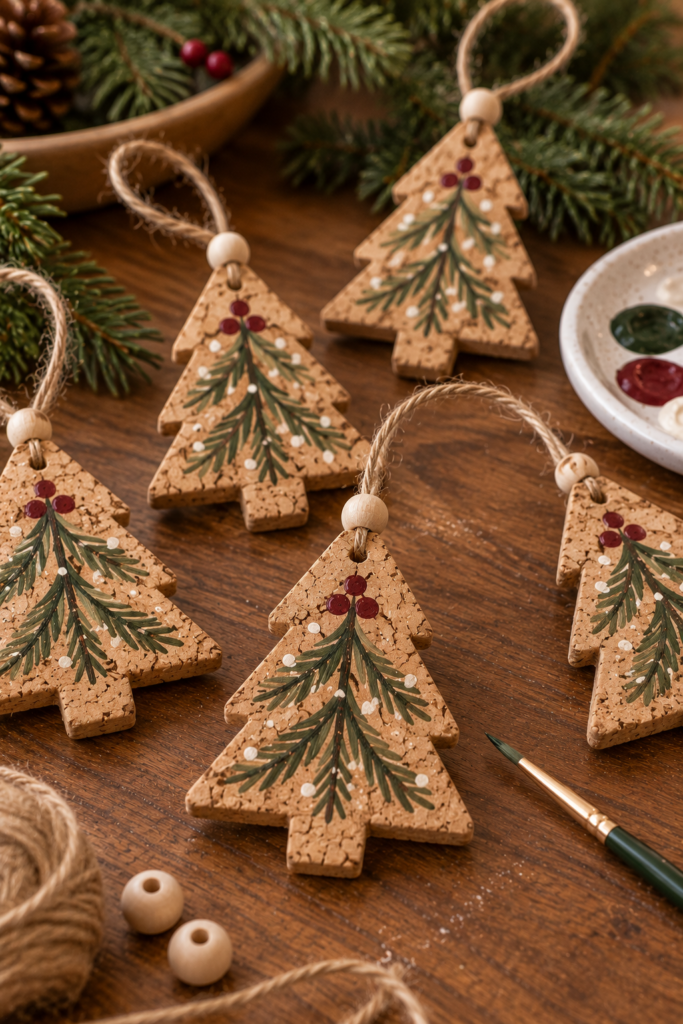
1. Make Simple Cork Christmas Trees
Start with one of the easiest shapes.
A triangle.
Cut a simple Christmas tree from craft cork sheet or use a pre-cut cork tree blank.
Leave most of the natural cork exposed.
Paint a few muted-olive branches across the front.
Add tiny warm-cream dots.
Finish with one deep muted burgundy dot near the top.
Use simple hanging twine or ribbon attached with a method appropriate for the cork thickness and ornament weight.
Make several.
Slight differences between them are a feature.
Not a manufacturing defect.
2. Create Cork Snowflake Ornaments
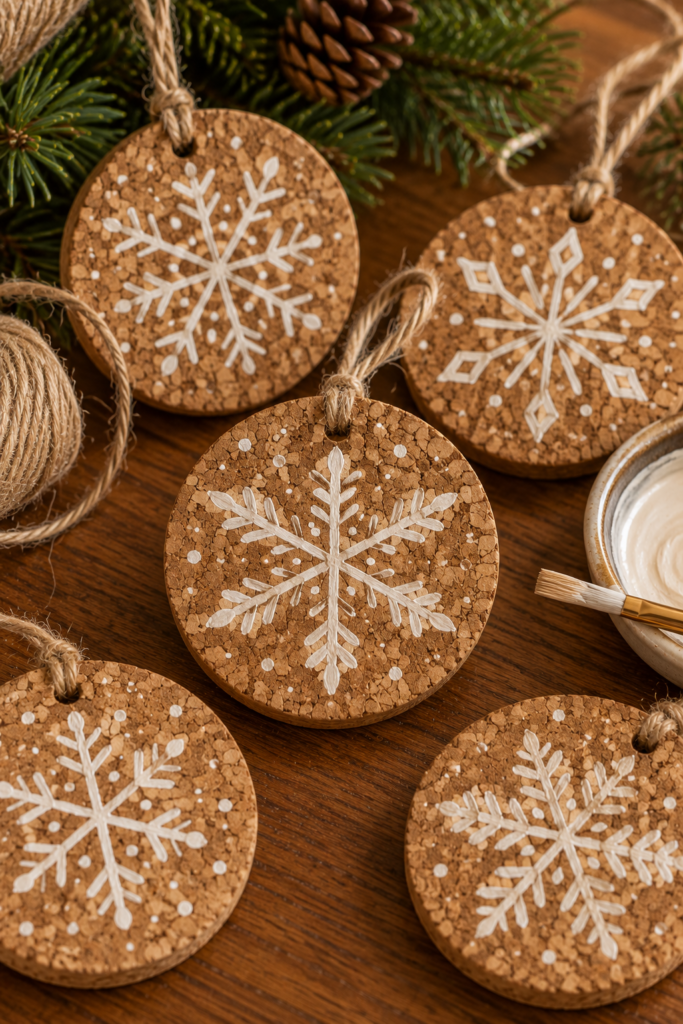
Use round cork discs.
Paint a simple warm-cream snowflake in the center.
Keep the lines slightly irregular.
Add several tiny cream dots around the snowflake.
That’s enough.
The natural cork becomes the background.
For a more coordinated tree, make five or six with different snowflake patterns.
You don’t need mathematical perfection.
Your snowflake isn’t applying for a geometry scholarship.
3. Make Cork Reindeer Ornaments
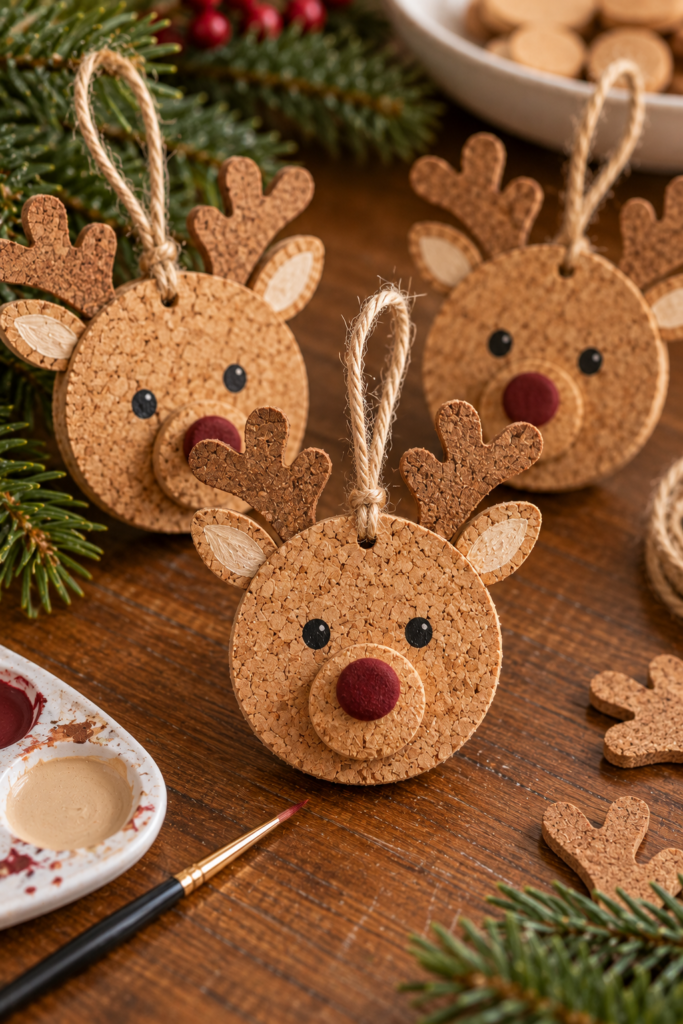
Create a simple reindeer face using a cork shape.
Keep the design flat.
Paint two matte-black eyes.
Add a deep burgundy nose.
Create simple antler shapes using an appropriate lightweight craft material.
Keep everything compact.
Avoid long wire ends or sharp exposed pieces.
For young children’s crafts, use age-appropriate materials and avoid small detachable parts.
The finished reindeer doesn’t need 3D ears, giant antlers, bells, glitter, and a scarf.
It’s already a reindeer.
The concept has landed.
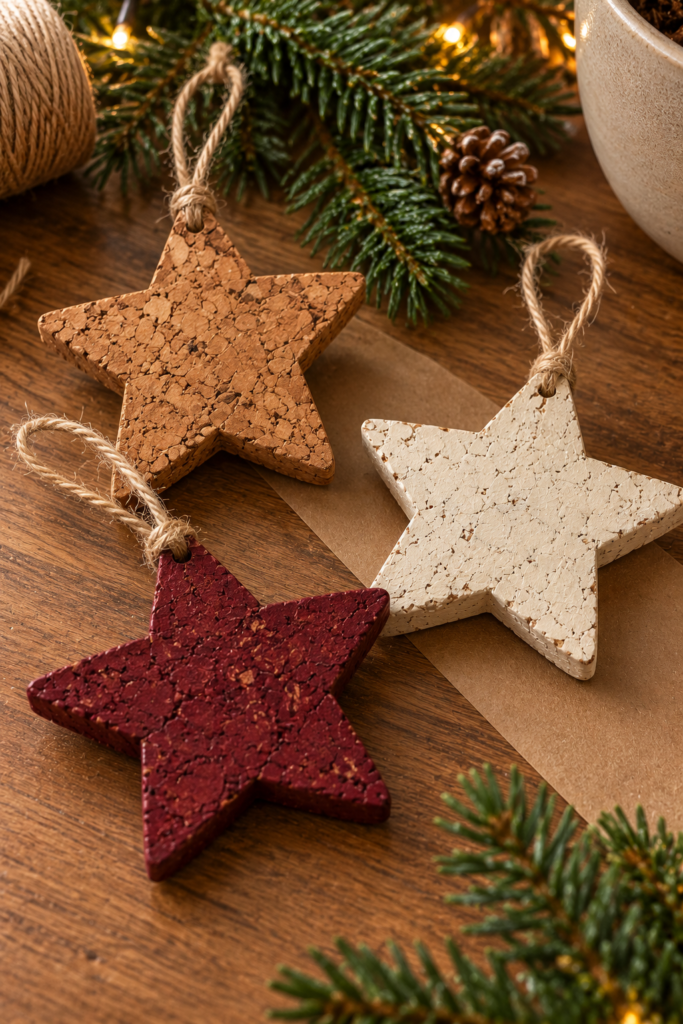
4. Create Cork Star Christmas Ornaments
Cut or use pre-cut cork stars.
Leave one completely natural.
Paint another warm cream.
Paint a third deep burgundy.
For the painted versions, let some texture remain visible where the chosen paint system allows.
Add simple natural twine.
Hang all three near one another on the tree.
The repeated shape keeps the set coordinated even though the finishes are different.
Very efficient.
One template.
Three ornaments.
Minimal emotional damage.
5. Make Cork and Wooden Bead Ornaments
Combine cork with natural wood.
Use a simple cork circle or tree shape.
Attach a short hanging cord.
Add one or two larger wooden beads above the cork piece.
Choose unfinished wood.
Or paint one bead warm cream.
Keep the construction lightweight.
Make sure beads are securely attached.
And remember that small beads and detachable components can present choking hazards for young children.
For adult spaces?
Lovely.
For a toddler-accessible lower tree branch?
Maybe choose the bead-free version.

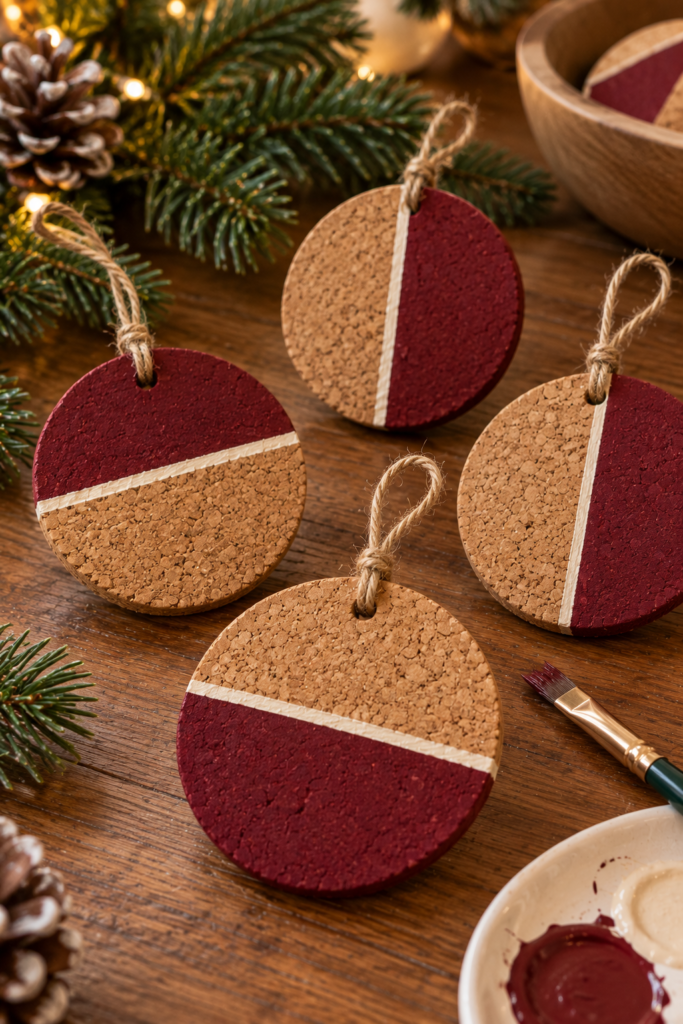
6. Create Painted Burgundy Cork Ornaments
Burgundy works surprisingly well on cork.
Use round cork discs.
Paint only the lower half deep muted burgundy.
Leave the upper half natural.
Add a thin warm-cream line where the two finishes meet.
The result feels modern without hiding the material.
You can also reverse the design on another ornament.
Burgundy top.
Natural cork bottom.
Together, they make a coordinated set.
Look at us.
We’re doing geometry now.
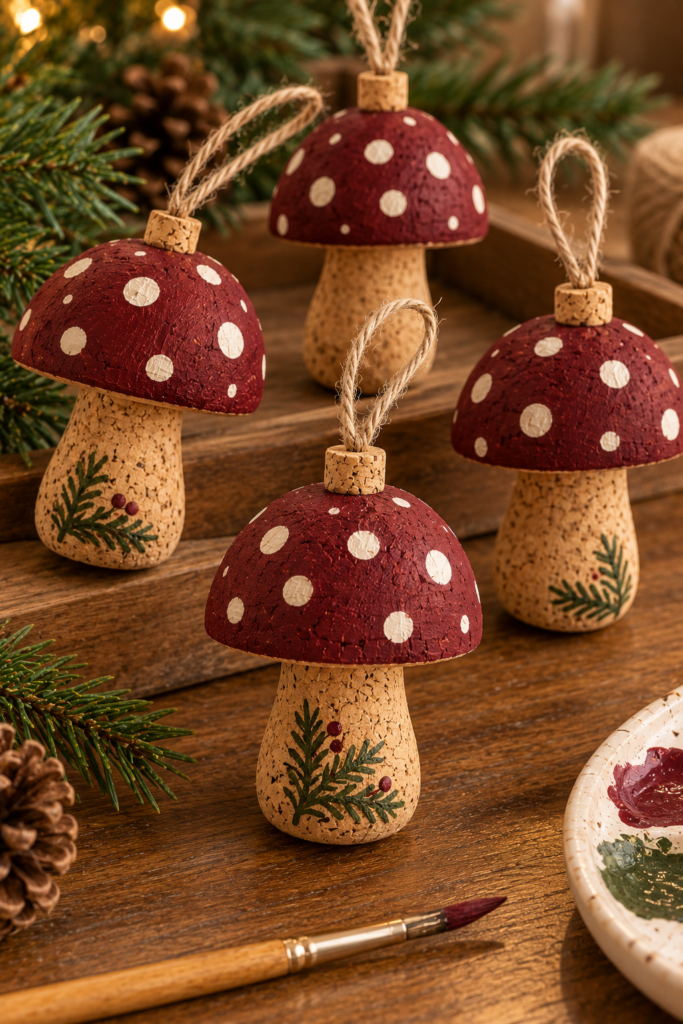
7. Make Cork Mushroom Christmas Ornaments
For a woodland tree, make mushrooms.
Use a simple cork mushroom silhouette.
Leave the stem natural.
Paint the cap deep burgundy.
Add warm-cream dots.
That’s basically the entire project.
You can add one tiny muted-olive evergreen detail near the bottom.
Make several mushrooms in slightly different shapes.
They look especially cute beside pinecones, wood garland, and evergreen.
And yes, mushrooms are invited to Christmas.
We’ve already settled this.
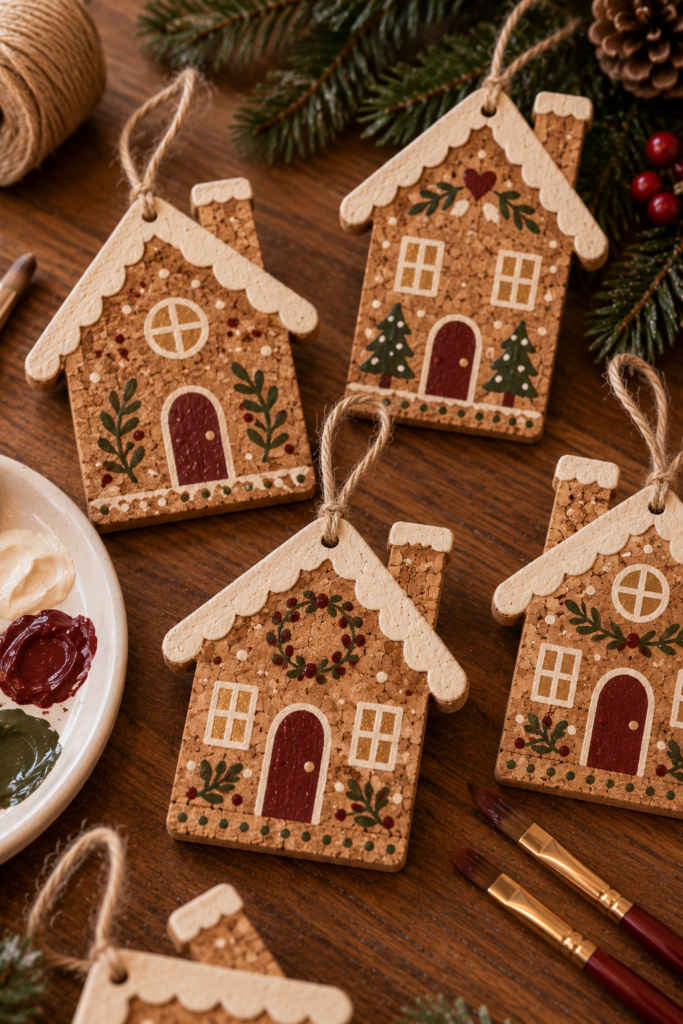
8. Create Cork Gingerbread House Ornaments
Cork already has the right warm-brown color.
Use a simple house-shaped cork blank.
Paint warm-cream scallops along the roof.
Add a burgundy door.
Paint two small cream window shapes.
Add muted-olive dots around the doorway.
Keep the design flat and simple.
No need for faux icing piled half an inch thick.
We’re making ornaments.
Not entering the national gingerbread engineering championship.
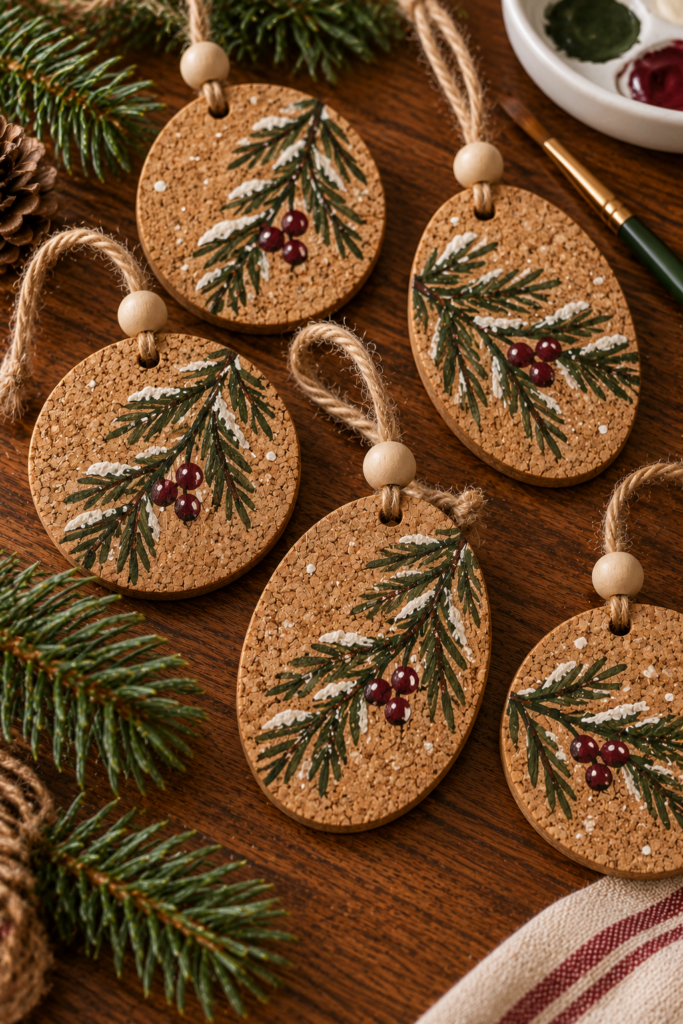
9. Make Cork Evergreen Branch Ornaments
Use round or oval cork blanks.
Paint one simple evergreen branch diagonally across each piece.
Use muted forest green.
Add three burgundy berry-like dots.
Paint a few warm-cream snow marks along the branch.
Leave the majority of the cork unpainted.
This creates a more elegant ornament while keeping the material recognizable.
The design also works beautifully with rustic or botanical Christmas decor.
One branch.
Three berries.
A little snow.
Stop.
You’ve won.
10. Create Cork Bell Ornaments
Cut a simple bell silhouette from craft cork or use pre-cut blanks.
Paint the lower edge warm cream.
Add a thin burgundy stripe above it.
Use a tiny muted-gold painted circle to suggest the clapper rather than attaching a heavy metal piece.
This keeps the ornament flat and lightweight.
Add natural twine for hanging.
You get the bell look.
Without an actual bell ringing every time someone walks past the tree.
Introverts everywhere approve.

11. Make Cork Mini Wreath Ornaments
Use cork rings or carefully prepared ring-shaped craft cork pieces.
Leave the cork natural.
Paint small muted-green leaf marks around the ring.
Add several burgundy berry-like dots.
Finish with a tiny painted or securely attached burgundy fabric bow.
Keep the bow proportional.
You want a miniature wreath.
Not a tiny cork circle being slowly consumed by ribbon.
These look especially good on trees decorated with natural wood and warm cream.

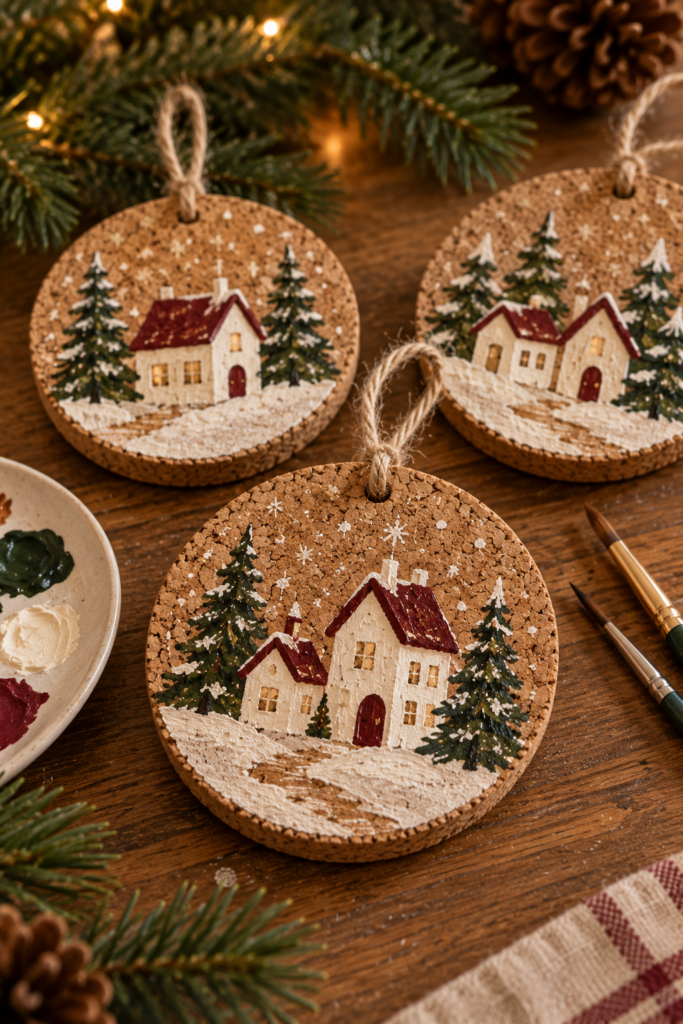
12. Create Cork Snowy Village Ornaments
Use a larger round cork disc.
Paint two tiny warm-cream houses along the bottom.
Add a couple of muted-green evergreen trees.
Paint small cream dots across the upper portion for snow.
Keep the cork visible as the background.
The warm brown gives the little village a cozy look automatically.
No complicated shading required.
And no municipal planning this time.
The houses can simply exist peacefully.
Lucky them.
13. Build a Coordinated Cork Ornament Collection
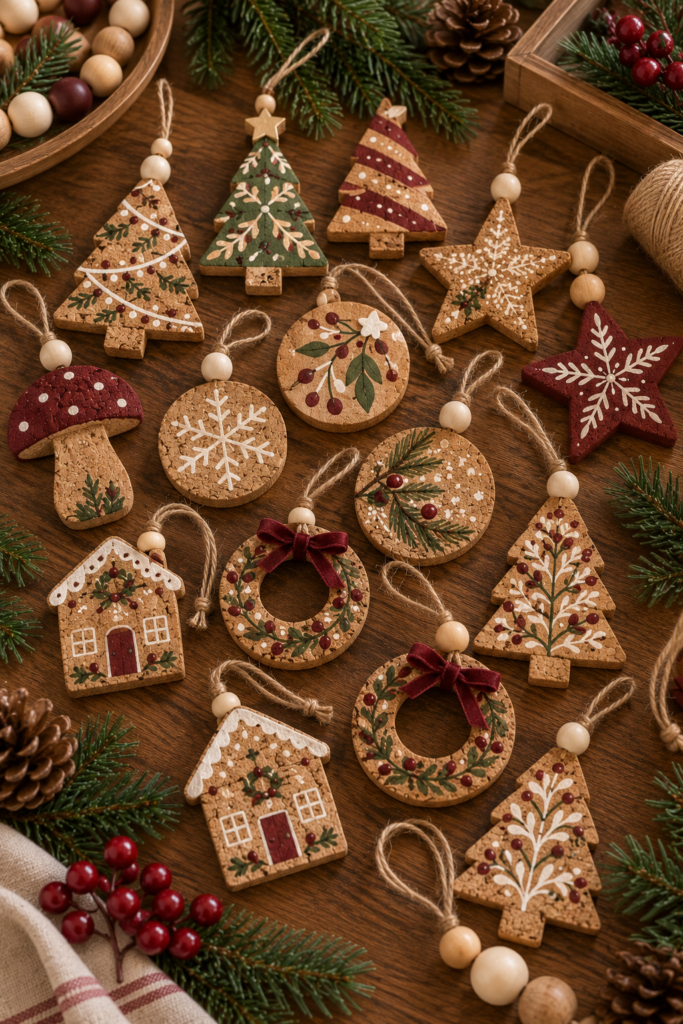
Why choose one design?
Make a full set.
Use the same palette across every ornament:
Natural cork.
Warm cream.
Muted olive.
Deep burgundy.
Warm brown.
A tiny amount of muted gold.
Create:
Trees.
Stars.
Snowflakes.
Mushrooms.
Gingerbread houses.
Botanical discs.
Mini wreaths.
Because the colors repeat, the collection looks coordinated.
Hang them across the tree with natural wood beads, pinecones, and warm-cream ribbon.
The result feels handmade without looking random.
That’s the sweet spot.
Crafty.
Not “the supply drawer exploded.”
What Kind of Cork Can You Use for Christmas Ornaments?
Purpose-made craft cork is usually the easiest option.
Depending on the project, you might use:
- Cork craft sheets
- Pre-cut cork shapes
- Cork discs
- Cork rings
- Clean natural cork craft pieces
- Cork blanks specifically sold for crafting
The thickness matters.
Very thin cork may tear.
Very thick cork can become harder to cut neatly.
Choose the material based on the ornament design and the tools you’re comfortable using.
For detailed silhouettes, pre-cut blanks can make life considerably easier.
There is no Christmas prize for fighting a cork sheet with scissors for 45 minutes.
Easy Cork Christmas Ornaments Ideas
Start with shapes that require minimal cutting.
Use circles.
Stars.
Triangles.
Pre-cut trees.
Then add one painted motif.
Try:
Cream snowflake.
Olive evergreen branch.
Burgundy stripes.
Tiny stars.
Simple dots.
The natural cork becomes most of the design.
This is why cork ornaments can be so beginner-friendly.
You’re starting with texture and color already built in.
Cork Christmas Ornaments Ideas for Beginners
Try a cork disc first.
Paint a snowflake.
Or a tree.
Or half of the disc burgundy.
Add hanging twine.
Done.
Once you’re comfortable, move to shaped ornaments such as trees, stars, houses, or mushrooms.
Don’t begin with a detailed cork reindeer containing individually sculpted antlers and a functional sleigh.
We’re pacing ourselves.
Cork Christmas Tree Ornaments
A triangle is enough.
Leave the cork natural.
Add:
Olive branches.
Cream snow.
Burgundy dots.
Or muted-gold stars.
You could also paint the entire tree warm cream and leave the edges natural.
Make several sizes for variety.
Just keep ornaments lightweight enough for the branches where you plan to hang them.
Cork Snowflake Christmas Ornaments
Round cork discs are perfect for snowflakes.
Use warm-cream paint.
Create one large snowflake in the center.
Add tiny snow dots.
For a different look, paint the disc burgundy first and add a cream snowflake once the base has dried according to the product directions.
Create several different snowflake patterns.
They don’t need to match.
In fact, that’s rather the point.
Cork Reindeer Christmas Ornaments
Keep the construction simple.
Use flat cork.
Paint the facial details.
Choose lightweight antler components if you’re adding them.
Secure everything appropriately.
Avoid sharp wire ends.
For young children, use larger pieces and age-appropriate materials, and avoid detachable small components.
A painted antler can be an even simpler alternative.
Cork Star Christmas Ornaments
Stars are one of the easiest ways to showcase natural cork.
Leave them plain.
Paint them cream.
Color-block them burgundy.
Add olive dots.
Or paint one small evergreen branch across the center.
Use the same shape in several finishes.
That gives your tree repetition without making every ornament identical.
Cork Mushroom Christmas Ornaments
Use natural cork for the stem.
Paint the cap burgundy.
Add cream dots.
Simple.
You can also make an olive mushroom with cream spots for variety.
Combine these ornaments with pinecones, wooden beads, and evergreen for a woodland Christmas theme.
Cork Gingerbread Christmas Ornaments
Cork is basically doing half the work for you here.
Its warm-brown color already resembles gingerbread.
Paint warm-cream decorative lines.
Add burgundy doors.
Use olive accents.
Try houses, gingerbread people, or simple stars.
Keep decorative details flat.
This keeps the ornament lightweight and easier to store.
Cork Christmas Ornaments With Paint
Cork is porous, so paint behavior can differ from smoother materials.
Use craft products appropriate for cork or porous craft surfaces.
Test when needed.
The texture may remain visible through the coating.
That’s usually a good thing.
Use thin controlled layers rather than trying to completely bury the cork beneath heavy paint.
Let each layer dry according to product instructions.
Handpainted Cork Christmas Ornaments
Handpainting is particularly effective on cork because perfect lines aren’t necessary.
Try:
Evergreen branches.
Snowflakes.
Stars.
Berries.
Mushrooms.
Simple houses.
Botanical patterns.
Use a small brush.
But let the cork texture influence the line.
A slightly broken brushstroke can actually make the ornament feel more rustic.
Burgundy Cork Christmas Ornaments
Burgundy and cork are a great combination.
The dark red contrasts beautifully with warm brown.
Use burgundy for:
Mushroom caps.
Berries.
Doors.
Stripes.
Stars.
Color-blocking.
Tiny bows.
Pair it with warm cream and muted olive.
That’s enough color for a complete collection.
Neutral Cork Christmas Ornaments
Leave most of the cork exposed.
Use:
Warm cream.
Mushroom.
Natural wood.
Muted olive.
A little muted gold.
Skip bright colors.
Try cream snowflakes, olive branches, or natural wooden beads.
Neutral cork ornaments look especially good on trees with warm-white lights and simple cream ribbon.
Rustic Cork Christmas Ornaments
Cork already has rustic texture.
Don’t fight it.
Combine it with:
Natural twine.
Wood beads.
Pinecones.
Evergreen.
Warm cream.
Burgundy.
Keep finishes matte.
Avoid covering everything in glitter.
The cork is already providing visual interest.
Let the material do some work.
It has earned this.
Scandinavian Cork Christmas Ornaments
Use simple geometric shapes.
Trees.
Stars.
Circles.
Keep most surfaces natural.
Add warm cream, muted olive, or matte black in small amounts.
Use straightforward hanging loops.
Avoid excessive embellishment.
One cork star with one cream stripe can be enough.
Minimalism occasionally makes Christmas crafting much faster.
A useful side effect.
Farmhouse Cork Christmas Ornaments
Combine cork with warm cream and natural wood.
Try:
Tree shapes.
Stars.
Mini wreaths.
Simple snowflakes.
Use natural twine.
Add burgundy sparingly.
Avoid oversized bows.
The texture of cork works naturally with rustic and farmhouse Christmas trees.
Cork Christmas Ornaments With Wooden Beads
Add one or two beads to the hanging loop.
Keep them proportional.
Use larger craft beads rather than lots of tiny pieces.
Try unfinished wood.
Warm cream.
Muted olive.
Make sure everything is securely attached.
If small components could be accessible to young children or pets, choose a simpler bead-free ornament or position it securely out of reach.
Cork Christmas Ornaments With Greenery
Small artificial evergreen accents can work on larger cork ornaments.
Use only a tiny amount.
Secure the greenery properly.
Don’t make the ornament excessively heavy or bulky.
For smaller pieces, simply paint greenery onto the cork.
This gives you the look without additional components.
It’s also easier to store.
Future-you appreciates flat decorations.
How to Make Cork Christmas Ornaments
Start with your cork material.
Choose the ornament shape.
Create a template if needed.
Mark the shape lightly.
Cut using an appropriate method for the cork type and thickness.
Smooth or tidy the edges if the material and project require it.
Paint the design.
Allow the paint to dry or cure.
Add additional components.
Attach the hanging loop securely.
Let adhesives cure fully according to their instructions.
Then test the ornament before placing it on the tree.
Hold it by the hanging loop.
Give it a gentle inspection.
If anything looks loose, fix it now.
The Christmas tree is not where we conduct final structural testing.
How to Cut Cork for Christmas Ornaments
The correct cutting method depends on cork thickness and product type.
Thin craft cork may work with sturdy scissors.
Other cork products may require an appropriate craft-cutting tool and protected cutting surface.
Follow the cork manufacturer’s recommendations when available.
Use sharp tools carefully.
Cut away from your body.
Protect the table.
Supervise children appropriately.
If you want complicated shapes but aren’t comfortable cutting them, buy pre-cut cork blanks.
There is absolutely no shame in outsourcing the star shape.
How to Paint Cork Christmas Ornaments
Remove loose dust first.
Follow the paint manufacturer’s preparation instructions.
Use thin layers.
Let the cork texture remain visible if that’s part of the design.
Allow adequate drying time.
Add details only after the base is ready.
If you want a protective finish, use a product compatible with both the cork and paint.
Test first when appropriate.
Some coatings can alter the appearance of natural cork.
How to Attach Hanging Loops to Cork Ornaments
The method depends on the cork thickness, ornament construction, and weight.
Some pre-made blanks already include hanging holes.
For others, use a craft attachment method appropriate for the material.
The connection needs to support the finished ornament without tearing through the cork.
Avoid overly heavy embellishments.
Keep loops short enough that the ornament hangs predictably.
And test the finished attachment before decorating the tree.
How to Make Cork Ornaments Look Expensive
Use fewer colors.
Try:
Natural cork.
Warm cream.
Deep burgundy.
Muted olive.
Muted gold.
Keep the painting restrained.
Use consistent hanging materials.
Create a coordinated set.
Leave the cork texture visible.
And avoid piling on unnecessary embellishments.
Natural materials tend to look best when you can still identify the natural material.
A cork ornament covered in six layers of glitter has somewhat missed the opportunity.
How to Display Cork Christmas Ornaments
Hang them on the tree.
Use them on an ornament garland.
Attach one to gift wrapping.
Display several from a secure decorative branch.
Place larger flat pieces in a Christmas bowl.
Create a small woodland display with cork ornaments, pinecones, and wooden trees.
Keep them away from open flames and significant heat sources.
Cork is combustible.
The fact that it looks adorable as a mushroom does not change its material properties.
Cork Christmas Ornament Safety
Use cork products suitable for crafting.
Choose tools appropriate for the material.
Protect your cutting surface.
Use cutting tools carefully and supervise children appropriately.
Follow instructions for paints, adhesives, primers, markers, and sealers.
Use adequate ventilation where required.
Allow adhesives and coatings to dry or cure fully.
Keep small beads and detachable pieces away from young children.
Avoid sharp exposed wires or fasteners.
Check hanging loops and glued components before display.
Keep cork, twine, wood, fabric, paper, dried botanicals, and similar combustible materials away from open flames, fireplaces, heaters, hot fixtures, and other significant heat sources.
If you use lights on the tree, follow the light manufacturer’s instructions and keep damaged electrical products out of service.
Don’t place overly heavy cork ornaments on weak branches.
And if pets are enthusiastic ornament collectors, keep lightweight handmade pieces higher on the tree or otherwise inaccessible as appropriate.
Cork ornaments should be rustic.
Not chew toys.
How to Store Cork Christmas Ornaments
Make sure everything is clean and dry.
Remove loose natural greenery if it isn’t intended for storage.
Store ornaments flat or in divided compartments.
Don’t place heavy decorations on top of thin cork pieces.
Protect painted surfaces from rubbing.
Keep cork somewhere dry.
Avoid crushing dimensional additions.
Store small sets together.
And label the container.
A shallow box works particularly well because many cork ornaments are flat.
Which means, for once, Christmas decorations may actually cooperate with storage.
Enjoy this rare event.
Final Thoughts
The best Cork Christmas Ornaments Ideas for a Creative Handmade Holiday let the natural material remain part of the design.
Make simple Christmas trees.
Paint snowflakes.
Create reindeer.
Cut cork stars.
Add wooden beads.
Try burgundy color-blocking.
Make woodland mushrooms.
Create gingerbread houses.
Paint evergreen branches.
Make bells.
Create miniature wreaths.
Paint snowy villages.
Or build a coordinated collection using all your favorite designs.
Stick with a simple palette of natural cork, warm cream, muted olive, deep burgundy, and a little muted gold.
Keep the ornaments lightweight.
Secure the hanging loops.
Use craft materials properly.
And don’t worry about achieving factory-perfect edges or brushstrokes.
They’re handmade.
If one cork Christmas tree leans slightly to the left, that’s not a mistake.
That’s personality.
And unlike the actual Christmas tree, you can fix it without crawling underneath and adjusting the stand.
