

15 Half Garage Half Gym Ideas That Keep Your Workout Space and Storage Working Together
A garage gym sounds simple until you remember that most garages still need to behave like garages.
The car needs somewhere to park. Bikes have to live somewhere. There are tools, holiday decorations, lawn equipment, paint cans, DIY supplies, and those storage bins nobody has opened since moving house. In some homes, the garage also contains a workbench or laundry appliances.
Trying to eliminate all of that for the sake of a home gym isn’t realistic for most households.
A better approach is often a half garage half gym: protect a defined area for exercise while organizing everything else so it doesn’t gradually migrate back onto your workout floor.
That means thinking about clearance before equipment, storage before decoration, and how the garage works on an ordinary Tuesday—not just how it looks immediately after a makeover.
These 15 garage gym ideas cover single garages, double garages, workshops, car-and-gym combinations, narrow spaces, and flexible setups that can grow gradually.
1. Turn One Side of a Single Garage Into a Narrow Workout Zone
A single garage doesn’t automatically rule out a useful gym. The trick is resisting the urge to spread exercise equipment across the entire floor.
Instead, create a narrow training strip along one wall.
This arrangement works particularly well for dumbbell workouts, kettlebells, resistance bands, mobility work, and a compact adjustable bench. It also borrows a useful principle from storage container gyms: equipment stays around the perimeter while the middle remains available for movement.
Start by measuring the garage with the car parked inside if you still use it for parking. Measure the actual vehicle too. Generic garage dimensions aren’t particularly useful when your own car doors, mirrors, shelving, and garage-door tracks determine what fits.
Try opening the driver’s and passenger doors. Walk around the car. Mark the area that genuinely remains available.
A workout strip around 6–8 feet (1.8–2.4 m) long gives you considerably more exercise options than a collection of equipment scattered into smaller gaps, though your required length depends on your height and workouts.
Use rubber tiles or a roll of rubber flooring to visually establish the gym boundary. Check the concrete for moisture before covering large areas, and remember that garage floors often slope toward the door.
Keep dumbbells against the wall rather than leaving them along the edge of the mat. A shallow wall rack for bands, collars, and accessories keeps the training strip clear.
If the garage is very tight, skip the giant power rack. Adjustable dumbbells, a bench, bands, and a kettlebell can support an enormous variety of workouts while occupying a fraction of the space.

2. Dedicate One Bay of a Two-Car Garage to a Complete Gym
A two-car garage gives you one of the cleanest ways to create a shared space: use one bay for parking and dedicate the other to exercise.
This is often more practical than dividing the garage front-to-back because each activity gets a long, uninterrupted rectangle.
A full bay can accommodate more substantial equipment—a rack, bench, dumbbells, and possibly a cardio machine—without requiring the whole garage to become a gym.
But don’t assume the painted line down the center of the floor is automatically the correct boundary.
Park the vehicle first. Open its doors fully enough for normal use and determine how much space people actually need to enter and unload it. If the gym’s weight plates or bench extend into that clearance, the layout isn’t working.
Garage-door tracks matter too. A tall rack placed beneath door hardware can interfere with operation or simply not fit vertically. Measure ceiling height and door position before ordering tall equipment.
For flooring, covering the gym bay with rubber creates an obvious visual division while leaving the parking side as concrete. Use a neat transition so the rubber edge doesn’t curl or become a trip point.
Storage can sit along the gym’s outer wall, but keep it shallow enough that it doesn’t shrink your training area unnecessarily.
This arrangement can become a substantial garage makeover gym without sacrificing the garage’s original purpose.

3. Keep the Front Half for Garage Storage and the Back Half for Training
Not every garage divides neatly from side to side.
A front-to-back arrangement can work better when you don’t regularly park inside or when the garage’s side walls are already occupied by doors, utility equipment, or fixed storage.
In this layout, everyday garage functions remain closer to the main garage door while the gym occupies the quieter rear section.
The biggest advantage is psychological as much as practical: once you walk past the storage zone, you’re entering a distinct workout area.
The disadvantage is access.
Don’t build a beautiful gym at the back and then create an obstacle course of bicycles, lawn equipment, and storage bins in front of it. Maintain a continuous walking route from the garage entrance to the workout zone.
Frequently used items should stay accessible. Seasonal decorations can go higher or farther away, while the lawn mower shouldn’t require you to roll a bench out of the way every weekend.
Rubber flooring across the back section clearly identifies the training footprint. If you use a barbell, allow room around the bar rather than calculating only the rack dimensions.
A standard Olympic barbell is about 7 feet (2.13 m) long, so a rack squeezed between shelving with almost no side clearance can become irritating very quickly.
For a simpler setup, adjustable dumbbells and a bench dramatically reduce the required width.

4. Build the Gym Around a Folding Wall-Mounted Rack
A folding rack can be extremely useful in a shared garage, but it’s worth understanding what “folding” actually solves.
It reduces the rack’s projection from the wall. It doesn’t magically make everything else disappear.
The bench, barbell, weight plates, safety equipment, and accessories still need permanent storage. And some folding racks remain several inches deep when closed.
Before buying one, mark both its open and folded dimensions on the floor and wall. Then park the car, open the doors, and operate the garage door.
If something conflicts, find out now rather than after drilling into the wall.
A folding rack works best when everything associated with it has a designated storage position. A vertical bar holder can get the barbell off the floor, while wall-mounted plate storage keeps plates from spreading across the training area.
The bench is often the awkward piece. A compact bench that can be stored upright according to its manufacturer’s instructions can free substantial floor space.
Wall-mounted racks also need appropriate structural attachment. This isn’t an area to improvise with unsuitable fasteners. Follow the rack manufacturer’s installation requirements and use qualified help if you’re uncertain about the wall structure.
Done properly, the whole strength-training setup can occupy one concentrated wall instead of permanently consuming half the garage.

5. Create a Garage Gym and Workshop With Clearly Separated Zones
A garage gym and workshop can coexist, but this is one situation where visual organization isn’t enough.
The two areas need practical separation.
Sawdust, sharp metal offcuts, screws, oils, cords, and loose hardware have no place on a workout floor where you may be lying down, kneeling, or handling weights.
Put the workshop at one end or along one clearly defined wall and give it its own storage. Tools belong on pegboard, wall tracks, drawers, or closed cabinets rather than migrating toward the gym.
Before exercising, clean workshop debris from the shared floor. If a woodworking session has filled the garage with dust, deal with that before rolling out a yoga mat.
I’d also avoid positioning the gym immediately beside a stationary saw or other workshop machinery. Creating a little physical distance is far more important than making both areas share the same color scheme.
A narrow tool cabinet or shelving unit can help create a visual boundary without building a wall. Just preserve an unobstructed route between the garage entrance and both working zones.
The gym itself can stay relatively simple: rubber floor, bench, dumbbells, and wall storage. You don’t need a huge equipment collection in a room already doing two jobs.

6. Use Vertical Storage to Keep Household Clutter Out of the Gym
“Use vertical storage” is common garage advice, but it only helps if the wall storage is planned around what you actually own.
Start with frequency of use.
Items you grab weekly—bike helmets, gardening tools, extension cords, reusable shopping bags—shouldn’t be buried behind seasonal bins. Give them reachable hooks, wall tracks, pegboard, or shelves.
Items you use a few times a year can go higher.
The goal is to create a firm edge around the workout zone. If every household item has a wall position, there’s less temptation to put something “temporarily” on the rubber floor.
Shallow shelves can be particularly useful in narrow garages because they store bins without projecting as far into the room as deep utility shelving.
Closed stock cabinets are worth considering for messy collections of small objects. A wall of open shelving can technically be organized and still look chaotic.
Gym accessories need their own vertical storage too. Bands, jump ropes, foam rollers, and yoga mats can occupy a small wall section rather than a large floor basket.
Keep heavy items at sensible heights. Vertical organization doesn’t mean placing a dangerously heavy box above someone’s head simply because the ceiling is available.

7. Move Seasonal Storage Up and Away From the Training Zone
Seasonal storage is frustrating because it consumes a lot of space while being used very infrequently.
Holiday decorations, camping equipment, empty luggage, and off-season outdoor gear don’t need prime waist-height shelving.
Where the garage structure and storage system are appropriate, less frequently used lightweight items can move to higher shelves or properly installed overhead systems.
The key word is appropriate.
Heavy toolboxes, weights, liquids, and awkward objects shouldn’t be placed overhead simply to reclaim floor space. Follow the storage system’s load limits and installation requirements, and get professional help where structural attachment is uncertain.
Keep anything that needs frequent access lower.
A good arrangement might have lightweight holiday decorations in clearly labeled upper bins, household supplies at chest height, and heavy items close to the floor.
The gym then gets a protected lower footprint rather than competing with a tower of plastic tubs.
Don’t forget garage-door movement. Overhead racks need to remain clear of door panels, tracks, openers, and other equipment.
You should also be able to access stored items safely. A storage solution isn’t particularly clever if retrieving one box requires balancing on gym equipment.

8. Create a Compact Dumbbell Gym Without a Full Power Rack
A lot of homeowners buy a power rack because that’s what a “real” garage gym seems supposed to contain.
You may not need one.
For general strength training, adjustable dumbbells and a good adjustable bench can create an extremely capable gym in a small footprint. Add one or two kettlebells and resistance bands, and the number of available exercises grows quickly.
This setup is particularly good for small garage room ideas where the room must still store household items.
The bench needs enough open floor around it to change position and perform exercises comfortably. Rather than filling every remaining inch with equipment, preserve a clear rectangle for movement.
Adjustable dumbbells are especially valuable because one pair can replace a long rack of fixed weights. If you prefer traditional dumbbells, a compact vertical stand can reduce the footprint.
Store the bench against the wall when appropriate for the specific model, and give accessories a shallow wall rack.
For flooring, rubber tiles or an equipment mat may be enough if you aren’t dropping heavy weights.
This is also an easy gym to build gradually. Start with dumbbells and a mat. Add the bench later. Then add a kettlebell or bands as your training requires them.
Buying fewer versatile pieces often produces a much more usable shared garage.

9. Use Movable Equipment When the Car Still Needs the Floor
Sometimes the only realistic workout space is the same rectangle where the car parks.
That doesn’t mean you need to give up on a garage gym. It means your equipment has to pack away predictably.
The important word there is predictably.
If preparing for every workout involves carrying twelve pieces of equipment into the driveway, you’ll probably stop using the setup.
A better flexible gym might consist of adjustable dumbbells, a foldable or compact bench, kettlebell, mat, and a small rolling equipment cart that all return to one wall.
Mark the storage footprint and keep it permanently clear.
Once the car is moved outside, you should be able to create the workout area in a few minutes. Afterward, everything goes back to the same location before the vehicle returns.
Avoid heavy items on unstable rolling carts. Wheels are useful for lighter accessories, but weights need storage designed for their load.
Also look upward before exercising. Moving the car doesn’t change the location of garage-door tracks, openers, or low lighting.
For jumping and overhead movements, check vertical clearance as carefully as floor area.

10. Build a Wall-Mounted Resistance-Training Station
If floor space is extremely limited, shift more of the workout onto the wall.
Resistance bands, cable-style wall equipment designed for appropriate installation, and suspension trainers can support useful strength workouts without requiring a large freestanding rack.
The wall still needs to be suitable for the equipment.
Don’t assume any hook screwed into drywall can support bodyweight exercise. Follow the manufacturer’s structural mounting requirements for anything that will carry significant load.
For lighter resistance bands, a purpose-designed anchor system can keep different attachment heights organized.
Add a narrow shelf or cabinet for handles, bands, and smaller accessories. A vertical mat holder keeps yoga mats and foam rollers from falling across the floor.
This setup pairs well with a compact bench or simply an open rubber exercise area.
It’s particularly useful in a garage where lawn equipment or storage already occupies most of the other walls.
And visually, it can be very clean. One organized equipment panel usually looks better than five separate pieces of exercise equipment leaning against the wall.

11. Store Bicycles Without Sacrificing the Workout Floor
Bikes are one of the biggest enemies of a small garage gym because they consume an awkward amount of floor space.
If they’re simply leaned against the wall, handlebars and pedals project into the room. Worse, you often have to move one bike to reach another.
Wall-mounted bike storage can reclaim significant floor area, but choose the arrangement based on how often the bikes are used.
A frequently used commuter bike should be easy to remove. Hanging it somewhere that requires a ladder every morning defeats the purpose.
Vertical wheel-holding racks can fit several bikes into a relatively short wall, though you need enough room to maneuver each bicycle in and out.
Horizontal racks can work well above lower storage where wall width is available.
Don’t position bikes directly above your bench or primary lifting position. Even properly installed storage is better kept outside the immediate training footprint.
For family garages, consider giving helmets and pumps hooks beside the bikes. That stops accessories migrating into the gym.
Once the bikes have a defined wall zone, the workout floor can finally remain a workout floor.

12. Make the Shared Garage Look Organized Without Hiding Everything
A shared garage doesn’t need to resemble a finished interior room.
It’s still a garage.
Concrete, door tracks, utility cabinets, exposed outlets, and storage bins are completely normal. Instead of hiding all of them, aim for visual consistency in the things you can easily control.
Paint is one of the cheapest improvements. Warm-white walls can make a dark garage feel cleaner, while a charcoal gym wall creates an obvious exercise zone.
Repeat a few simple materials: black wall hooks, plywood shelving, matching bin styles, and clean rubber flooring.
One large mirror can be useful for checking exercise form and can visually open a smaller garage, but place and secure it appropriately. Don’t put it where a car door, bicycle, or rolling equipment can easily hit it.
Lighting is another worthwhile upgrade. Bright, even illumination is much more useful than trying to create a moody commercial-gym atmosphere in a room where you’re also looking for screws and unloading groceries.
A freestanding fan is an inexpensive addition for warm garages and can be moved away when not needed.
The goal isn’t to disguise the garage. It’s to make every zone look intentional.

13. Create a Compact Cardio and Mobility Garage Gym
Not every garage gym needs to revolve around weights.
If your routine is mostly cardio, stretching, yoga, mobility work, or bodyweight training, preserve open floor instead of filling it with strength equipment you rarely use.
Choose one cardio machine that matches how you actually train. A compact exercise bike takes up relatively little room. Some treadmills fold, although their folded dimensions still need to be accounted for.
Place the machine near an outlet if required so cords don’t cross the walking path.
Then protect an open mat area beside it.
For yoga and mobility, the floor doesn’t necessarily need the thick rubber required for heavy lifting. An exercise mat over a clean, suitable surface may be enough, while equipment mats can protect the floor beneath cardio machines.
Wall storage works well for yoga mats, blocks, bands, and foam rollers.
A freestanding fan can improve comfort without requiring permanent electrical work.
This is one of the easiest half garage gym ideas to combine with household storage because most of the exercise zone can remain visually open.

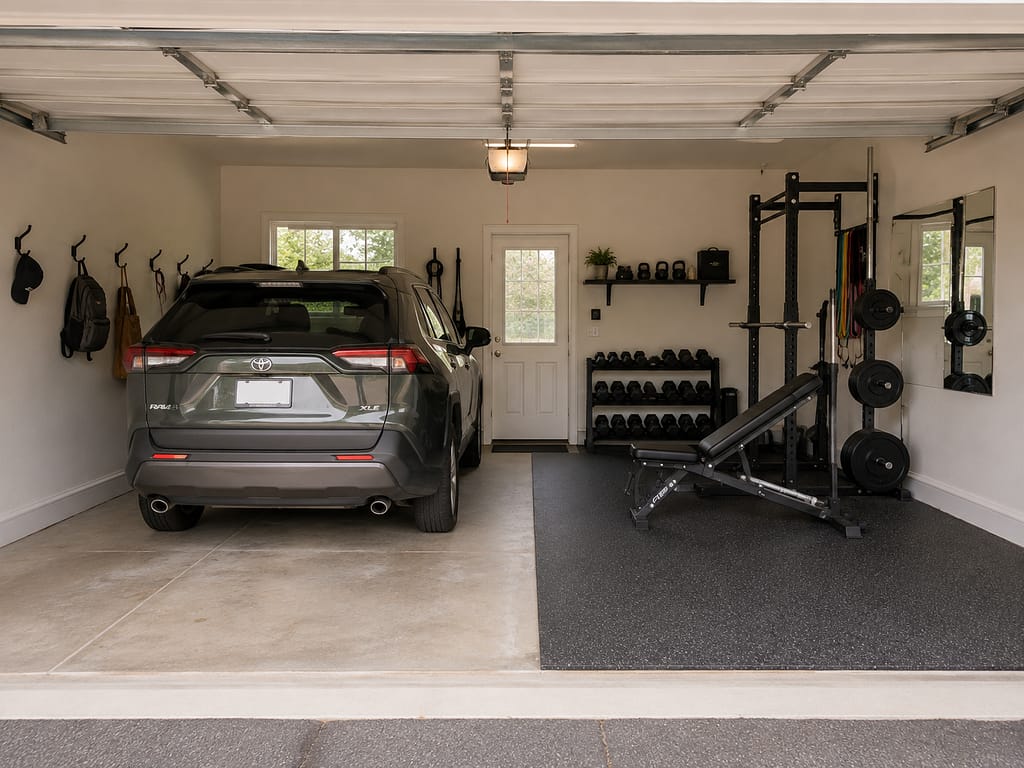
14. Design a Double Garage With One Gym Bay and One True Parking Bay
A double garage gym works best when the parking side is treated as a real parking bay rather than whatever floor area happens to remain after installing the gym.
Map the vehicle first.
Mark its width and length, then open the doors and hatch or trunk as you normally would. Include the route from the car to the house.
Only then should you define the gym bay.
On the gym side, keep equipment oriented away from the vehicle where possible. A rack against the outer wall is generally easier to manage than one positioned near the centerline.
Store plates and barbells on that same outer wall so hard, heavy objects aren’t protruding toward the car.
A mirror belongs on the gym wall, not somewhere a vehicle door can strike it.
You can make the division visually clear with flooring: concrete on the parking side, rubber on the gym side.
For a polished but affordable finish, repeat one or two details across the room—perhaps warm-white walls and matching black hooks—without forcing the storage and gym areas to look identical.
This is one of the most practical 2 car garage gym ideas because neither side needs to be dismantled for the other to function.
15. Create a Flexible Gym That Expands for Workouts and Packs Back Into One Zone
The most practical shared garage may not have a permanently empty workout floor at all.
Instead, give the equipment a permanent storage footprint and let the training area expand temporarily.
This works particularly well for kettlebell workouts, adjustable dumbbells, resistance bands, mobility sessions, and circuit training.
Start by designating perhaps one 3–4-foot-wide (91–122 cm) section of wall for gym storage. The exact width depends on your equipment.
Everything should fit there when the workout is finished.
A narrow rack can hold weights. Mats can stand vertically. Bands hang from hooks. A compact bench can return to a dedicated position. If you use movable flooring, store the pieces so they don’t curl or become difficult to handle.
Then keep the adjacent floor free enough that the gym can expand into it when needed.
The test is how long setup takes.
If you’re reorganizing half the garage for twenty minutes before every workout, simplify the equipment collection.
This approach is also excellent for someone starting on a modest budget. Begin with a mat, used dumbbells or adjustable dumbbells, bands, and perhaps a secondhand bench. Improve lighting, add rubber flooring, or upgrade storage later.
A garage gym doesn’t become more useful simply because it contains more equipment.
Protecting a predictable area where you can actually move is usually far more important.

A Shared Garage Works Best When the Workout Area Stays Protected
A successful half garage half gym isn’t really about squeezing the maximum amount of exercise equipment into the room. It’s about creating a workout area that doesn’t disappear every time groceries, bicycles, tools, or storage bins return to the garage.
Before buying equipment, map the things that can’t easily move: the parked vehicle, open car doors, garage-door tracks, utility equipment, permanent shelving, workshop space, and the route into the house. Then decide what floor area you can realistically protect for exercise.
Start small if necessary. Rubber flooring, adjustable dumbbells, a compact bench, and good wall storage can create a far more functional garage gym than a room packed with machines.
Once the basic layout works, improve it gradually with better lighting, paint, storage, mirrors, or additional equipment.
The best garage gym is the one that’s still easy to use after the rest of the garage moves back in.