

15 Wooden Pumpkin Painting Ideas for Cozy Seasonal Decor
Wooden pumpkins are one of those fall decorations that quietly earn their storage space.
They don’t rot.
They don’t require carving.
They can be repainted when you’re tired of last year’s color.
And unlike some ultra-specific Halloween decor, a well-painted wooden pumpkin can stay out from the first hint of fall straight through Thanksgiving.
The fun part is deciding what to paint on it.
You can keep things simple with warm cream, muted olive, burgundy, or warm brown, or turn the pumpkin into a tiny canvas with plaid, leaves, florals, mushrooms, ghosts, or celestial details.
And because wood already brings texture, even an imperfect paint job can look charming.
Before painting, check whether you’re working with unfinished wood, plywood, MDF, or a previously coated piece. Prepare it appropriately and use paints, primers, finishes, and sealers suitable for that material and where you plan to display it.
Ready to give plain wood a fall upgrade?
Here are 15 wooden pumpkin painting ideas for cozy seasonal decor that feel creative, attainable, and easy to style around the house.
1. Paint Wooden Pumpkins Warm Cream
If you want an easy project, start here.
Paint your wooden pumpkin soft warm cream.
Leave a little wood grain visible if the paint and surface allow it and you like a more rustic finish.
Paint the stem warm brown or leave an attractive natural-wood stem unfinished where appropriate.
Then lightly emphasize the pumpkin sections with a slightly deeper cream or taupe.
Keep it subtle.
You want dimension, not dramatic contouring.
Pair the finished pumpkin with medium walnut, woven baskets, olive greenery, and muted-orange accents.
It’s simple enough for beginners but polished enough to use almost anywhere.
Sometimes beige wins.
I know.
We’re all processing it.

2. Create a Muted Olive Wooden Pumpkin
Olive is practically made for cozy fall decorating.
Choose a muted earthy green rather than a bright botanical shade.
Paint the pumpkin olive.
Leave the stem medium brown.
Add subtle warm-brown shading around the grooves or edges if the wooden design has defined sections.
Pair it with cream pumpkins and natural wood.
This color works especially well in neutral interiors because it adds depth without overwhelming the room.
It also transitions beautifully into November.
No bats.
No ghosts.
No obvious Halloween reference.
Just a very sophisticated green pumpkin quietly paying rent on your console table.

3. Paint a Deep Burgundy Wooden Pumpkin
Deep burgundy gives wooden pumpkins a richer, moodier fall look.
Use a muted wine-burgundy rather than bright red.
Keep the finish matte or softly textured.
Paint the stem warm brown.
For a rustic look, allow tiny hints of wood texture to remain visible where appropriate.
Style the pumpkin beside cream and olive decor.
Add a warm LED candle.
The burgundy looks especially good against warm cream walls and medium-walnut furniture.
And closer to Halloween, bring in a few matte-black accents.
Suddenly your cozy fall pumpkin has developed a mysterious side.
Character growth.
We support it.

4. Paint Simple Autumn Leaves
Use a warm-cream wooden pumpkin as your canvas.
Paint several loose autumn leaves across the front.
Try muted orange.
Burgundy.
Olive.
Warm brown.
Keep the leaves simple.
You don’t need detailed veins on every one.
A few loose brushstrokes make the design feel more handmade.
Concentrate the leaves around one edge or let them drift diagonally across the pumpkin.
Leave plenty of the cream background visible.
Negative space is useful.
Also free.
An excellent decorating material.

5. Create a Cozy Plaid Wooden Pumpkin
Few patterns say cozy fall quite like plaid.
Paint the pumpkin warm cream.
Add camel vertical stripes.
Cross them with burgundy horizontal stripes.
Then use thin warm-brown lines for extra detail.
Don’t worry about perfect geometry.
The slightly imperfect hand-painted lines can actually work beautifully with wood.
Use this as one statement pumpkin.
Pair it with solid cream, olive, and burgundy pumpkins.
Plaid already has a lot to say.
It doesn’t need six patterned coworkers interrupting.
Give it the floor.

6. Paint Tiny Mushrooms on a Wooden Pumpkin
This one is perfect for cottage-inspired fall decor.
Start with a mushroom-taupe or warm-cream background.
Paint small woodland mushrooms along the bottom.
Use warm-brown and burgundy caps.
Paint the stems cream.
Add tiny olive leaves or grasses.
Keep the upper portion of the pumpkin relatively empty.
That gives the little mushroom scene more room to breathe.
Pair the finished pumpkin with a woven basket and dark greenery.
Congratulations.
Your wooden pumpkin now looks like it owns a tiny cottage in the forest.
Mortgage status unknown.
Very charming property, though.

7. Create a Black and Cream Checkerboard Pumpkin
Give your wooden pumpkin a playful modern look.
Paint alternating sections matte black and warm cream.
You can create a traditional checkerboard pattern or simplify it into larger blocky squares.
If the pumpkin has carved grooves, use them as guides.
Keep the stem natural wood or medium brown.
Pair the finished piece with solid black and cream pumpkins.
This works especially well for Halloween, but the warm wood keeps it from feeling too harsh.
And don’t obsess over perfectly square checks.
It’s a handmade wooden pumpkin.
Nobody from the International Checkerboard Authority is visiting.
Relax.

8. Paint a Burgundy Floral Pumpkin
Use a warm-cream or pale-taupe base.
Paint an asymmetrical floral design down one side.
Use deep-burgundy flowers.
Muted-rust petals.
Dusty-plum buds.
Dark-olive leaves.
Keep the flowers loose and painterly.
You don’t need perfect roses.
Actually, please don’t spend three hours attempting microscopic roses unless that genuinely brings you joy.
Simple flowers look better with rustic wood anyway.
Pair the pumpkin with cream ceramics and walnut furniture.
The result feels seasonal without being obviously Halloween.

9. Create a Moon and Stars Wooden Pumpkin
For something a little witchy, start with a deep dusty-plum or matte-black base.
Paint a warm-cream crescent moon on the front.
Add small muted-gold stars around it.
Keep the pattern concentrated in the center.
Leave some dark background visible.
Paint the stem warm brown to connect the pumpkin back to natural fall materials.
This looks beautiful with burgundy foliage, LED candles, and cream pumpkins.
It’s Halloween-friendly without relying on novelty characters.
Sometimes the moon is enough.
She’s been handling spooky nighttime atmosphere for quite a while.
Experienced professional.

10. Paint a Simple Black Cat Pumpkin
Start with a warm-cream or muted-orange wooden pumpkin.
Paint a simple matte-black cat silhouette on the front.
Use pointed ears.
A curved tail.
A clean body shape.
Add a tiny crescent moon or several stars if you want more detail.
Keep it graphic rather than realistic.
This makes the design easier to paint and easier to recognize from across the room.
Use it on an entry table or Halloween mantel.
And if the cat turns out slightly wider than planned?
Congratulations.
It’s well fed.
We don’t body-shame wooden cats here.

11. Create a Botanical Vine Pumpkin
Paint the wooden pumpkin pale sage or warm cream.
Then create a thin dark-olive vine that curves across several sections.
Add simple leaves.
Paint tiny burgundy berries.
Use a few warm-brown branches.
Keep the lines delicate.
This is a great way to create something more detailed without covering the entire pumpkin.
The vine can follow the pumpkin’s shape naturally.
Let the wood grain remain slightly visible if that works with your chosen finish.
The wood already brought texture to the project.
Don’t make it sit there doing nothing.
Team effort.

12. Paint a Warm Brown Tonal Pumpkin
Not every painted pumpkin needs a bright contrast.
Try a tonal brown design.
Paint the pumpkin medium camel brown.
Use a deeper chocolate brown around the edges and grooves.
Add a lighter warm-taupe dry-brush-style highlight across raised areas if suitable for your paint system.
Keep the stem dark walnut.
The layered browns emphasize the wood rather than hiding it.
Pair the pumpkin with cream textiles and olive foliage.
This is one of those decorations that looks quietly autumnal without demanding attention.
The introvert pumpkin.
Shows up.
Looks great.
Leaves before the party gets loud.
Respect.

13. Paint a Friendly Ghost Pumpkin
For playful Halloween decor, start with a warm-brown, muted-orange, or dusty-plum background.
Paint three simple warm-white ghosts on the front.
Give each ghost a slightly different shape.
Add tiny black eyes.
Scatter a few small stars around them.
Keep the design family-friendly and graphic.
This works particularly well on flat wooden pumpkin cutouts because you have an easy painting surface.
Use it on a console, bookshelf, or covered porch.
Three ghosts.
One pumpkin.
Apparently they’re carpooling.
Environmentally responsible haunting.
Nice.

14. Create a Color-Blocked Wooden Pumpkin
Use broad sections of color for a modern look.
Paint different pumpkin sections in:
Warm cream.
Muted olive.
Deep burgundy.
Camel brown.
Follow the natural grooves or construction lines of the wooden pumpkin.
Keep the stem medium walnut.
This design is particularly effective on chunky freestanding wooden pumpkins because the broad color areas emphasize their shape.
Make a set of three using the same colors in different combinations.
They’ll coordinate without being identical.
Like a very organized pumpkin friend group.
Everyone follows the dress code.
Nobody wears the exact same outfit.
Excellent social etiquette.

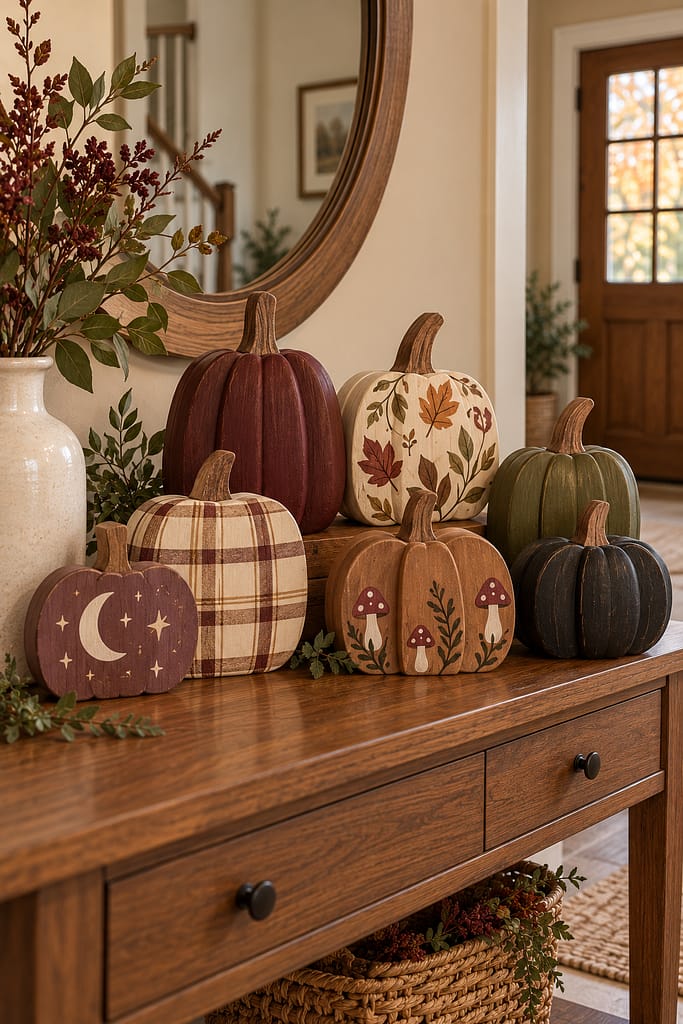
15. Create a Coordinated Wooden Pumpkin Collection
If you enjoy painting, build a small collection rather than choosing one design.
Keep everything connected with the same palette:
Warm cream, muted olive, burgundy, warm brown, dusty plum, and matte black.
Paint one solid cream.
One olive.
One burgundy.
Give one a plaid pattern.
Add mushrooms to another.
Paint autumn leaves on one.
Use a moon-and-stars design for the smallest Halloween accent.
Mix heights and shapes.
Some pumpkins can be chunky blocks.
Others can be flat cutouts.
Because the colors repeat, the different designs still look like one intentional collection.
This is also a perfect excuse to keep crafting.
Not that we needed one.
But documentation is useful.
How to Paint Wooden Pumpkins
Start by identifying the material.
Your pumpkin might be made from:
Solid unfinished wood.
Plywood.
MDF or engineered wood.
Previously painted wood.
A sealed decorative wood product.
Preparation can differ between them.
Clean the surface appropriately.
If sanding is suitable and necessary, follow safe practices and product guidance, especially with engineered materials.
Remove dust before painting.
Use a primer if your paint system or surface requires one.
Then apply thin coats.
Let each coat dry as directed before adding another.
Once the base is ready, add your pattern.
Finish with a compatible protective product if appropriate for the paint, material, and intended location.
Simple process.
The hardest part is usually waiting for paint to dry instead of poking it every six minutes.
We’ve all been there.
What Paint Should You Use on Wooden Pumpkins?
Use paint appropriate for your particular wooden surface.
Many decorative wood projects use suitable water-based craft or furniture paints, but requirements vary depending on the material and existing finish.
Read the paint instructions.
If you’re painting over a slick or previously sealed surface, additional preparation may be required.
If the pumpkin will live outdoors, make sure the complete coating system is appropriate for the expected conditions.
Indoor craft paint isn’t automatically outdoor paint because you feel optimistic.
Weather remains unmoved by enthusiasm.
Prepare Unfinished Wooden Pumpkins
Unfinished wood may need light preparation before painting.
Check for rough edges.
Smooth them appropriately if needed.
Remove dust.
Inspect for splinters.
If the wood absorbs paint unevenly, a suitable primer or base coat may help depending on the finish you want.
Wood grain can be part of the design.
For rustic pumpkins, use thinner-looking coats where appropriate so some grain remains visible.
For graphic patterns such as checkerboards, you may prefer a more opaque base.
Different design.
Different strategy.
Your pumpkin contains multitudes.
Choose a Cozy Fall Color Palette
Color does most of the decorating work.
For neutral fall:
Warm cream + camel + warm brown
For earthy fall:
Muted olive + cream + walnut
For rich autumn:
Burgundy + cream + dark olive
For cottage fall:
Mushroom taupe + burgundy + olive
For Halloween:
Black + cream + muted orange
For witchy fall:
Dusty plum + black + muted gold
Pick three or four colors.
Repeat them across your wooden pumpkin collection.
Then vary the patterns.
This keeps everything cohesive.
One pumpkin gets plaid.
Another gets leaves.
Another gets mushrooms.
They’re different.
But they clearly attend the same fall family reunion.
Easy Wooden Pumpkin Painting Ideas for Beginners
If you’ve barely touched a paintbrush since school, start with:
Solid colors.
Polka dots.
Large stripes.
Color blocking.
Simple leaves.
Ghosts.
Basic moons and stars.
Don’t begin with a tiny botanical masterpiece involving 87 individual leaves.
That’s how relaxing crafts become performance reviews.
Start large.
Keep shapes simple.
Use a limited palette.
And let the wood texture help you.
Handmade doesn’t need to mean flawless.
It needs to look intentional.
Those are very different requirements.
Rustic Wooden Pumpkin Painting Ideas
Rustic wooden pumpkins look best when the material still feels like wood.
Use warm cream.
Muted orange.
Brown.
Olive.
Burgundy.
Allow subtle grain to show where appropriate.
Use slightly imperfect brushwork.
Try gentle edge shading.
Pair the pumpkins with baskets, natural-looking foliage, warm wood, and simple textiles.
Avoid excessive distressing if you’re going for an updated rustic look.
A little texture?
Charming.
Making the pumpkin look like it survived 14 winters behind a barn?
Perhaps unnecessary.
Modern Wooden Pumpkin Painting Ideas
Simplify everything.
Use matte finishes.
Try color blocking.
Black and cream.
Olive and cream.
Burgundy and camel.
Keep patterns geometric.
Use only a few pumpkins.
Avoid excessive bows, lettering, or tiny accessories.
Chunky wooden pumpkins look especially good in modern interiors because their shapes already feel graphic.
Let form and color do the work.
Modern decorating is basically knowing when to stop.
A surprisingly advanced skill.
Farmhouse Wooden Pumpkin Painting Ideas
Use warm white instead of stark white.
Bring in muted black.
Add warm wood.
Try plaid.
Use olive.
Paint subtle leaves.
Keep lettering minimal or skip it entirely for a more timeless look.
Pair wooden pumpkins with woven baskets and medium-walnut accents.
If you’re using several pumpkins, mix solid colors with one patterned piece.
You don’t need every farmhouse motif on every pumpkin.
No chicken wire required.
The pumpkin is relieved.
Wooden Pumpkin Painting Ideas for Halloween
Start with a darker palette.
Try matte black.
Dusty plum.
Muted orange.
Warm cream.
Then add:
Ghosts.
Bats.
Black cats.
Moons.
Stars.
Checkerboards.
Keep designs graphic.
A wooden pumpkin with one black-cat silhouette can create more impact than a dozen tiny Halloween symbols.
This also makes the project easier.
Fewer details.
Less brush-related regret.
Strong strategy.
Wooden Pumpkin Painting Ideas With Flowers
Use simple painterly blooms.
Five petals are plenty.
Add olive leaves.
Try burgundy flowers on cream.
Dusty plum on pale sage.
Rust on mushroom taupe.
Concentrate the floral design on one side.
Or paint a small cluster around the stem.
Don’t cover the entire surface unless you specifically want an all-over pattern.
Leaving wood or base color visible helps the flowers stand out.
Negative space is doing unpaid labor again.
We appreciate it.
Wooden Pumpkin Painting Ideas With Mushrooms
Use simple shapes.
Cream stems.
Rounded caps.
Warm brown.
Burgundy.
Muted rust.
Add tiny olive grass or leaves.
Place mushrooms along the lower edge so they feel like they’re growing from the bottom of the pumpkin.
This works especially well on flat wooden cutouts because you have plenty of easy painting space.
Pair them with cream and brown decor.
Instant woodland fall.
No actual forest required.
Much easier vacuuming.
Wooden Pumpkin Painting Ideas With Plaid
Paint the lightest color first.
Let it dry according to instructions.
Add wider vertical stripes.
Then horizontal stripes.
Finish with thin accent lines if desired.
Try:
Cream + camel + burgundy.
Cream + olive + brown.
Cream + black + muted orange.
Keep the number of colors controlled.
Plaid gets complicated surprisingly quickly.
Three colors?
Cozy.
Nine colors?
You’ve accidentally opened a textile factory.
Wooden Pumpkin Painting Ideas With Leaves
Paint individual leaves.
Create a vine.
Make a falling-leaf pattern.
Or add a leafy border around the bottom.
Use olive, burgundy, muted orange, and warm brown.
A cream background makes the colors stand out.
For a subtler version, use different shades of brown on a camel base.
You can even let leaves overlap the edges slightly on flat cutouts.
Keep the shapes loose.
Real leaves are irregular.
Nature has once again provided excellent cover for our painting skills.
Wooden Pumpkin Painting Ideas for the Front Porch
Use larger wooden pumpkins so they’re visible from the sidewalk.
Solid colors and bold patterns work best.
Try cream.
Olive.
Burgundy.
Large plaid.
Color blocking.
Simple black bats.
Place pumpkins against a wall, beside a planter, or near other stable fall decor.
Keep doors, stairs, thresholds, and handrails clear.
If the pieces are lightweight, secure them appropriately for wind.
Use finishes suitable for outdoor exposure if they’re going outside.
Wood and weather have a complicated relationship.
Don’t make them improvise.
Wooden Pumpkin Painting Ideas for the Mantel
Choose smaller pieces.
Mix heights.
Try one burgundy pumpkin.
One cream.
One olive.
One patterned pumpkin.
Add dark-olive foliage.
Use LED candles.
Leave empty space.
If the fireplace is functional, maintain all required clearances and follow manufacturer guidance.
Keep combustible wooden decor away from heat and open flames.
Wooden pumpkins are adorable.
They remain, inconveniently, wood.
Act accordingly.
Wooden Pumpkin Painting Ideas for the Dining Table
Use compact flat or chunky pumpkins.
Group three in a shallow tray.
Or place several along the table center.
Keep them low enough for conversation.
Pair them with cream dinnerware and burgundy or camel napkins.
Use LED candles for warmth.
Keep painted decorative items separated appropriately from food-contact areas.
Your hand-painted pumpkin can be the centerpiece.
It does not need to become an improvised serving board.
Stay in your lane, pumpkin.
Wooden Pumpkin Painting Ideas for the Entryway
An entry table gives wooden pumpkins plenty of visibility.
Use one larger pumpkin at the back.
Place two smaller ones forward.
Add a vase of fall branches.
Bring in a warm lamp.
Leave room for everyday objects.
A burgundy, cream, and olive trio is especially easy to style.
If you have a narrow entry, keep the floor clear.
Put the decor on the console rather than creating a pumpkin colony around people’s shoes.
Cute has spatial limits.
Wooden Pumpkin Painting Ideas for Shelves
Use small pumpkins.
One per shelf section is often enough.
Pair them with ordinary books.
Cream pottery.
Small plants.
Warm-brown objects.
Repeat colors across the shelves rather than repeating identical pumpkin designs.
And make sure shelving is properly installed and suitable for the weight.
Don’t balance chunky wooden pumpkins on narrow unsupported ledges.
Gravity doesn’t care that it’s fall.
Make Wooden Pumpkins Look More Expensive
Use fewer colors.
Choose muted tones.
Paint the stem carefully.
Let appropriate wood texture remain visible.
Use matte or low-sheen finishes where they suit the design.
Avoid filling every inch with decoration.
Mix solid-color pumpkins with only one or two patterns.
Style them with natural-looking foliage, warm wood, cream ceramics, and woven textures.
And group them thoughtfully.
Presentation matters.
A beautiful pumpkin buried among seventeen random decorations will still look random.
Give it some breathing room.
Let the pumpkin network.
Protect Painted Wooden Pumpkins
Your finish should match where the pumpkin will be used.
Indoor pieces may have different needs from porch decorations.
If a protective topcoat is appropriate, choose one compatible with the paint and wooden material.
Follow drying and curing instructions.
For outdoor use, remember that “covered porch” does not necessarily mean completely protected from moisture, temperature changes, or wind.
Inspect seasonal wooden decor periodically.
Bring it indoors if conditions exceed what the materials and finish can handle.
Your pumpkin is reusable.
Don’t make it prove how reusable during a rainstorm.
Store Wooden Pumpkins After Fall
Clean them according to the materials and finish.
Make sure they’re fully dry.
Wrap delicate painted pieces where appropriate.
Avoid stacking heavy objects on thin wooden cutouts.
Protect stems and dimensional details.
Store everything in a dry location appropriate for the material.
If you created a coordinated set, keep them together.
Next year you’ll open one box and immediately have a complete fall collection.
Future You will feel extremely organized.
Do not tell Future You how long the plaid pumpkin took.
Some information is unnecessary.
Keep Wooden Pumpkin Crafts Safe
Protect your work surface.
Use paints, primers, adhesives, finishes, and sealers according to their labels.
Use appropriate ventilation where required.
If sanding is necessary, follow safe practices suitable for the wood or engineered material you’re working with.
Supervise children appropriately.
Allow finishes to dry and cure fully.
Keep painted wooden decor away from open flames and unsafe heat exposure.
Use LED candles around wooden decorations.
For outdoor displays, keep pumpkins out of walkways, stairs, thresholds, and door swings.
Secure lightweight pieces against wind.
A wooden pumpkin can look rustic.
The crafting process does not need to be.
Boring safety.
Cute result.
Excellent arrangement.
Final Thoughts
The best wooden pumpkin painting ideas for cozy seasonal decor don’t require complicated artwork.
Paint one warm cream.
Try muted olive.
Go richer with burgundy.
Add autumn leaves.
Create a cozy plaid pattern.
Paint tiny mushrooms.
Try a black-and-cream checkerboard.
Add florals.
Create a celestial moon-and-stars pumpkin.
Or make a coordinated collection using several designs in the same warm fall palette.
Let some wood texture show.
Keep the colors connected.
Use paint and finishes appropriate for your wooden surface.
And embrace the little imperfections that make hand-painted decor look handmade.
Because if one plaid stripe ends up slightly crooked, there’s a highly advanced professional decorating technique available:
Turn the pumpkin three inches to the left.
Problem solved. 🍂