

17 Ceramic Pumpkin Painting Ideas for Creative Fall Decor
Ceramic pumpkins are basically the low-maintenance overachievers of fall decorating.
You paint them once, store them after the season, and bring them back next year without wondering whether the pumpkin has developed a suspicious soft spot overnight.
Even better, ceramic pumpkin painting ideas can go far beyond standard orange.
Think warm cream, muted olive, deep burgundy, dusty plum, tiny florals, plaid, mushrooms, leaves, checkerboards, and even a little moon-and-stars magic for Halloween.
You don’t need professional painting skills either.
Some of the prettiest ceramic pumpkins are simply painted one beautiful matte color and styled with wood, foliage, candles, and other fall textures.
Before painting, identify what kind of ceramic piece you’re working with—unfinished bisque, previously glazed ceramic, or another finished surface—and use paint, primer, sealers, or other products specifically suitable for that surface. Follow the manufacturer’s directions, especially if curing or heat is involved.
Ready to rescue that plain ceramic pumpkin from a lifetime of generic orange?
Here are 17 ceramic pumpkin painting ideas for creative fall decor.
1. Paint a Ceramic Pumpkin Warm Cream
Start simple.
A soft warm-cream ceramic pumpkin works almost anywhere.
Instead of bright white, choose a creamy shade with subtle beige undertones.
Paint the stem medium brown.
For a little dimension, leave slightly deeper cream in the pumpkin’s grooves.
The result feels softer and more natural than a perfectly flat white finish.
Style it on a medium-walnut console with burgundy foliage and a smaller olive pumpkin.
That’s it.
No tiny brushes.
No detailed drawing.
No emotional confrontation with a checkerboard pattern.
Sometimes one beautiful color does the job.

2. Create a Matte Black Ceramic Pumpkin
For something moodier, go black.
Paint the ceramic pumpkin soft matte black rather than high-gloss black.
Keep the stem warm brown or muted aged-brass-like.
A matte finish allows the pumpkin’s ridges and shape to remain visible.
Pair it with cream pumpkins for contrast.
Add dark-olive foliage and medium walnut nearby.
This design works for both fall and Halloween, which means it gets a longer decorating season.
The ceramic pumpkin has range.
September?
Sophisticated fall.
October?
Mysterious Halloween.
November?
Still sitting there confidently because nobody told it to leave.

3. Paint a Muted Olive Ceramic Pumpkin
Muted olive is one of the easiest colors to blend into everyday decor.
Choose a warm earthy olive green.
Avoid anything too bright or saturated.
Paint the entire ceramic pumpkin olive, then use a slightly darker shade in the grooves if you want extra depth.
Keep the stem brown.
Pair the finished pumpkin with cream ceramics and warm wood.
Olive works beautifully from early fall through Thanksgiving-season decorating.
It’s seasonal without shouting.
Basically, this pumpkin has excellent indoor manners.
Invite it everywhere.

4. Create a Deep Burgundy Ceramic Pumpkin
Burgundy instantly makes fall decor feel richer.
Paint your pumpkin a deep muted wine-red.
Use a matte or softly satin finish depending on the product and surface.
Add a warm-brown stem.
Then pair the pumpkin with cream, olive, and medium walnut.
Burgundy works particularly well on a fireplace mantel or dining sideboard.
It brings fall color without relying on bright orange.
And once Halloween arrives, add matte-black accents nearby.
One pumpkin.
Two seasonal personalities.
The ceramic decor department is operating efficiently this year.

5. Paint Tiny Autumn Leaves
Start with a warm-cream base.
Then paint small scattered leaves across the pumpkin.
Use muted olive.
Deep burgundy.
Warm brown.
Muted orange.
Keep the leaves simple.
A basic pointed oval with a center line is enough.
Vary their direction so the pattern doesn’t look too rigid.
Leave plenty of cream visible between motifs.
This is a great beginner-friendly pattern because every leaf can be slightly different.
Nature already gave you permission.
No two leaves match perfectly.
Your shaky brushstroke is now “organic.”
You’re welcome.

6. Create a Burgundy and Cream Floral Pumpkin
Paint the pumpkin warm cream.
Then add an asymmetrical floral cluster beginning near the stem and flowing down one side.
Use burgundy flowers.
Muted-rust blooms.
Tiny dusty-plum buds.
Dark-olive leaves.
Keep the opposite side mostly blank.
This makes the design feel more modern than covering the entire pumpkin in flowers.
You don’t need botanically accurate blossoms.
Simple petal shapes work perfectly.
If someone identifies the flower incorrectly, congratulations.
You’ve invented a new species.
Very exclusive.

7. Paint a Plaid Ceramic Pumpkin
Plaid looks especially cozy on ceramic pumpkins.
Start with a cream base.
Add broad camel vertical stripes.
Once dry, cross them with muted-burgundy horizontal stripes.
Add thinner warm-brown lines if you want more detail.
Follow the natural ridges of the pumpkin rather than trying to force perfectly straight lines around the curved surface.
A little imperfection makes the design feel hand-painted.
Place the finished pumpkin beside solid cream and burgundy pumpkins.
One plaid pattern is enough to create interest.
You don’t need an entire plaid pumpkin army.
Although admittedly that sounds extremely autumnal.

8. Create a Black and Cream Checkerboard Pumpkin
Want something bolder?
Paint alternating black and warm-cream checkerboard sections.
Use the ceramic pumpkin’s grooves as natural guides.
Don’t worry about creating mathematically perfect squares.
The curved shape will distort them slightly anyway.
Keep the stem medium brown to soften the black-and-cream contrast.
This design works especially well for Halloween but can still feel stylish when surrounded by warm wood and neutral decor.
Use one checkerboard pumpkin as the focal piece.
It’s already doing enough visually.
Let the other pumpkins have quiet jobs.
Every group has an extrovert.

9. Paint Tiny Mushrooms on a Ceramic Pumpkin
For cottage-inspired fall decor, add mushrooms.
Use a warm-cream or mushroom-taupe base.
Paint small mushrooms around the lower half.
Try warm-brown caps.
Burgundy caps.
Cream stems.
Add tiny olive leaves or grasses between them.
Keep the upper portion relatively simple.
The design feels whimsical without becoming overly busy.
Pair it with a woven basket, walnut furniture, and dark greenery.
Tiny mushrooms are unfairly effective at making fall decor adorable.
One appears?
Cute.
Seven appear?
Apparently we live in an enchanted cottage now.
Accept it.

10. Create a Moon and Stars Ceramic Pumpkin
Give your fall decor a witchy twist.
Paint the ceramic pumpkin deep dusty plum.
Add one large warm-cream crescent moon to the front.
Surround it with small muted-gold stars.
Keep the pattern concentrated on one side rather than wrapping it completely around the pumpkin.
Paint the stem matte black or warm brown.
Style it with cream pumpkins and burgundy foliage.
This works beautifully from September through Halloween.
And unlike decor covered in spooky phrases, it doesn’t need to explain itself.
Moon.
Stars.
Dark pumpkin.
Message received.

11. Paint a Blue and Brown Ceramic Pumpkin
Fall colors don’t have to stop at orange, burgundy, and olive.
Try a dusty muted blue paired with chocolate brown.
Paint the pumpkin soft blue-gray.
Add thin warm-brown botanical branches around several ribs.
Keep the stem dark brown.
Pair it with cream pumpkins and walnut furniture.
The blue gives the arrangement something unexpected while the brown keeps it grounded in autumn.
This is especially pretty in homes that already use blue decor.
No need to redesign your entire room because a pumpkin arrived.
The pumpkin can adapt.
Good pumpkin.

12. Create a Polka Dot Ceramic Pumpkin
Polka dots are practically impossible to overthink.
Well…
You can overthink them.
Please don’t.
Paint the pumpkin warm cream.
Add dots in burgundy, olive, camel, and muted orange.
Vary the sizes slightly.
Keep the spacing loose.
Use a small round brush or appropriate dotting tool.
This is an easy project for beginners and works especially well on smaller ceramic pumpkins.
Create a set of three using the same palette but different dot arrangements.
They’ll coordinate without matching perfectly.
Basically siblings.
Related.
Distinct personalities.
Occasionally annoying.
Very authentic.

13. Paint a Botanical Vine Around the Pumpkin
Use the pumpkin’s natural grooves to guide a vine pattern.
Start with a soft cream or pale sage base.
Paint a thin dark-olive vine curling around the pumpkin.
Add simple leaves.
Bring in tiny burgundy berries or small muted-rust buds.
Keep the pattern delicate.
This looks more sophisticated than a dense all-over print and works beautifully on a mantel or bookshelf.
Follow the ceramic shape rather than fighting it.
The pumpkin already provided the layout.
Honestly, it’s doing half the design work.
Very collaborative craft supply.

14. Create a Color-Blocked Ceramic Pumpkin
Color blocking is perfect when you want something modern without detailed artwork.
Use the pumpkin’s ribs to divide it into broad sections.
Paint alternating areas:
Warm cream.
Muted olive.
Deep burgundy.
Camel.
You can repeat two colors or use three or four.
Keep the edges reasonably clean but don’t panic over tiny imperfections.
Hand-painted decor should look hand-painted.
Otherwise you could have just bought it.
Which would have saved time, admittedly.
But where’s the smug DIY satisfaction in that?

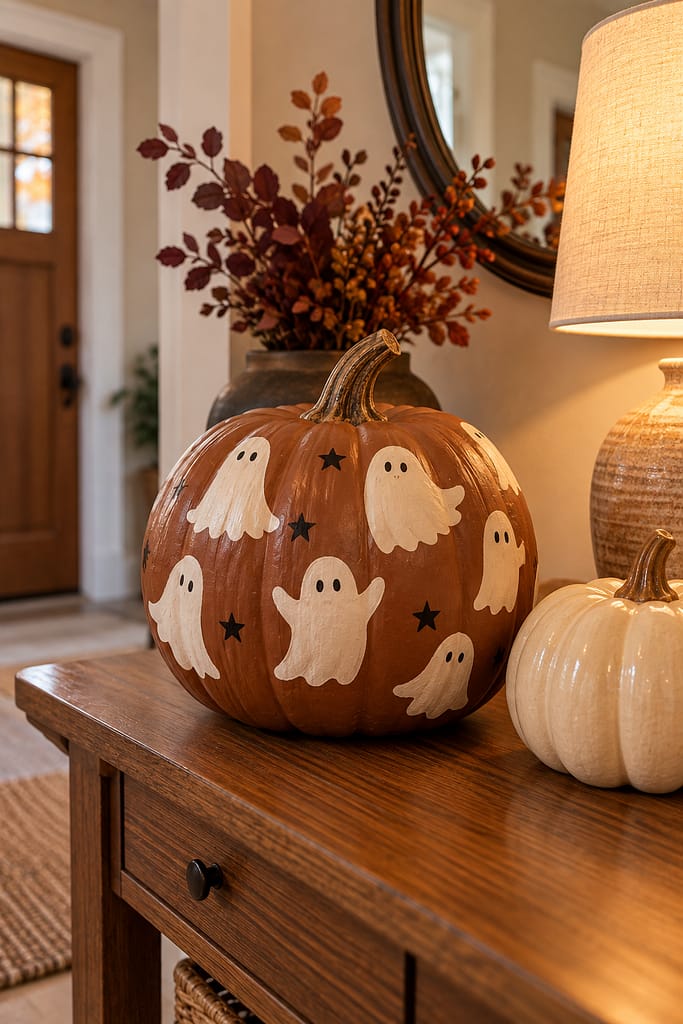
15. Paint Tiny Ghosts on a Ceramic Pumpkin
Turn a ceramic pumpkin into Halloween decor without making it scary.
Use a muted-orange, dusty-plum, or warm-brown base.
Paint small warm-white ghost shapes around the surface.
Give each ghost two simple black eyes.
Vary their shapes slightly.
Add a few tiny black stars between them.
Keep the design playful.
This works especially well on smaller pumpkins placed on an entryway table.
After Halloween, swap it out for your solid-color ceramic pumpkins.
The ghost pumpkin has completed its annual contract.
See you next October.
16. Create an Antique-Look Ceramic Pumpkin
If you prefer vintage-inspired decor, don’t paint the pumpkin perfectly flat.
Start with a warm taupe or mushroom base.
Add subtle darker brown shading in the grooves.
Use a lighter cream dry-brush-style effect across raised areas if appropriate for your chosen paint system.
Keep everything restrained.
You’re trying to emphasize texture, not make the pumpkin look dirty.
Paint the stem dark warm brown.
Pair it with aged-brass-look decor and burgundy foliage.
The finished pumpkin looks like something you might have discovered in an old cupboard.
Except cleaner.
Hopefully much cleaner.
Vintage charm has limits.

17. Paint a Coordinated Collection of Ceramic Pumpkins
Can’t choose one?
Don’t.
Create a small coordinated ceramic pumpkin collection using one consistent palette.
Try:
Warm cream.
Muted olive.
Deep burgundy.
Dusty plum.
Warm brown.
Matte black.
Paint one solid cream.
One olive.
One burgundy.
Give another a plaid pattern.
Add tiny leaves to one.
Use mushrooms on another.
Finish with a moon-and-stars pumpkin for a little Halloween magic.
Mix sizes and shapes.
Because the colors repeat, the collection feels cohesive even though the designs differ.
This is also a great project to build slowly.
Paint one this weekend.
Another next weekend.
By October you’ll have a whole ceramic pumpkin family.
Try not to name them.
Actually…
No.
Name them.
We’ve come this far.

How to Paint Ceramic Pumpkins
First, figure out what you’re painting.
A ceramic pumpkin may be:
Unfinished ceramic bisque.
Glazed ceramic.
Previously painted ceramic.
A decorative ceramic-like product with another coating.
That distinction matters because different surfaces may require different preparation and paint systems.
Clean the piece according to the requirements of its material.
Let it dry completely.
Use primer if your chosen system calls for one.
Apply paint in thin layers.
Let coats dry as directed.
Then add your pattern.
If you’re using a sealer or protective finish, make sure it’s compatible with both the paint and ceramic surface.
Follow manufacturer instructions throughout.
This is especially important if any product involves curing or heat.
DIY confidence is great.
DIY chemistry experiments?
Less ideal.
What Paint Should You Use on Ceramic Pumpkins?
There isn’t one universal answer because ceramic surfaces vary.
Paint made for porous unfinished bisque may behave differently on a slick glazed pumpkin.
Look for products specifically labeled as compatible with your surface.
Some craft paints are formulated for ceramics.
Certain multi-surface paints may also be appropriate.
Some projects may require primer.
Others may require a compatible sealer.
If you’re painting a decorative piece only, you usually don’t need to approach it like functional dinnerware.
And unless your complete paint system specifically says otherwise, don’t assume a painted decorative pumpkin is food-safe.
It’s decor.
Let it enjoy the easier job.
Painting Unfinished Ceramic Pumpkins
Unfinished bisque is porous.
That can make it relatively easy to paint, but it may also absorb paint differently from a glazed surface.
Remove loose dust appropriately.
Keep the surface dry and clean.
Apply suitable paint in thin coats.
Because the ceramic texture can absorb color, the first coat may look uneven.
Don’t immediately panic.
Let it dry as instructed.
Add another coat if necessary.
Then paint your details.
Solid matte colors look especially good on unfinished ceramic because the naturally soft surface complements the finish.
Cream, olive, burgundy, and warm brown?
Hard to mess up.
Painting Glazed Ceramic Pumpkins
Glazed ceramic can be trickier because the surface is smooth and less absorbent.
Use products designed to adhere to slick ceramic or glazed surfaces.
Preparation requirements vary by product, so follow those directions carefully.
Don’t automatically sand, prime, bake, or seal something simply because another tutorial did.
Your specific ceramic and coating system may require something different.
Test in an inconspicuous area when appropriate.
And if the pumpkin has sentimental or monetary value?
Maybe don’t make it your first experimental craft project.
Practice pumpkin exists for a reason.
Choose a Ceramic Pumpkin Color Palette
Choosing colors first makes everything easier.
For cozy fall decor:
Warm cream + camel + brown
For earthy fall:
Muted olive + cream + walnut
For moody fall:
Burgundy + cream + dark olive
For Halloween:
Matte black + cream + muted orange
For witchy fall:
Dusty plum + black + muted gold
For cottage-inspired decor:
Mushroom taupe + burgundy + olive + cream
Use the same palette across multiple pumpkins.
Then experiment with different patterns.
That’s how a checkerboard pumpkin, mushroom pumpkin, and floral pumpkin can sit together without looking like they met five minutes ago.
Color introduces everyone.
Easy Ceramic Pumpkin Painting Ideas for Beginners
Start with solid colors.
Seriously.
A beautifully painted olive pumpkin can look better than an ambitious pattern you hated creating.
Then try:
Polka dots.
Simple leaves.
Color blocking.
Large stripes.
Tiny ghosts.
Basic mushrooms.
Moons and stars.
Once you’re comfortable controlling the brush on a curved surface, move into plaid, florals, or botanical vines.
And don’t judge your design while your face is approximately four inches from it.
Put the pumpkin down.
Walk across the room.
Look again.
Craft projects improve dramatically at normal viewing distance.
Convenient.
Neutral Ceramic Pumpkin Painting Ideas
Use:
Warm cream.
Mushroom.
Taupe.
Camel.
Warm brown.
Pale sage.
Add matte black in small amounts.
Neutral ceramic pumpkins work beautifully with woven baskets, medium walnut, warm greige walls, and olive foliage.
Texture becomes particularly important.
Use subtle shading in the grooves.
Try a slightly lighter tone on raised areas.
Or mix smooth solid pumpkins with one patterned design.
Neutral doesn’t mean every pumpkin needs to become beige.
We can be calm without surrendering entirely.
Ceramic Pumpkin Painting Ideas for Halloween
For Halloween, bring in graphic motifs.
Try:
Black-and-cream checkerboards.
Tiny ghosts.
Black bats.
Crescent moons.
Stars.
Black cats.
Dusty-plum bases.
Matte-black pumpkins.
Keep the designs simple if you want the pumpkins to work with more sophisticated decor.
A matte-black ceramic pumpkin beside burgundy flowers and warm wood already feels Halloween-ready.
You don’t necessarily need to paint a screaming face on it.
The pumpkin appreciates your restraint.
Ceramic Pumpkin Painting Ideas for Fall
Skip obvious Halloween imagery and focus on autumn motifs.
Paint:
Leaves.
Florals.
Mushrooms.
Botanical vines.
Plaid.
Polka dots.
Color blocks.
Use cream, olive, burgundy, warm brown, camel, and muted orange.
These designs can stay out from early fall through Thanksgiving-season decorating.
That’s especially useful with ceramic pumpkins because they’re reusable.
One craft project.
Many weeks of decor.
The return on pumpkin investment is looking strong.
Ceramic Pumpkin Painting Ideas With Flowers
Keep flowers simple.
Use five-petal shapes.
Loose brushstrokes.
Tiny buds.
Basic leaves.
You don’t need to create botanical illustrations.
Concentrate flowers on one side of the pumpkin.
Or paint a small floral ring around the stem.
Try burgundy with cream.
Rust with olive.
Dusty plum with warm brown.
A limited palette helps loose floral shapes look intentional.
When in doubt, add a leaf.
This is suspiciously effective.
Ceramic Pumpkin Painting Ideas With Leaves
Leaves are even easier.
Follow the natural grooves.
Paint a vine down one rib.
Add leaves on alternating sides.
Or scatter individual leaves across the pumpkin.
Use several fall colors.
Try muted olive, burgundy, warm brown, and muted orange on a cream background.
Leave plenty of negative space.
You don’t need to fill every inch.
The pumpkin was attractive before you started.
We’re enhancing.
Not filing a complete surface-coverage requirement.
Ceramic Pumpkin Painting Ideas With Plaid
Use wider stripes first.
Then add thinner accent lines.
Choose no more than three or four colors.
Warm cream + camel + burgundy works beautifully.
Cream + olive + brown feels earthier.
Black + cream + muted orange works for Halloween.
Follow the ceramic curves.
Don’t expect lines to look perfectly straight from every angle.
They’re traveling around a pumpkin.
They’ve been given a difficult assignment.
Show compassion.
Ceramic Pumpkin Painting Ideas With Mushrooms
Mushrooms work best on lighter backgrounds.
Try mushroom taupe.
Warm cream.
Pale sage.
Paint simple stems.
Add rounded caps.
Use burgundy and brown.
Add tiny olive leaves or grass.
Concentrate the design around the lower third or one side.
This creates a little woodland scene without requiring an entire landscape.
Pair the finished pumpkin with woven textures and natural wood.
Instant cottage-fall energy.
Possibly suspicious woodland energy.
Either way, cute.
Ceramic Pumpkin Painting Ideas With Celestial Designs
Start with a darker base.
Dusty plum.
Matte black.
Deep blue-gray.
Then add warm-cream moons and muted-gold stars.
You can also add tiny dots to suggest a night sky.
Keep the pattern concentrated on the front if the pumpkin will mostly be viewed from one direction.
Celestial ceramic pumpkins are especially useful because they can bridge fall and Halloween.
They feel magical without being aggressively spooky.
A moon has never needed a plastic spider to prove it’s mysterious.
Ceramic Pumpkin Painting Ideas for Kids
Choose straightforward patterns.
Dots.
Stripes.
Color blocks.
Funny faces.
Ghosts.
Big leaves.
Use age-appropriate products and supervision.
Protect the work surface and clothing.
Follow all paint instructions.
If the ceramic pumpkin is breakable, consider whether it’s appropriate for the child’s age and crafting setup.
A lightweight craft pumpkin may be a better choice for very young kids.
Because dropping a ceramic pumpkin is one of those activities that becomes considerably less fun during the final half-second.
Plan accordingly.
Make Ceramic Pumpkins Look More Expensive
Choose a limited palette.
Use warm, muted colors.
Avoid overly glossy finishes unless they’re intentionally part of the design.
Let ceramic texture show.
Keep patterns restrained.
Paint stems thoughtfully.
Mix solids with only a few patterned pumpkins.
Use subtle shading to emphasize sculpted grooves.
Then style the pumpkins with natural-looking materials.
Medium walnut.
Dark-olive foliage.
Burgundy branches.
Woven baskets.
Cream textiles.
A $5-looking pumpkin can suddenly become very convincing when it stops hanging out with seventeen unrelated decorations.
Friends matter.
Even for ceramics.
Style Ceramic Pumpkins on a Mantel
Use odd numbers.
Try three or five pumpkins.
Vary their sizes.
Place the largest slightly off-center.
Add foliage for height.
Use LED candles.
Leave negative space.
For example:
One burgundy pumpkin.
Two cream pumpkins.
One olive pumpkin.
One small plaid pumpkin.
Done.
If the fireplace is functional, follow required clearances and manufacturer instructions.
Keep combustible materials away from heat.
Ceramic may tolerate more than foliage does.
The arrangement needs to be considered as a whole.
No pumpkin gets to make unilateral safety decisions.
Style Ceramic Pumpkins on a Dining Table
Use smaller ceramic pumpkins.
Place three in a shallow wood tray.
Or create a loose line down the center.
Keep them below sightlines.
Pair them with LED candles and low foliage.
Leave room for serving dishes.
And keep painted decorative pieces away from direct food contact unless the entire product system is specifically suitable for that use.
Decorative pumpkin?
Yes.
Improvised bread bowl?
Absolutely not.
Know your pumpkin’s professional qualifications.
Style Ceramic Pumpkins on an Entryway Table
Entryways are perfect for displaying a mixed collection.
Start with one medium pumpkin.
Add two smaller pumpkins.
Bring in a vase of foliage.
Use a table lamp.
Leave part of the surface clear for keys or everyday items.
Try cream, olive, and burgundy together.
Or use a patterned pumpkin as the focal point with two solids.
The entryway gets seasonal personality without losing its job.
Function first.
Pumpkins second.
They’re surprisingly understanding.
Style Ceramic Pumpkins on Bookshelves
Use one pumpkin per shelf section rather than filling every shelf.
Pair a small ceramic pumpkin with ordinary books.
Add a warm-gray pottery piece.
Use one trailing or compact plant where appropriate.
Repeat your pumpkin colors across several shelves.
Avoid overloading shelves.
Use securely installed shelving suitable for the displayed weight.
And don’t place breakable ceramic pieces where they’re likely to be knocked down.
Gravity has never respected seasonal decor.
Seal and Protect Painted Ceramic Pumpkins
Whether your painted pumpkin needs a protective finish depends on the paint, ceramic surface, intended use, and desired appearance.
Follow the manufacturer’s guidance for your specific products.
If you use a sealer, confirm that it’s compatible with the underlying paint and ceramic surface.
Allow all coats to dry or cure for the specified time before handling or storing the pumpkin.
Don’t rush curing because the surface “feels dry.”
Dry to the touch and fully cured aren’t always the same thing.
Crafting teaches patience.
Usually against our will.
Store Painted Ceramic Pumpkins Carefully
Ceramic pumpkins are reusable, but they’re also breakable.
Clean them appropriately before storage.
Make sure everything is completely dry.
Wrap each pumpkin individually with suitable protective material.
Avoid putting heavy objects directly on top.
Protect delicate stems.
Store them in a sturdy container where they won’t shift excessively.
Label the box.
Next fall, Future You can open it and discover an entire coordinated pumpkin collection ready to go.
Future You will be impressed.
Possibly even suspicious.
Enjoy the rare victory.
Final Thoughts
The best ceramic pumpkin painting ideas for creative fall decor can be surprisingly simple.
Paint one warm cream.
Try muted olive.
Go moody with burgundy or matte black.
Add autumn leaves.
Paint a floral cluster.
Try plaid.
Create a checkerboard.
Add tiny mushrooms.
Paint a botanical vine.
Experiment with color blocking.
Or create a dusty-plum pumpkin covered in moons and stars for Halloween.
Choose colors that already work with your home.
Use products appropriate for your ceramic surface.
Let each layer dry or cure according to the instructions.
And don’t worry about tiny handmade imperfections.
That’s part of what makes painted ceramic pumpkins interesting.
Besides, if one leaf turns out slightly crooked, place that side toward the wall.
DIY has many advanced techniques.
Strategic rotation is one of the best. 🎃