

15 Garage Tool Organization Ideas That Actually Save Space
A cluttered garage has a way of slowing every project down. You spend more time hunting for a socket than actually fixing the lawn mower, or you end up buying another tape measure because the first one disappeared months ago. It happens to almost everyone once tools outgrow a couple of shelves.
The solution isn’t filling your garage with random storage products. It’s building an organization system that matches how you actually work. By combining wall storage, modular panels, proper cabinets, overhead racks, and dedicated work zones, you can keep everything visible, protected, and easy to reach without sacrificing valuable floor space.
Whether your garage doubles as a woodworking shop, a home mechanic’s workspace, or simply a place to keep household and gardening equipment organized, these garage tool organization ideas will help you create a workshop that’s easier to maintain long after the initial cleanup.
1. Install a Full Garage Pegboard Wall
A garage pegboard remains one of the most effective garage wall organization solutions available.
Instead of storing hand tools inside drawers where they’re difficult to find, hang them on a pegboard system where every item remains visible and accessible.
Why It Works
A properly installed pegboard does far more than clear off your workbench—it changes how you work. When every screwdriver, wrench, square, and pair of pliers has a permanent place, you waste far less time opening drawers or digging through toolboxes. A full wall panel measuring roughly 4 x 8 feet provides enough space for hundreds of commonly used hand tools without consuming any floor area. Metal pegboards are worth the extra cost if your collection is growing because they resist sagging better than traditional hardboard and support heavier accessories. The one downside is that you’ll occasionally need to rethink the layout as your tool collection changes, but that’s much easier than reorganizing overflowing cabinets every few months.
How To Do It
Mount the pegboard over wall studs rather than fastening directly to drywall. A stud finder, drill/driver, level, tape measure, and 2½-inch wood screws are usually all you’ll need. If you’re using standard 1/4-inch hardboard pegboard, install furring strips behind it first to create enough clearance for peg hooks. Arrange tools by task instead of size—keep measuring tools together, fastening tools together, and cutting tools together—so grabbing what you need becomes almost automatic. Locking pegboard hooks are worth considering because they don’t fall out every time you remove a heavy hammer, which is one of the biggest frustrations with cheaper pegboard setups.

2. Create a Tool Shadow Board
Professional workshops often use shadow boards to maintain organization.
Tool outlines are marked directly onto the pegboard, making it easy to see where every tool belongs.
Why It Works
Shadow boards add another level of organization by removing the guesswork. Instead of wondering where your 10-inch adjustable wrench should go, its outline tells you immediately. That’s one reason commercial workshops rely on them—they make missing tools obvious before a project gets too far along. This approach also encourages everyone in the household to return tools to the correct spot instead of hanging them wherever there’s an empty hook. It’s especially useful if multiple people share the garage. It does require a little more effort upfront, and you’ll probably need to repaint or update outlines whenever you replace tools with different sizes, but that’s a small tradeoff for a system that stays organized.
How To Do It
Once your pegboard layout is finalized, remove each tool one at a time and trace around it using a white paint marker, acrylic paint, or adhesive vinyl cutouts. Fine-tip permanent markers tend to fade over time, especially in garages that receive a lot of sunlight, so paint generally lasts longer. Keep about 2 to 3 inches between larger tools to avoid overcrowding the board, and leave some empty space for future additions. If you frequently upgrade your tools, consider using removable vinyl instead of paint so changing outlines later doesn’t become a weekend project by itself.

3. Add Modular Garage Wall Panels
Modern garage storage wall systems provide flexibility that traditional shelving cannot.
Why It Works
Unlike a fixed pegboard, modular slatwall systems evolve with your workshop. Hooks, baskets, cabinets, shelves, and specialty holders can all be moved without drilling new holes every time your needs change. That’s particularly useful if your garage serves multiple purposes throughout the year—gardening in spring, home repairs during summer, woodworking over winter. PVC and aluminum slatwall panels are also easier to clean than painted drywall and hold up well in garages where humidity fluctuates. They’re certainly more expensive than basic wall hooks, but if you’re planning to stay in the house for years, they’re one of the few storage upgrades that rarely feel like money wasted.
How To Do It
Install slatwall panels directly into wall studs using the fasteners recommended by the manufacturer. Most systems come in 4-foot sections that stack neatly to create a continuous storage wall behind a workbench. Use a level frequently during installation because even a slight tilt becomes noticeable once shelves and cabinets are attached. Reserve stronger steel hooks for heavier items like extension cords, framing hammers, and levels, while lighter baskets can hold gloves, safety glasses, and sanding supplies. Resist the temptation to overload individual hooks—it’s usually the accessories, not the wall panels themselves, that reach their weight limits first.

4. Build a Dedicated Workbench Storage Zone
A workbench should function as the command center of your garage workshop organization.
Why It Works
Most projects naturally begin and end at the workbench, so it makes sense to concentrate your most frequently used tools there. A well-designed work zone minimizes unnecessary walking across the garage and keeps essential equipment within arm’s reach. Ideally, the bench should measure at least 24 inches deep and between 6 and 8 feet long if space allows, providing enough room for repairs without constantly shifting tools around. Combining drawers below, wall storage above, and shelving nearby creates a workspace that feels organized without becoming cluttered. Skip oversized benches if your garage is narrow, though—they can quickly make the room feel cramped and restrict vehicle access.
How To Do It
Start with a sturdy workbench built from a solid wood top or a laminated plywood surface at least 1½ inches thick. Anchor freestanding benches to wall studs whenever possible to eliminate movement during heavy work. Install shallow drawers beneath the bench for measuring tools, drill bits, and frequently used hardware, then mount a pegboard or slatwall directly above for daily-use hand tools. Open shelves positioned 18 to 24 inches above the work surface are ideal for power tools and supplies you grab often. Leave at least 36 inches of clear floor space in front of the bench so you can comfortably maneuver larger projects without constantly bumping into storage.

5. Use Rolling Tool Cabinets
Tool boxes remain essential for storing specialized equipment.
Why It Works
Even the best wall storage can’t replace a quality rolling tool cabinet. Precision measuring tools, socket sets, specialty automotive equipment, and delicate hand tools stay cleaner and better protected inside drawers than they do on open shelving. Ball-bearing drawer slides make a noticeable difference once drawers start carrying significant weight, and deeper lower drawers are perfect for larger power tools or bulky accessories. A cabinet on locking casters also gives you flexibility—you can roll it beside a vehicle during repairs and return it to its usual position afterward. The only drawback is that inexpensive cabinets often become frustrating once heavily loaded, so this is one upgrade where spending a little more usually pays off.
How To Do It
Choose a cabinet with drawers of varying depths rather than identical sizes throughout. Line each drawer with non-slip foam or rubber matting to keep tools from sliding every time the cabinet moves. Organize drawers by function instead of brand: sockets together, ratchets together, electrical tools together, measuring equipment together. Label the drawer fronts with simple adhesive labels so everything gets returned correctly after a project. Position the cabinet close enough to your workbench that it becomes part of the main workspace, but leave enough clearance for every drawer to open fully without hitting nearby shelving or parked vehicles.

6. Install Overhead Garage Storage Racks
Most garages contain valuable unused ceiling space.
Why It Works
Ceiling storage is one of the easiest ways to reclaim floor space without making the garage feel cramped. Items you only reach for a few times a year—holiday decorations, camping gear, coolers, seasonal sports equipment, or spare tires—don’t need prime real estate along the walls. Heavy-duty overhead racks typically measure 4 x 8 feet and can support anywhere from 300 to 600 pounds when properly anchored into ceiling joists, giving you a surprising amount of storage above parked vehicles. Just be realistic about what belongs overhead. Anything you need every weekend shouldn’t require climbing a ladder, and overloading a rack with dense materials like boxes of tile or engine parts is asking for trouble.
How To Do It
Locate ceiling joists with a stud finder before drilling any holes, and never rely on drywall anchors alone to support overhead storage. Most rack kits require a drill, socket wrench, level, tape measure, and a helper to hold sections in place during installation. Leave enough clearance so garage doors can open fully without hitting stored bins—this is a mistake that’s more common than you’d think. Store belongings in matching heavy-duty plastic totes with locking lids instead of cardboard boxes, which tend to absorb moisture over time. Label the ends of every bin so you can identify what’s inside without dragging everything down.

7. Create a Gardening Tool Station
Garden tool holders help prevent long-handled tools from becoming tangled or damaged.
Why It Works
Long-handled tools have an annoying habit of ending up in one leaning pile where every shovel, rake, broom, and hoe falls over the moment you pull one out. A dedicated gardening station fixes that instantly. Keeping outdoor equipment together also prevents dirt, fertilizer, and grass clippings from spreading across your woodworking or automotive workspace. A wall section about 4 to 6 feet wide is usually enough for most households, and organizing tools vertically helps protect wooden handles from unnecessary stress. One thing worth considering is leaving a little extra room between tools. If everything is packed tightly together, you’re back to wrestling equipment every time you need a leaf rake.
How To Do It
Install heavy-duty wall-mounted handle holders or rubber-grip tool racks directly into wall studs. These systems generally hold handles between ¾ inch and 1½ inches in diameter and grip them securely without scratching the finish. Place frequently used tools at shoulder height and lighter seasonal equipment higher up. A lower shelf works well for watering cans, fertilizer spreaders, and small pots, while a nearby plastic tray can catch muddy boots before they track dirt across the garage. If you own powered lawn equipment, keep fuel containers on a separate shelf away from battery chargers and electrical outlets.

8. Store Power Tools on Open Shelving
Power tools deserve dedicated storage.
Why It Works
Cordless drills, circular saws, sanders, routers, and nail guns are expensive enough that tossing them into random bins rarely ends well. Open shelving keeps everything visible, improves airflow around batteries and chargers, and allows you to grab the right tool without digging through stacked cases. Shelves at least 12 to 16 inches deep provide enough room for most portable power tools while keeping them stable. Plywood shelving generally handles workshop conditions better than particleboard, especially if humidity fluctuates throughout the year. The downside? Open shelves collect sawdust faster than cabinets, so plan on giving them a quick cleanup every so often.
How To Do It
Build shelves from ¾-inch plywood supported by sturdy wall brackets or install heavy-duty steel shelving rated for at least 150 pounds per shelf. Mount them directly into studs and avoid placing the heaviest tools on the highest shelf. Keep chargers together on one dedicated shelf with a power strip mounted neatly underneath, leaving space around each charger for ventilation. Store batteries according to the manufacturer’s recommendations rather than leaving them permanently plugged in. It’s also smart to leave one empty shelf for current projects so tools don’t end up covering your workbench every time you’re halfway through a repair.

9. Organize Fasteners in Clear Bins
Small hardware items often create the most clutter.
Why It Works
Loose screws and mixed boxes of hardware have a way of multiplying over the years until finding the correct bolt becomes its own project. Clear storage bins solve that by making everything visible before you even open a drawer. Separating fasteners by both size and type—rather than throwing all screws into one container—saves an incredible amount of frustration during repairs. Small compartment organizers also make inventory easier because you can immediately see when supplies are running low. The only thing to avoid is creating dozens of tiny categories with just a handful of pieces in each. Sometimes “wood screws” is practical; organizing by every half-inch length isn’t.
How To Do It
Use stackable clear polypropylene bins or drawer organizers with removable dividers. Label every compartment with both the fastener type and its size, such as “1¼-inch wood screws” or “M8 washers,” using a label maker for readability. Mount wall organizers close to the workbench so hardware is always within reach during assembly projects. A shallow drawer beneath the organizers is handy for frequently used measuring tools like calipers, thread gauges, and tape measures. Every few months, combine nearly empty containers before buying replacements—you’ll often discover you already own plenty of the hardware you thought you’d run out of.

10. Install Vertical Lumber Storage
Wood storage can consume enormous amounts of floor space.
Why It Works
Leaning lumber against a wall might seem harmless until you need one board from the back of the pile. Vertical storage keeps boards organized, reduces warping, and frees valuable floor space for actual projects. It’s particularly useful for offcuts and shorter pieces between 3 and 8 feet long that are too useful to throw away but too awkward to store horizontally. For longer boards, wall-mounted horizontal racks usually make more sense, but a combination of both systems gives the greatest flexibility. Just remember that lumber gets surprisingly heavy once it starts accumulating, so strength matters far more than appearance.
How To Do It
Install steel wall-mounted lumber racks directly into wall studs, spacing support arms according to the manufacturer’s recommendations. Most quality systems can safely hold several hundred pounds when installed correctly. Dedicate separate sections for hardwood, softwood, sheet goods, and scrap material to avoid constantly moving stacks around. If you’re building a vertical bin for shorter pieces, construct it from ¾-inch plywood with internal dividers to keep boards upright instead of collapsing into one another. One habit that’s worth adopting is periodically sorting through offcuts. Everyone keeps scraps “just in case,” but after a while they become clutter that takes up space better used for full-length material.

11. Create a Yard Equipment Storage Wall
Yard equipment storage becomes much easier when every tool has a dedicated location.
Why It Works
Lawn care equipment tends to spread across an entire garage if it isn’t given its own zone. Trimmers end up leaning against bicycles, extension cords get wrapped around shovel handles, and hedge shears somehow disappear behind storage bins. Creating a dedicated wall for outdoor equipment keeps those tools separate from woodworking and automotive gear, making everything easier to find when it’s time to mow the lawn or trim hedges. A storage wall about 6 to 8 feet wide is enough for most households, and grouping similar equipment together also helps prevent damage from tools constantly knocking into one another. It’s a small change that makes the whole garage feel more intentional instead of looking like general storage.
How To Do It
Mount heavy-duty steel hooks, adjustable utility brackets, and rubber-grip holders directly into wall studs using 2½-inch structural screws. Place heavier tools such as string trimmers and pressure washer accessories at waist height so they’re easy to lift without straining your back. Install a narrow shelf above the hooks for fuel cans, spare trimmer line, gloves, and safety glasses, but keep gasoline away from battery chargers or electrical outlets whenever possible. A simple basket mounted near the bottom of the wall works well for extension cords and hoses, provided they’re neatly coiled first. Don’t hang everything as tightly as possible—leaving a few inches between tools makes them much easier to remove.

12. Add Corner Shelving Units
Garage corners are often wasted space.
Why It Works
Corners usually become dumping grounds because standard shelving rarely fits them well. Purpose-built corner shelving turns those awkward spaces into practical storage without eating into valuable floor area. Heavy-duty shelves are perfect for paint cans, automotive fluids, detailing supplies, adhesives, and boxed hardware that doesn’t need to stay on the main workbench. Three or four shelves extending roughly 18 to 24 inches from each wall provide plenty of storage while still allowing you to move comfortably around the garage. One thing to avoid is storing your most frequently used items in the deepest corner—that space is better suited to supplies you reach for only occasionally.
How To Do It
Install steel corner shelving or build custom shelves from ¾-inch plywood supported by substantial wall cleats anchored into studs. Use a level throughout the installation because even a slight twist becomes noticeable once shelves are loaded with heavy containers. Place the heaviest items on the lowest shelf to keep the unit stable and reserve upper shelves for lighter supplies like spray paint, gloves, polishing cloths, and cleaning products. Clear storage bins help contain smaller items that would otherwise disappear into the back corner. If your garage experiences damp winters, leave a little air gap behind stored containers instead of pushing everything tight against the wall.

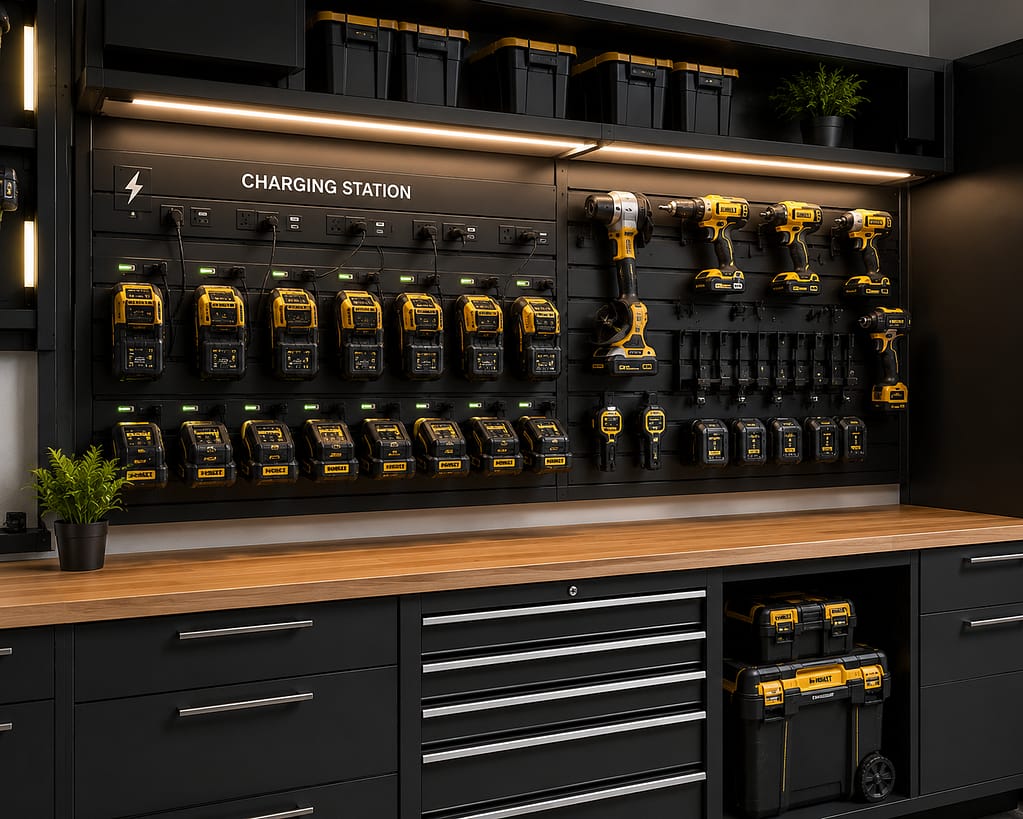
13. Build a Tool Charging Station
Battery-powered tools can quickly create clutter.
Why It Works
Cordless tools are incredibly convenient until half a dozen chargers and tangled power cords take over the workbench. A dedicated charging station keeps batteries together, reduces cable clutter, and makes it obvious which packs are fully charged before you begin a project. It’s also easier on the batteries because they’re stored in one clean, dry location instead of scattered throughout the garage. If you’ve invested in several cordless tools, this is one upgrade that’s genuinely worth the effort. The only downside is that chargers generate a little heat, so the station needs decent ventilation rather than being crammed inside a tightly enclosed cabinet.
How To Do It
Build a charging shelf from ¾-inch plywood or mount a prefabricated wall cabinet near a standard electrical outlet. Secure a surge-protected power strip underneath the shelf using screws instead of adhesive tape, then route cables through drilled grommet holes or cable clips to keep everything tidy. Label charging positions if you own batteries from different tool platforms so they don’t get mixed up. Leave a few inches of space between chargers to improve airflow, and avoid stacking batteries directly on top of one another. A shallow drawer beneath the station is handy for spare batteries, charger manuals, and small accessories that tend to disappear otherwise.
14. Use Labeled Storage Bins
One of the simplest garage organization ideas is also one of the most effective.
Why It Works
Not everything belongs on display. Seasonal decorations, plumbing fittings, electrical supplies, spare hardware, and vehicle maintenance products are much easier to manage when they’re sorted into matching bins instead of random cardboard boxes. Uniform containers also stack more securely, making shelves look cleaner and allowing you to use vertical space more efficiently. Clear bins are helpful because you can quickly verify the contents without opening every lid, although opaque bins work just as well if your labels are consistent. It sounds almost too simple, but clear labeling is usually the difference between an organization system that lasts and one that slowly falls apart after a few weekends.
How To Do It
Choose durable polypropylene storage bins with locking lids that seal out dust and moisture better than inexpensive snap-top containers. Use a label maker or printed waterproof labels rather than handwritten masking tape, which tends to peel away over time. Group similar supplies together—electrical items, plumbing parts, painting supplies, automotive fluids, and fasteners each deserve their own container. Store heavier bins on lower shelves and lighter seasonal items higher up for safety. Before filling new bins, take a few minutes to throw away broken parts and duplicates. There’s no point organizing clutter if it never gets used.

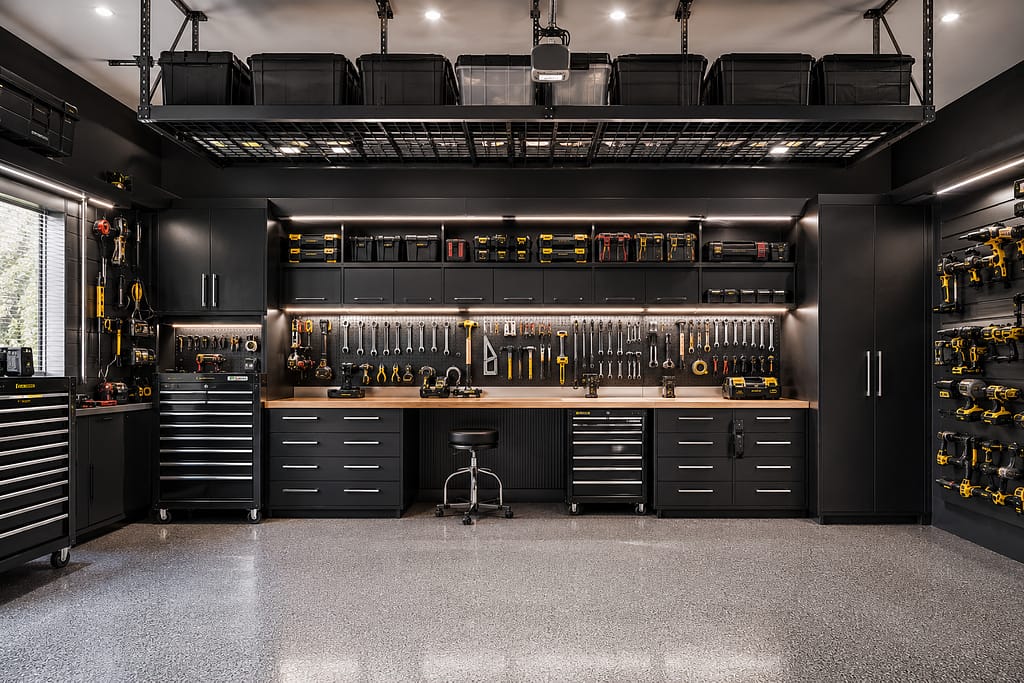
15. Design a Complete Garage Organization System
The most beautiful garage designs combine multiple storage solutions into one cohesive system.
Why It Works
The garages that stay organized for years aren’t relying on one clever storage product—they’re built around a complete system. Pegboards handle daily-use hand tools, slatwall panels store awkward equipment, rolling cabinets protect precision tools, overhead racks free up floor space, and shelving keeps supplies organized. Every storage solution supports the others instead of competing for space. That’s what gives a workshop its professional feel. It doesn’t have to be finished all at once, either. In fact, adding quality storage gradually often leads to a better layout because you learn what actually works instead of buying everything in a single weekend.
How To Do It
Start by dividing the garage into dedicated zones: a workbench area, power tool storage, gardening equipment, lumber storage, automotive supplies, and long-term overhead storage. Sketch a simple floor plan before installing anything permanent so pathways remain at least 36 inches wide and large items don’t block garage doors or vehicle access. Invest first in structural storage—quality wall systems, cabinets, shelving, and racks—before filling the space with smaller organizers. As your collection grows, resist the temptation to squeeze tools into any available gap. Leaving a little breathing room makes the entire workshop easier to maintain, and that’s usually what separates an organized garage from one that slowly drifts back into clutter.
Quick Garage Tool Organization Tips
- Store tools vertically whenever possible to free up workbench and floor space.
- Keep your most-used hand tools within one or two steps of your primary workbench.
- Label every drawer, cabinet, shelf, and storage bin so items always return to the same place.
- Maximize wall and ceiling space before adding more floor storage.
- Organize by task rather than by tool size whenever it makes sense.
- Create separate zones for automotive work, woodworking, gardening equipment, and household repairs.
- Schedule a quick clean-out every few months to remove broken tools, duplicate hardware, and supplies you’ll never realistically use.
- Buy storage systems that can expand over time instead of replacing everything when your collection grows.
Frequently Asked Questions
What is the best way to organize garage tools?
The most effective approach is to combine several storage methods instead of relying on one solution. A pegboard or slatwall above the workbench keeps everyday hand tools visible, a rolling cabinet protects specialty tools, shelving stores power tools and supplies, and overhead racks handle seasonal equipment. Organizing your garage into dedicated work zones also makes it much easier to keep everything tidy after each project.
How do I organize a small garage workshop?
Focus on making the walls and ceiling work harder. Install vertical storage wherever possible, choose a compact workbench with built-in drawers, and use overhead racks for items you don’t need every week. Multi-purpose storage systems, such as slatwall with interchangeable hooks and shelves, provide flexibility without taking up additional floor space.
Are pegboards good for garage tool organization?
Absolutely. A properly installed pegboard remains one of the most practical workshop storage systems available. Mounting it securely into wall studs and using quality locking hooks creates a durable setup that keeps hand tools visible and within easy reach. Metal pegboards generally support heavier accessories and last longer than traditional hardboard versions, especially in busy workshops.
How can I make my garage look professional?
Consistency makes the biggest difference. Use matching cabinets and storage bins, keep labels uniform, group tools by function, and maintain clear walkways around the workspace. Durable wall systems, organized shelving, and a clean workbench create the same structured appearance you’ll find in many professional workshops, even if you’ve built the system gradually over several years.
Final Thoughts
The best garage tool organization systems aren’t about cramming more storage into every available corner—they’re about making your workshop easier to use. When frequently used tools are always within reach, supplies are easy to locate, and the floor stays clear enough to work safely, projects become faster and far less frustrating.
Start with one major improvement, such as a full pegboard wall or a properly organized workbench zone, then expand the system over time with modular wall panels, cabinets, shelving, and overhead storage. Building the garage in stages usually leads to a better layout anyway, and you’ll end up with a workspace that fits the way you actually work instead of one that simply looks good in a photo.